Forum Replies Created
-
AuthorPosts
-
 GlitchBRONZE Member
Strangely I can’t help being disappointed that it wasn’t more of a challenge to fix!
LOL. I’ve had a similar feeling after getting something working with a full “recap/reflow”. 😉
Glitch
GlitchBRONZE MemberQuestion: You are using a “Mini” buffer for the polish. In the Youtube video above the guy is using a “standard” sized buffer. Is there a specific reason, any advantages using a smaller one?
I like this “mini buffer” since it seems appropriately sized for the job. I have a couple of larger buffers and I would expect them to work just fine for most of the job. They would just be a bit less maneuverable. I also have a smaller buffer that is easier to get into tighter spaces, but I didn’t have the need. I could have done the job with the smaller machine, it just would have taken more time. I have all of the buffers since I also restore cars and boats as a hobby.
The deeper scratches are hard to remove. As you likely already figured out, polish will usually make a scratch less noticeable, but doesn’t really remove it. Removing a scratch is better described as removing the material around the scratch to the depth of the scratch.
Sanding is the most efficient way of doing this. But sanding leaves its own scratches. These scratches are removed with the next finer sandpaper, and so on until the scratches are shallow enough that polish will work.
I exclusively use a machine for this job since I don’t have the patience to do it by hand. I make my own ultrafine hook&loop sandpaper pads by gluing the ultrafine sandpaper to felt cloth and cutting it into circles to fit the backing plate. This is another place where the mini buffer comes in handy since it can be fitted with a backing plate that is similar diameter to the width of the sandpaper brand that I buy.
One tip for hand sanding is to alternate sanding directions. By changing the sanding direction by 90 degrees, it is easier to tell when you removed all of the scratches from the previous direction.
Marking the scratches with a sharpie can also be helpful. Sanding away the sharpie marks provides an easy to see indication of where and how much to sand.
A bit of soap in the wet sanding water helps keep the paper from loading up as fast.
Clean things meticulously between stages. There is nothing worse than picking up a piece of grit, introducing new marks and have to back up a step.
If you feel as if you just fell down the rabbit hole, it is because you have ;-).
Glitch
GlitchBRONZE MemberAnother advantage to the tape is that it could make it easier for the next person that wants to recover the grills. Tape should be easier to remove from the plastic frames than glue.
I like to make it easier for the “next guy” that works on the equipment because it probably will be me ;-).
Glitch
GlitchBRONZE MemberI’m currently working on a Beogram 8002 and its dust cover needed some work.
Here is my setup.

This cover had some pretty deep scratches. I started with 1000 grit sandpaper. Here is a picture of one of the scratches after a light 1000 grit sanding.
I stepped through 1000, 2000, and 3000 grit sandpaper with an occasional rough polish to check on the progress. I had to make several loops through the 2000 to rough polish stages. Once it was “good enough” (i.e. I got tired of working on it for the day), there was a final fine polish. Here are some before and after pictures.

The cover is reasonably presentable now. I plan to do a couple of more loops starting at 3000 grit to perfect it. I also need to do some work on the inside of this cover. The turntable was shipped with the platter installed (and the suspension not locked down). The platter left some pretty nasty gouges on the inside of the dust over.
Rolf: It looks like your cover is starting in much better condition. It should be a pretty straightforward job to perfect it.
Glitch
GlitchBRONZE MemberIt has been a long time since I recovered a pair of Penta grills. I don’t recall the exact order that I did things.
The advantage of the tape is that the fabric is repositionable. Apply the tape to the plastic frames, press hard to “permanently” attach it, then remove the protective film on the other side of the tape. Drape the fabric over the frames/tape, stretch slightly, and LIGHTLY press the fabric onto the tape. The fabric can be repositioned and stretched to remove any wrinkles. After it looks good, “hard press” the fabric into the tape to permanently attach it. Trim off any excess fabric as needed to get the grills to seat properly.
The first time I did this I was skeptical about the tapes holding ability. My concerns were unfounded.
Glitch
GlitchBRONZE MemberCan anybody here share their tips for how to change the fabric?
A high tack, double sided tape will make the job much easier. I’ve had good results using iCraft SuperTape. There are other “industrial quality” tapes that are just as good, but might be harder to find.
It will also be helpful to pick a very thin, very stretchy fabric. Try to keep the tension on the fabric just high enough to remove the wrinkles.
HTH
Glitch
GlitchBRONZE MemberControlling the ML USB adapter by direct by UART instead of USB
I had a similar thought. I considered suggesting adding solder jumpers and some pads to attached wires (or a connector) to the UART signal traces. Without more detail of the design, it is hard to know if suggestions like this make sense or not.
I’m glad that I found a USB-serial chip that on the receiving side happily ignores any parity errors…
What happens when there is an actual (real) parity error?
I’m looking forward to any updates on functionality, availability, and pricing. This device has the potential to be a lot of fun.
Glitch
GlitchBRONZE MemberWhere to find the manual in PDF?
When searching for a user manual, look for the Master Control Panel user manual. It will have more information on operating the receiver than the Beomaster user manual.
Glitch
GlitchBRONZE MemberRolf,
For something like this, technique is much more important than the product that you use. There are hundreds of plastic and car polishes that can be used to get great results.
Polishing is a multi-step process where one progresses though ever finer polishes until the desired results are achieved. The aggressiveness of the products that you use depend on the problem you are trying to fix. Deep scratches may need to be addressed with sandpaper, light haze might only need a final polish.
A few tips…
- Practice on a junk cover to develop your technique. Thrift shops are a great place to find these inexpensively.
- Remove any metal trim or brackets if it is possible to do so without damage. Mask any trim that cannot be removed. (I hope that it is obvious that the cover should be removed from the turntable 😉 )
- Use the least aggressive polish that will fix the defect. Using too fine of a polish usually does no harm. Too coarse of a polish or sandpaper (or paper towels) will add new scratches that you will need to polish out.
- Microfiber cloths are ideal for this
- Using a machine will speed up the job. It can also speed up the severity of your mistakes. I prefer random orbit over rotary machines.
- Securing the cover so it will not move makes polishing easier and reduces the possibility of unintended damage
- Don’t try to polish the inside of a dust cover. It is usually not necessary and the inside corners are impossible to polish
- A (new) reproduction cover might be available. This could be a good option depending on your skill set and how much you value your time.
- Don’t forget to post before and after pictures 😉
Glitch
GlitchBRONZE MemberC110 (2,2uF series coupling capacitor for phono right channel input) should have positive pin towards TR100/R111
Martin: For a low level (<2v) audio signal coupling capacitor, isn’t the polarity somewhat arbitrary since the DC voltage is zero? Would this explain the inconsistencies that jfrancis49 is seeing?
Sorry if my questions or explanations don’t make sense as I’m not looking at the schematic.
Glitch
GlitchBRONZE MemberThe order that I use for a conflicting polarity situation:
1) Do a quick analysis and install the capacitor such that it is forward biased.
2) Verify the forward bias by taking a voltage reading right when the device is powered up
3) Install in the same polarity as the original part (taking pictures of the board before the recap can help here)
4) Install per the schematic (errors are easy to fix/update on schematics)
5) Install per the markings on the board (boards are often not scrapped due to printing errors)
Glitch
GlitchBRONZE MemberClose, but no cigar.
lol!
I’ve also come across the money and Legos.
Your reference to the valve-based radios happily reminded me of the console TV we had when I was a kid. My dad used to hide money (presumably from my mom) inside the cabinet. It probably never occurred to him that he was raising a future engineer that took apart everything in the house, to see how it worked, when my parents were away. 😉
Glitch
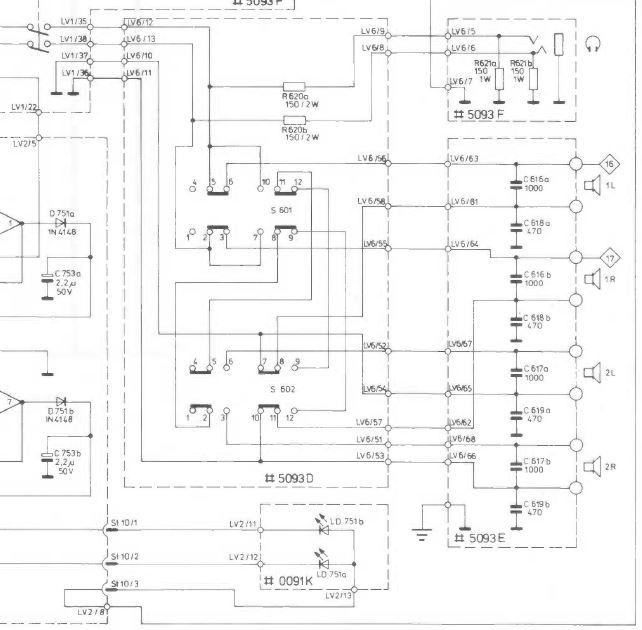
GlitchBRONZE MemberGuy: If you like speaker schematics (and I suspect that you do 😉 ) check out this one…

The cool thing that this one does is puts the speakers into series when both sets are selected. Note: the L&R channel signals originate from the upper left of the diagram.
RossJP: Just curious…
What did you have before the BC9500? Were you happy with the sound level?
Did you add the Redlines in order to get more volume or did you want rear speakers (or both)?
Glitch
GlitchBRONZE MemberBut wouldn’t Beolabs reduce the load on the BC9500 because they are providing their own amplification? (Connected to BC9500’s PL output before its main amp stage)
Absolutely. My mistake. I misread the statement and was thinking “Beovox” (i.e. physically smaller speakers wouldn’t change anything).
How would the relative loudness between the front and rear speakers be controlled with a either a Beolab speaker or Passive solution?
Of course, if one wants really wants “loud”, two pair of Beolab Pentas would do the trick ;-).
Glitch
GlitchBRONZE MemberSo maybe I’ll keep the 5700s up front and get some smaller Beolabs for the rear.
You will likely have the same issues with “smaller Beolabs for the rear”. The root of the problem is that the low impedance configuration that you are trying to run is pushing the BC9500 past its design limit.
How loud are you trying to achieve? I would expect that the BC9500/BV5700 would get pretty loud (louder than most people would want to listen).
Of course, “loud” is a relative term. Consider buying an inexpensive decibel sound level meter. This will give you a better idea of how loud things are actually getting. I use mine as a way to protect my precious hearing.
Have you considered running a powered subwoofer? This would allow you to offload the the power hungry low frequencies from the BC9500.
Glitch
GlitchBRONZE MemberDoes anyone know is this normal? Am I just expecting too much?
You are probably expecting too much. Based on a quick search, the BC9500 appears to be only rated at 8 ohms. This typically means that the manufacturer expects you to hookup either one or two pairs of 8 ohm speakers. Running two pairs of 8 ohm speakers is roughly equivalent to running one pair of 4 ohm speakers (assuming the internal connections are in parallel). With this in mind, you shouldn’t have any issues running just your BV5700’s (which are 4 ohm) or just your Redlines (which are 8 ohm?).
The problem is when you try to run both, the equivalent impedance is roughly 2.7 ohms. Usually, one can get away with this as long as you keep the volume low, but this configuration is (probably) not how the receiver was intended to be used.
Are you having any issues running only one pair of speakers at a time?
If you don’t have any issues with running the BV5700’s by themselves, then the BC9500 is likely working properly. If you still have issues while running one pair, then they may be something else that needs to be addressed.
I wouldn’t recommend mixing different impedance speakers on the same amp from a sound level perspective. You may have noticed that one pair of speakers plays louder than the other. Matching the speaker’s impedance (and efficiency) will usually result in a better overall listening experience.
Glitch
GlitchBRONZE MemberCompare the T/S parameters of a driver restored with foam to one restored with rubber (both played in to losen up the stiff new surrounds)
How close was the driver with the new foam to the original? All of the Penta midrange surrounds that I’ve dealt with were already too far gone to make meaningful measurements.
For anyone doing a surround replacement: Running T/S parameters, even if it is a crude DIY version, is helpful to verify your work. In this scenario, you are looking for any outliers (which can be caused by a variety of reasons). It is also helpful for sorting drivers if you are trying to make your speakers as balanced (left to right) as possible.
Glitch
GlitchBRONZE MemberI don’t think that there is a consensus. The purists will say foam, since it has the best chance at delivering the same as stock performance. The rest will say rubber, presumably because they think it will last longer(?).
I’m firmly in the foam camp. My assumption is that modern foam formulations won’t have the degradation issues that the original ones did. Regardless of longevity, I’d rather listen to (possibly) higher performance than always be wondering what I gave up with the heavier rubber surrounds. YMMV.
Glitch
GlitchBRONZE MemberGlitch wrote: Are you still thinking about offering anything based on the “universal link adapter”?
(snip) Don’t want to go that way.
Fair enough. It seems like the numbers were against the ULA concept. The subset of people that have the need for such a device, would want to pay a fair price for it, and have the skills and motivation to write the supporting code would be pretty small. However, a similar argument can be made for something like the Beolab 90, yet it exists ;-).
Glitch
GlitchBRONZE MemberWho is interested in such a thing?
I’m interested in the “MasterLink USB adapter” (MUA). I would like to hear more technical details about the hardware and (of course) the price.
I’ve been planning a major redesign of my audio system/network. I’m not sure exactly what it will be, but it will include a mixture of vintage B&O equipment, as well as equipment from other manufacturers (both new, old, and older). About the only thing that I have figured-out is that nobody seems to offer a suitable solution. As such, I expect to have to develop something custom.
Are you still thinking about offering anything based on the “universal link adapter”?
I think that that platform has a lot of potential. However, I’m concerned about the “care and feeding” of it from a software build standpoint.
I like the idea that the MUA could be used from a Raspberry Pi (or other Linux based PC?). Have you considered including a DataLink interface to the MUA?
Glitch
-
AuthorPosts