


Home › Forums › Product Discussion & Questions › BeoGram › Polishing BeoGram dustcovers
- This topic has 12 replies, 3 voices, and was last updated 2 years, 6 months ago by
 Glitch.
-
AuthorPosts
-
18 December 2023 at 11:39 #51347
 BRONZE Member
I recently acquired a BG RX2, my first radial B&O turntable. It is in good condition and came with a working MMC4. However, the dustcover has some scratches in its surface. Tim and Nick Jarman mention in their book on page 199 that polishing the dustcover with a product of the brand „Mer“ will give the best results. There are various products of the brand. Is the right product the „Mer car polish autocreme“? Anyone knows and / or has used it for the purpose? Thanks for hints and advice.
Kind regards,
Rolf
Location: Germany
Favourite Product: BeoSystem 4500
My B&O Icons:


 21 December 2023 at 06:57 #51348
 auricBRONZE Member
Hi Rolf:
I have used NOVUS products to remove scratches from dust covers:
The stuff is very good for removing the haze on the the acrylic. Light to medium scratches can be removed but may take some time. For example swirls from dusting can be removed very easily. Tip: Use a cloth like a used T-shirt to clean and polish. Don’t use paper towels.
Deeper gouges that you can feel with your finger will take more effort. You may have to use a polishing wheel etc.
There are a number of Youtube videos showing how to remove scratches from the dust covers. Various techniques and products are used. Here’s an example:
Derek
21 December 2023 at 16:15 #51349GlitchBRONZE MemberRolf,
For something like this, technique is much more important than the product that you use. There are hundreds of plastic and car polishes that can be used to get great results.
Polishing is a multi-step process where one progresses though ever finer polishes until the desired results are achieved. The aggressiveness of the products that you use depend on the problem you are trying to fix. Deep scratches may need to be addressed with sandpaper, light haze might only need a final polish.
A few tips…
- Practice on a junk cover to develop your technique. Thrift shops are a great place to find these inexpensively.
- Remove any metal trim or brackets if it is possible to do so without damage. Mask any trim that cannot be removed. (I hope that it is obvious that the cover should be removed from the turntable 😉 )
- Use the least aggressive polish that will fix the defect. Using too fine of a polish usually does no harm. Too coarse of a polish or sandpaper (or paper towels) will add new scratches that you will need to polish out.
- Microfiber cloths are ideal for this
- Using a machine will speed up the job. It can also speed up the severity of your mistakes. I prefer random orbit over rotary machines.
- Securing the cover so it will not move makes polishing easier and reduces the possibility of unintended damage
- Don’t try to polish the inside of a dust cover. It is usually not necessary and the inside corners are impossible to polish
- A (new) reproduction cover might be available. This could be a good option depending on your skill set and how much you value your time.
- Don’t forget to post before and after pictures 😉
Glitch
23 December 2023 at 17:03 #51350Hey guys,
really thank you for your responses. I forgot to turn on subscription, so I became aware of your support only when I checked on the forum last night.
@Derek:
Thank you for pointing me toward the novus polish, it seems to be a real good one. I must admit that I was being impatient and ordered meanwhile the Mer polish. As you said, I think that paper will not do, so I ordered some specific cloths for polishing.
“Deeper gouges that you can feel with your finger will take more effort. You may have to use a polishing wheel etc.” –> At the moment I will go only for the lighter ones, because in this case I do have no experience at all.
Since I am trying this for the first time, I find the video very helpful. I did not check the scratches in detail yet, from the first looks, they seem to be more of the lighter kind.
Thanks for your comprehensive tips which surely will support my endeavour. Here we go:
Practice on a junk cover to develop your technique. Thrift shops are a great place to find these inexpensively. –> Very good idea, I have a spare dustcover – ruined by a B&O repair shop – I can practice with.
Remove any metal trim or brackets if it is possible to do so without damage. Mask any trim that cannot be removed. (I hope that it is obvious that the cover should be removed from the turntable ? ) –> Mmmmh ?, according to the pictures in the book, I thought I could get away with the dustcover still assembled on the BG. I have disassembled some parts of a BG before, but never a dustcover. I will check on the service manual.
Use the least aggressive polish that will fix the defect. Using too fine of a polish usually does no harm. Too coarse of a polish or sandpaper (or paper towels) will add new scratches that you will need to polish out. –> Right now I would go only for the light scratches, having no experience at all. I have read that sandpaper will take away deeper scratches, e. g. taking care of the speaker displays of BL 3000, 4500, etc., but for this I definitely need more training and experience.
Microfiber cloths are ideal for this –> Got me some.
Using a machine will speed up the job. It can also speed up the severity of your mistakes. I prefer random orbit over rotary machines. –> At first try I will go manually, which should be good enough for lighter scratches?
Securing the cover so it will not move makes polishing easier and reduces the possibility of unintended damage –> O. K.
Don’t try to polish the inside of a dust cover. It is usually not necessary and the inside corners are impossible to polish –> I did clean the inside of the cover and it seems to be good.
A (new) reproduction cover might be available. This could be a good option depending on your skill set and how much you value your time. –> Time is a good point ?. I did some repairs myself in the past and now want to get more things done, because the people knowing how to take care of the old B&O stuff are rare and getting even rarer now. Since my time during the year is really limited, I have to go in small steps, although having an ever longer list of projects I want to start with. So in between holiday season and new years day, dustcover repair it will be.
Don’t forget to post before and after pictures ? –> Yes!
I appreciate your advice a lot. Get some rest, happy holidays and stay healthy!
Kind regards,
Rolf
Location: Germany
Favourite Product: BeoSystem 4500
My B&O Icons:
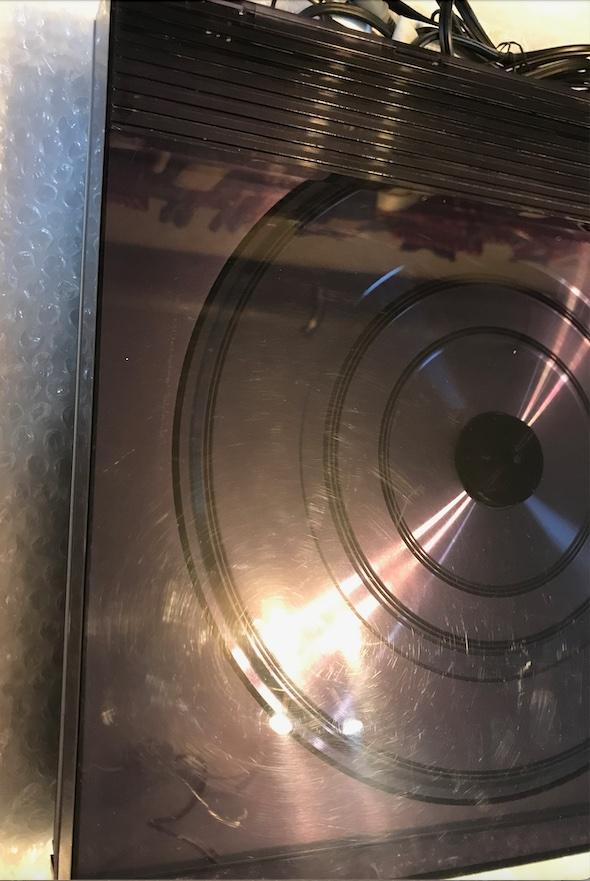
23 December 2023 at 17:15 #51351So, here are two pictures after I was done with cleaning the BG on the outside. The scratches cannot be seen on the pictures but I find the BG really beautiful:


After a demanding year I need to take a breath now for the holiday season. After that, I will take the RX2 out of its storage and post more pictures and let you know about my success. And, if time allows, I will administer the procedure to my BG 9500, 3300, ….
Kind regards,
Rolf
Location: Germany
Favourite Product: BeoSystem 4500
My B&O Icons:
28 December 2023 at 23:02 #51352GlitchBRONZE MemberI’m currently working on a Beogram 8002 and its dust cover needed some work.
Here is my setup.

This cover had some pretty deep scratches. I started with 1000 grit sandpaper. Here is a picture of one of the scratches after a light 1000 grit sanding.
I stepped through 1000, 2000, and 3000 grit sandpaper with an occasional rough polish to check on the progress. I had to make several loops through the 2000 to rough polish stages. Once it was “good enough” (i.e. I got tired of working on it for the day), there was a final fine polish. Here are some before and after pictures.

The cover is reasonably presentable now. I plan to do a couple of more loops starting at 3000 grit to perfect it. I also need to do some work on the inside of this cover. The turntable was shipped with the platter installed (and the suspension not locked down). The platter left some pretty nasty gouges on the inside of the dust over.
Rolf: It looks like your cover is starting in much better condition. It should be a pretty straightforward job to perfect it.
Glitch
30 December 2023 at 23:13 #51353The cover is reasonably presentable now.
Glitch, that is an amazing result, stunning! The before and after effect is really distinct. Hope I can get the same success.
Question: You are using a “Mini” buffer for the polish. In the Youtube video above the guy is using a “standard” sized buffer. Is there a specific reason, any advantages using a smaller one?
Rolf: It looks like your cover is starting in much better condition. It should be a pretty straightforward job to perfect it.
Yes, after the first cleansing I thought that, too. However, after the second time, I took a closer look and guess that I clearly misjudged the current status. It seems to me not as worse as the one you are working on, but not as good as on first sight, either. Have a look:


I will have to treat it much more intense than I thought.
Location: Germany
Favourite Product: BeoSystem 4500
My B&O Icons:
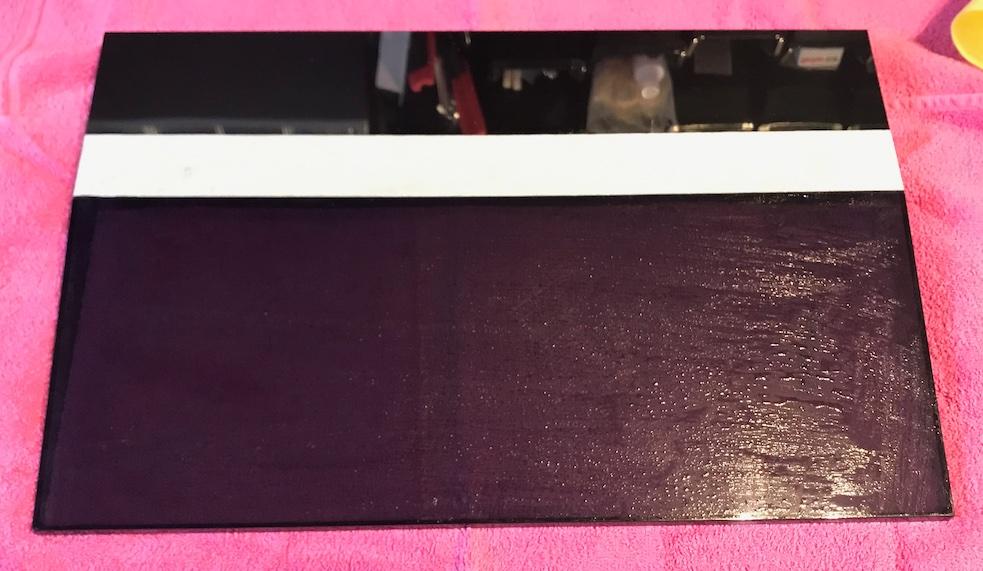
30 December 2023 at 23:38 #51354So, I decided to practice my polishing skills ??. First, I took my old BG dustcover and cleaned it with a mild polish like TG in the YT video:

You may see the difference between left, right (both cleaned) and middle area.
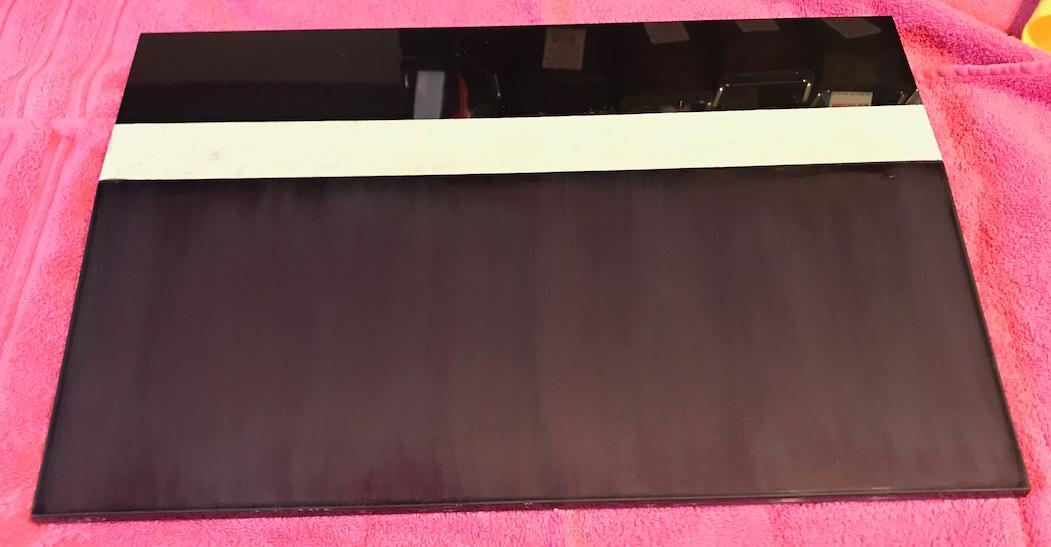
Now I cleaned the whole lid and taped the mirrored part to the front:


Better, but a lot, lot of scratches still left.
After that I watered it:

And then, I took a deep breath. Starting with sandpaper 1000:

First round – ever – done! Now, cleaning off the plastic fragments:

The surface feels very smooth, but I guess, the sanding image should be more regular? A long way to go.


The second picture reveals an indentation I most likely will not get covered. And I have to get me a buffer for the finish.
This is it for today. I hope, I can restart tomorrow, will keep you updated.
Kind regards,
Rolf
Location: Germany
Favourite Product: BeoSystem 4500
My B&O Icons:
31 December 2023 at 03:30 #51355GlitchBRONZE MemberQuestion: You are using a “Mini” buffer for the polish. In the Youtube video above the guy is using a “standard” sized buffer. Is there a specific reason, any advantages using a smaller one?
I like this “mini buffer” since it seems appropriately sized for the job. I have a couple of larger buffers and I would expect them to work just fine for most of the job. They would just be a bit less maneuverable. I also have a smaller buffer that is easier to get into tighter spaces, but I didn’t have the need. I could have done the job with the smaller machine, it just would have taken more time. I have all of the buffers since I also restore cars and boats as a hobby.
The deeper scratches are hard to remove. As you likely already figured out, polish will usually make a scratch less noticeable, but doesn’t really remove it. Removing a scratch is better described as removing the material around the scratch to the depth of the scratch.
Sanding is the most efficient way of doing this. But sanding leaves its own scratches. These scratches are removed with the next finer sandpaper, and so on until the scratches are shallow enough that polish will work.
I exclusively use a machine for this job since I don’t have the patience to do it by hand. I make my own ultrafine hook&loop sandpaper pads by gluing the ultrafine sandpaper to felt cloth and cutting it into circles to fit the backing plate. This is another place where the mini buffer comes in handy since it can be fitted with a backing plate that is similar diameter to the width of the sandpaper brand that I buy.
One tip for hand sanding is to alternate sanding directions. By changing the sanding direction by 90 degrees, it is easier to tell when you removed all of the scratches from the previous direction.
Marking the scratches with a sharpie can also be helpful. Sanding away the sharpie marks provides an easy to see indication of where and how much to sand.
A bit of soap in the wet sanding water helps keep the paper from loading up as fast.
Clean things meticulously between stages. There is nothing worse than picking up a piece of grit, introducing new marks and have to back up a step.
If you feel as if you just fell down the rabbit hole, it is because you have ;-).
Glitch
31 December 2023 at 17:27 #51356Could apply today the 2000, 3000 and 5000 sandpaper. Here a pic after using the 5000:

I tried to clean it really good after every step, thanks for the hint on the possibility of remaining grit.
I now will order a buffer. For me, it seems better using a smaller buffer for concentrating on smaller areas. Although maybe challenging the patience sometimes, if the lid is a bigger one ?.
Closing now for this year. Thank you so much for your support.
To you and all fellow Beoworlders I wish a good, healthy and successful 2024!
Kind regards,
Rolf
Location: Germany
Favourite Product: BeoSystem 4500
My B&O Icons:
2 January 2024 at 04:56 #51357auricBRONZE MemberRolf:
Just a quick tip when using polishing wheels. Be very careful when using and do not leave on one spot for too long. The friction can develop a lot of spot heat and melt the plastic.
Patience is key! Slow and easy. “Haste makes waste” 🙂
Re the gouges those can be removed wet sand paper. Grittier to first remove the gouge and then finer and finer grit to get it back to a polish.
Derek
7 January 2024 at 21:18 #51358Being quiet a few days, I now am able to present the lid after a polishing treatment. I bought a buffer and then made three passes of polishing over the surface. I am satisfied with this first round, gaining experience, thanks to the good and comprehensive advice I received. It looks much cleaner end clearer after the polish. The big scratch and the indentation are gone. I can still see scratches, but I am not sure, if they are on the surface (I cannot feel them), or maybe on the inside, or, third possibility, in the glass itself. I guess, before I work on my RX2 lid, I will give this practice lid another try, starting from scratch.


Tomorrow, I will return to business fully, so I am afraid that it will take me some time, until I can come back, working on the task. In any case, I will keep you updated, when I can present a new situation.
What would be interesting for me is, how much time it takes you for finishing such a work? How long do you need, e. g., for sanding in 4 steps, or for the machine polishing? It is a lesson learned for me, to plan more time, because I underestimated it. All in all, adding up the working time on the subject only, it took me for this first round appr. 5 – 6 hours.
Kind regards,
Rolf
Location: Germany
Favourite Product: BeoSystem 4500
My B&O Icons:
8 January 2024 at 15:52 #51359GlitchBRONZE MemberI now am able to present the lid after a polishing treatment.
It looks like you made a significant improvement!
I can still see scratches, but I am not sure, if they are on the surface (I cannot feel them), or maybe on the inside, or, third possibility, in the glass itself.
What you are seeing is most likely on the outer surface. The scratches might be ones that you originally didn’t notice or could be ones that you added as part of the sanding process. Being methodical with your sanding technique can help with identification. For instance, if you sanded “up and down” with the 1000 grit and “side to side” with the 2000 grit, the direction of the scratches gives a clue of where they came from. Scratches that are not up/down or side/side are probably original. The scratches left by a random orbit sander have a distinctive pattern and are easy to identify.
The other “problem” is that, with practice, you get better at finding and noticing the scratches. It is a curse. 😉
I will give this practice lid another try, starting from scratch.
That is a good plan. Doing so should also help you answer your own scratch questions definitively.
What would be interesting for me is, how much time it takes you for finishing such a work? How long do you need, e. g., for sanding in 4 steps, or for the machine polishing?
It all depends on the particular dust cover and how bad it was at the start. For example, I spent 4 to 5 hours on the BG8002 cover above before I took the pictures. I spent another 1.5 to 2 hours on it then next day to clean up the remaining scratches. Yesterday, I polished a Beogram 5500 cover (smaller, simpler shape) that started in better condition. This took about 2 hours total. Both of these jobs were done entirely with a random orbit sander.
Glitch
-
AuthorPosts


- You must be logged in to reply to this topic.