


Home › Forums › Product Discussion & Questions › BeoCord › Lubricating Sintered Bearings in Beocord 8000/9000
- This topic has 22 replies, 5 voices, and was last updated 3 years, 2 months ago by
 sonavor.
-
AuthorPosts
-
16 March 2023 at 04:51 #44735
 GlitchBRONZE Member
I’m looking for advice/discussion about lubricating the sintered bearings in a Beocord. I know that these were designed to be “lubricated for life”, but I assume that the design life for these bearings passed many years ago.

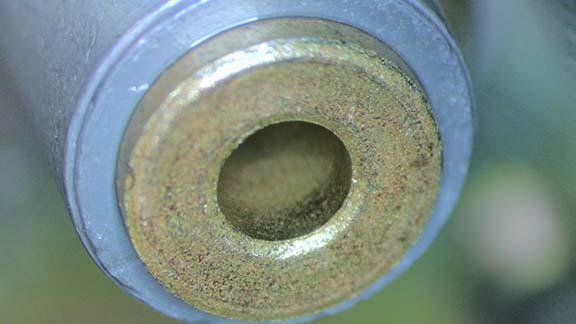
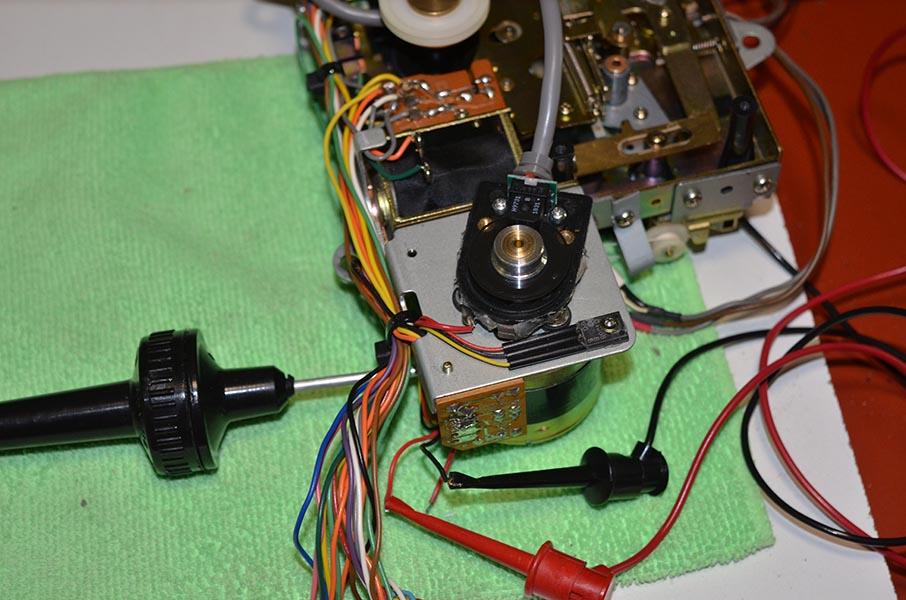
The picture above is the bottom capstan bearing. This looks pretty good (to me) with very little wear.
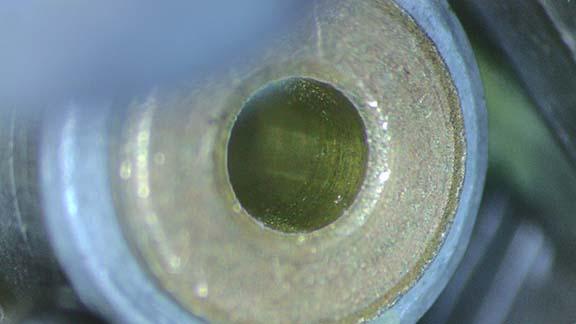
The next picture is the wear surface of the upper capstan bearing. This has worn past the “porous” surface.
What is the best course of action:
- Re-lubricate the bearing using the clean and vacuum infuse methods. This seems like the right thing to do for the lower bearing, but I’m not sure about the upper bearing.
- Run the bearings “wet” and continually monitor/maintain to ensure that the bearing doesn’t run dry. (i.e. the pores are closed so the bearing can’t work as originally designed)
- Both 1 & 2
- A combination of 1-3 and swap the upper and lower bearings.
- Replace the bearings with news ones. Are the parts available?
- Something else?
The bearings on the capstan shaft and idler shaft should be pretty easy to work with. The motor bearings are a different story. I tried searching the archives for past discussions but mostly found that people just replaced the parts with new or “better condition” used parts.
Glitch
17 March 2023 at 22:38 #44736sonavorBRONZE MemberHi,
The sintered oil bearings on the BG8000 – BG9000 DC motors are much like the Beogram 4002/4004 DC platter motors and do require restoring. There is a big difference in the disassembly and reassembly however. Not to mention the testing.
The Beocord motors are housed inside a metal housing that also includes a small, round circuit board. The trimmer resistor for adjusting the Beocord motor speed is on that board.
If the trimmer resistor needs replacing I haven’t found a suitable replacement yet as it has to be a really low profile device.
Removing the metal, outer shell can also be a chore as it is fit together with rivets. So those must be carefully cut out. I reassemble them by tapping holes and using screws to fit the housing back on.The Beogram 4002/4004 DC motors are pretty easy to test after restoring the motor bearings and reinstalling the platter motor. You can run the platter motor for however long you want to test it with and use something like the Beolover RPM sensor connected to a computer. The Beolover RPM sensor device will update the speed measurement every 10 seconds.
With the Beocord 8000-9000 motors you would have to rig up some testing device to perform a similar level of testing on the restored motor. Of course you can do a short test with a 3KHz test cassette and measure the tape play with a WOW/Flutter/Speed tester to verify you get an accurate 3KHz output but the test cassettes are usually only a few minutes long.
That is better than nothing but I would prefer a longer motor test in the case of a rebuilt motor.-sonavor
18 March 2023 at 04:20 #44737sonavorBRONZE MemberI re-read your original post. I was thinking motor bearings as I read it but I see that you are talking about the bearings on the capstan bearing.
I haven’t done anything with those parts other than treating them with some synthetic oil.
However, I think it would probably be better to re-infuse those bearings…and probably the two sintered bearings in the clutch assembly.If you decide to go that route I would be interested in hearing your results.
-sonavor
18 March 2023 at 17:00 #44738GlitchBRONZE MemberI was thinking motor bearings as I read it but I see that you are talking about the bearings on the capstan bearing.
I was considering ALL of the sintered bearings, but didn’t convey it very well. The first part of the question had to do with the best way, in general, to lubricate the bearings. I planned to ask a follow-up question on how to get the bearings out of the motor if it was deemed necessary. I also referred to the clutch bearings incorrectly as “idler shaft” bearings.
I am hoping to learn about other’s experience with various lubrication methods. I suspect that many of these machines were serviced/restored 15, or so, years ago. By now it should be clear what worked and what didn’t.
I assume that most everything that I’m doing to my machines is old news and was discussed decades ago. I’ve tried searching the archives of this (and other) forums for info. What I didn’t find much info on is: 1) the long term performance of the fixes and 2) the idea to swap the higher load bearing with the lower load bearing.
I’ve started working on cobbling together a small vacuum chamber. I think I figured out how to make a good connection to my vacuum pump with parts that I have on-hand.
My gut feel is to try option #3 above for the capstan/clutch and #2 for the motor unless someone has a compelling argument for one of the other options.
Glitch
18 March 2023 at 20:44 #44739sonavorBRONZE MemberOption 2, running the motor by continually trying to keep it wet doesn’t sound like a good idea to me.
I have come across a couple of Beocord 8000-9000 motors that were squeaking pretty bad. The bearings were the source of the problem.
As I said, I believe the motors are quite similar to a Beogram 4002/4004 DC platter motor which we know need refreshed bearings after forty years. I use a Dremel tool with a small cutting wheel to remove the rivets of the outer case/shell. Once you get to the motor, the disassembly and restoration of the bearings should be the same as on the Beogram 4002/4004 DC platter motor.-sonavor
19 March 2023 at 18:25 #44740GlitchBRONZE MemberOption 2, running the motor by continually trying to keep it wet doesn’t sound like a good idea to me.
I haven’t done anything with those parts other than treating them with some synthetic oil.
We may be talking about the same process here. What I’m calling “wet” simply means adding a small amount of oil to the shaft/bearing interface. “Dry” would be relying exclusively on the oil that is impregnated in the bearing. I would consider a mechanism that is maintained by adding oil to a felt washer to be “wet”.
Many say that the downside to running a bearing “wet” is that it attracts contaminants that cause extra bearing wear. This might be a necessary evil compared to running a bearing with a worn/damaged surface that might not be getting oil from the reserves in the bearing. Neither choice is appealing.
I do have a concern about damaging the motor when disassembling it. For me, it is a hard decision because the motor seems to be operating very well. I try to avoid the self-inflicted injuries/problems whenever possible. Also, I try to not leave “technician tracks” when I work on something.
The motor cover is held in place with three bent tabs. I’ve tried to remove it, but it quickly became apparent that I wouldn’t be able to do so without damaging the case.
I haven’t seen any videos/pictures of this particular motor being disassembled. My next thought is to buy a “parts machine” to experiment on.
Do the Beocord 8000’s use the same motor as the the BC9000?
You make an interesting point about testing the motor. I’ll have to think about how to do this. I have a precision encoder left over from a robotics project that might be perfect for this.
You talked about testing your motor rebuilds. Have you gone back from time to time to check to see how well your rebuilds are aging?
Glitch
19 March 2023 at 19:01 #44741Unfortunately the Beocord 9000 motor is specific to these decks. It is irreplaceable.
So unless you know what you’re doing, send it to someone who can do it in their sleep like Rudy!
I did mine ten years ago and it just needed a new set of belts and a drop of oil here and there, always a good idea while it’s in bits and pieces.
20 March 2023 at 05:26 #44742sonavorBRONZE MemberAs I understand it, the motor assemblies for the different Beocord models (BC8000, BC8002, BC8004, BC6000 & BC6002) have a different motor assembly than the BC9000.
BC9000:
12M1 8400112 Motor — Pulley 12101 2722027BC8000 through BC8004 (including BC6000, BC6002):
12M1 8400101 Motor — Pulley 12101 2722027However, I believe that the actual DC motor for the Beocord 8000-9000 (the DC motor inside the assembly) is the same. It is very similar to the Beogram 4002/4004 DC platter motor and I had Rudy re-infuse the oil in the bearings of a Beocord 9000 motor.
Martin Olsen would know for sure so maybe he will add something to this thread.
The Beocord DC motor is not easy to get to as it is inside a metal, outer shell that must be cut open.
I have attached some photos of the Beocord 9000 DC motor disassembled.Compare the actual motor that is shown in the disassembled photo to this Beogram 4002 DC platter motor that Rudy restored for me. You can see how much alike they are.
The biggest difference is the motor assembly. The Beocord 8000-9000 motor assemblies contain the DC motor, the metal shell and a circular circuit board. The circuit board has a small trimmer resistor for adjusting the motor speed. In my case, this Beocord 9000 motor had a failed speed adjustment trimmer. The motor was also noisy before the bearings were re-infused with oil.
I had to cut open the metal outer shell to open the motor assembly and in order to reassemble it later I drilled two small holes and tapped them for two M2 screws.
It makes sense that these Beocord motors will eventually start making some noise just like Beogram 4002/4004 platter motors do with age…until someone re-infuses the bearings with oil.
-sonavor
20 March 2023 at 20:31 #44743Thanks for the pictures John. Very useful. The trimmer is very thin. Have you found a replacement?
The motor does look similar to the Beocord 6000/8000 one but is it the same? How are the two speeds obtained?
Jacques
20 March 2023 at 23:17 #44744sonavorBRONZE MemberHi Jacques,
I found some more pictures where I took a Beocord 8002 motor assembly apart and photographed it next to the Beocord 9000.
I attached the photos in this post. I also included a photo of the assembly back together.
In the photo with the two different motor assemblies, the BC8002 is on the left and the BC9000 on the right.Regarding the trimmer resistor, I need to check on what its value is again. I may have to open the ones I reassembled and measure them. The motor PCB and components is not in the Beocord service manual. I was thinking of adapting a surface mount trimmer as a replacement but while that would probably work, it could be a pain to implement it. Especially because it is meant to be adjusted from outside the metal case, through the access hole. Then I realized that the adjustment hole for the trimmer and the PCB is right against the bottom of the metal cover. I think it would be easier to run three leads out the back of the round PCB, where the trimmer mounts, and attach a nice Bourns trimmer outside the case. It would be much easier to adjust and there is room where it won’t interfere with the cabinet. The length of the wires would only be 10 to 12 mm as the PCB is right on the other side of the case.
That is as far I got with it as I got busy with some Beogram and Beomaster restoration projects. These Beocord motors were a little side project to investigate the possibility of restoring them. The restored motor did run good but I discovered that I still need to mess with some of the PCB components to dial in the speed as I couldn’t dial in the speed I needed with just the trimmer.
However, I did prove to myself that the motor bearings could be re-infused by Rudy successfully and that reassembly and use in a Beocord would be possible. There are just a few things I need to go back and tweak. Maybe sometime this year 🙂
Right now my restoration backlog is just to big to even consider any Beocord projects.-John
21 March 2023 at 07:05 #44745Conclusion: send Rudy your motors, as he’s now the absolute expert. You know, like a surgeon who has performed lots of operations, as opposed to one who has just done a few.
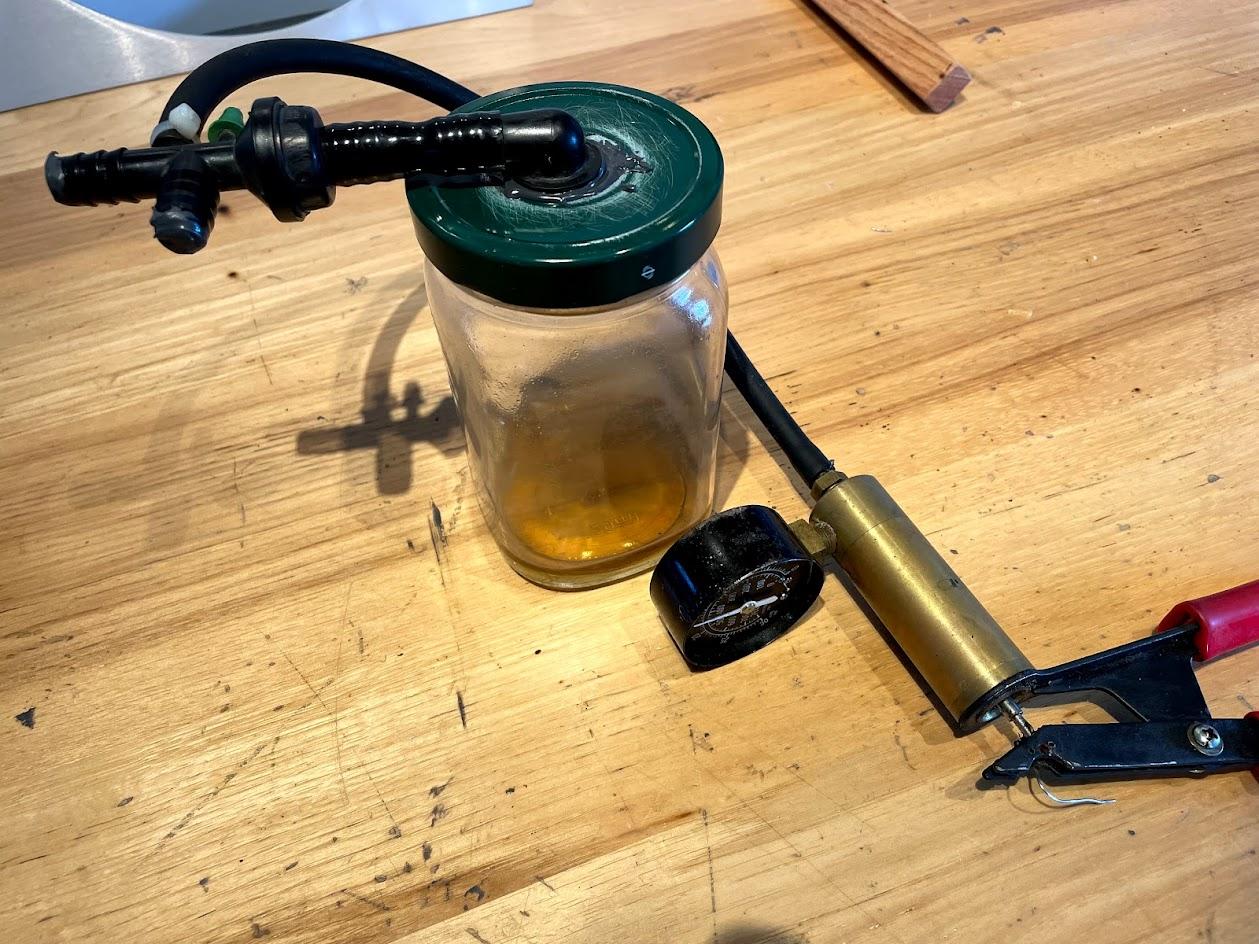
21 March 2023 at 13:20 #44746quattttroBRONZE MemberHere is my pressure lubricator, if you need some ideas. An automotive disc brake bleeder, a jar, and a check valve from some old car
 21 March 2023 at 16:14 #44747hcraig244SILVER Member
Looks like the nozzle from a windscreen wash, I bought a wine bottle vacuum pump when I was considering infusing one of my BG4000 motors….however when i put it on test and mapped it using one of Rudi’s tachometer devices, downloaded the readings to Excel to produce a graph I found the speed was very consistent so haven’t tried it yet. It’s something I will do when the time comes more out of interest than anything else…
21 March 2023 at 17:04 #44748GlitchBRONZE MemberI found some more pictures where I took a Beocord 8002 motor assembly apart and photographed it next to the Beocord 9000.
Thank you very much for posting the pictures. Based on your pictures and some other information posted by Beolover, it looks like this is a reasonably straightforward job.
I wonder if any of the Beogram bearings sold at beoparts-shop are the same size? The motors certainly look similar. Has anyone measured/checked this already? Obviously, new bearings would be better than refurbished bearings if they are available.
Here is my pressure lubricator, if you need some ideas.
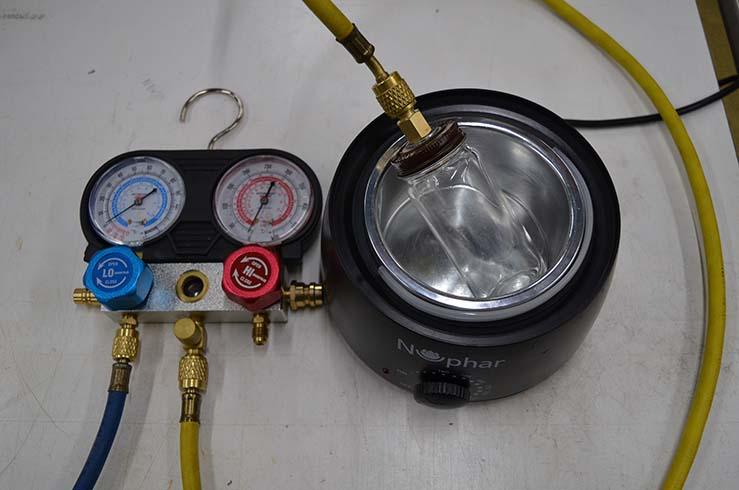
Here is what I came up with using what I had on-hand.

I can pull a very good vacuum and hold it for a few days. The blue hose goes to a HVAC vacuum pump. I plan to heat the bearings and oil. I don’t know if this will make a significant difference, but it couldn’t hurt.
Glitch
26 March 2023 at 17:50 #44749GlitchBRONZE MemberI did mine ten years ago and it just needed a new set of belts and a drop of oil here and there, always a good idea while it’s in bits and pieces.
How is it working now? Was the “drop of oil” added to the sintered bearings?
The motor does look similar to the Beocord 6000/8000 one but is it the same? How are the two speeds obtained?
Two speeds could be obtained by varying the voltage to the motor.
It’s something I will do when the time comes more out of interest than anything else…
It seems like the tricky part is figuring out how long it can be run before any permanent damage is done. Wouldn’t it be “too late” if the issue was found during some sort of performance testing?
If you decide to go that route I would be interested in hearing your results.
My plan is to buy another Beocord to experiment with. BC800x’s that need some TLC are readily available. I’d rather make any mistakes on a something that is already broken and less rare/collectable than the BC9000. I’ll post results when I make progress.
Glitch
26 March 2023 at 21:36 #44750I did mine ten years ago and it just needed a new set of belts and a drop of oil here and there, always a good idea while it’s in bits and pieces.
How is it working now? Was the “drop of oil” added to the sintered bearings?
Yes of course. It works perfectly.
8 May 2023 at 22:53 #44752GlitchBRONZE MemberI ended up buying a couple of dead Beocord 8000’s. I want to experiment on something appropriate before tearing into my beloved Beocord 9000. I learned quite a bit in the process. I won’t go into the whole story since there are a lot of details. However, I thought that people might be interested in a few highlights…

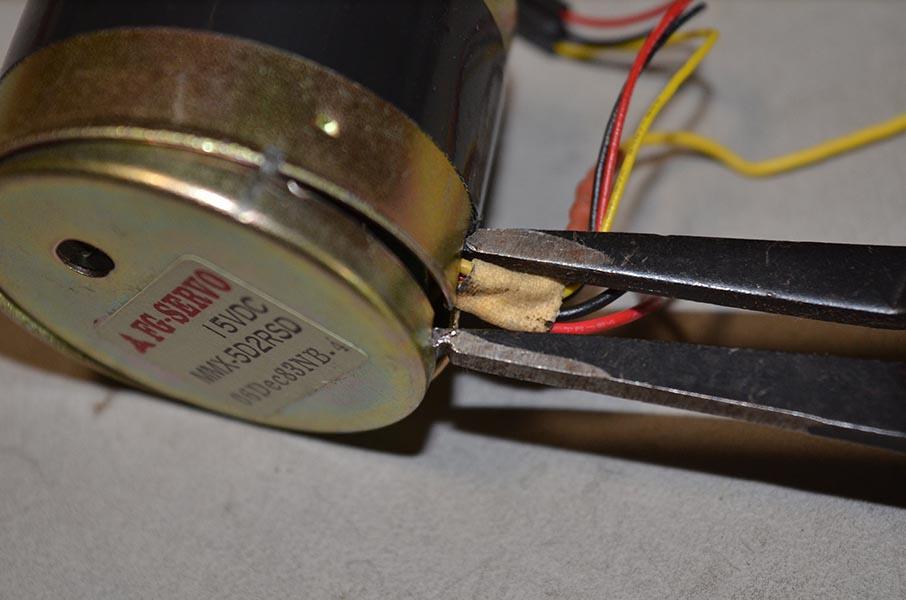
1) I found it is not necessary to do any Dremeling to get the motor lid off. I used a pair of snap ring expansion pliers to pop off the lid. The lid can be pressed back on without leaving any indication that work was done.
2) My motors were the same as in sonavor’s pictures. The motors themselves were surprisingly easy to take apart. The only things to be careful with are to not break the plastic clips holding the motor together and to pay attention to the white plastic spacer on the armature shaft. The motor tachometer is nothing like a Beogram 400x motor. The wire arrangement is such that one would have to try hard to break the thin wires.
3) The motor bearings are not like the Beogram bearings. They are different sizes. The bearing retention is similar. Making a tool for crimping the bearing retainer is easier than what is shown on the Beolover site. A simple piece of wooden dowel will work.

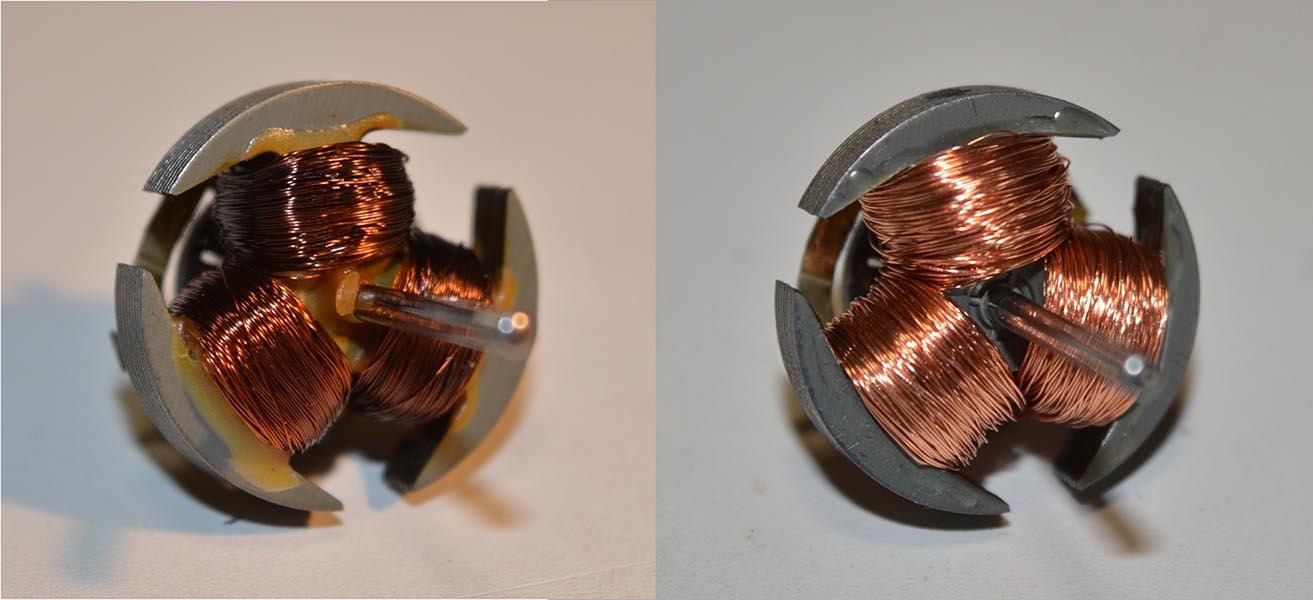
4) The windings in one of the motors were burnt up. Rewinding the armature is possible.

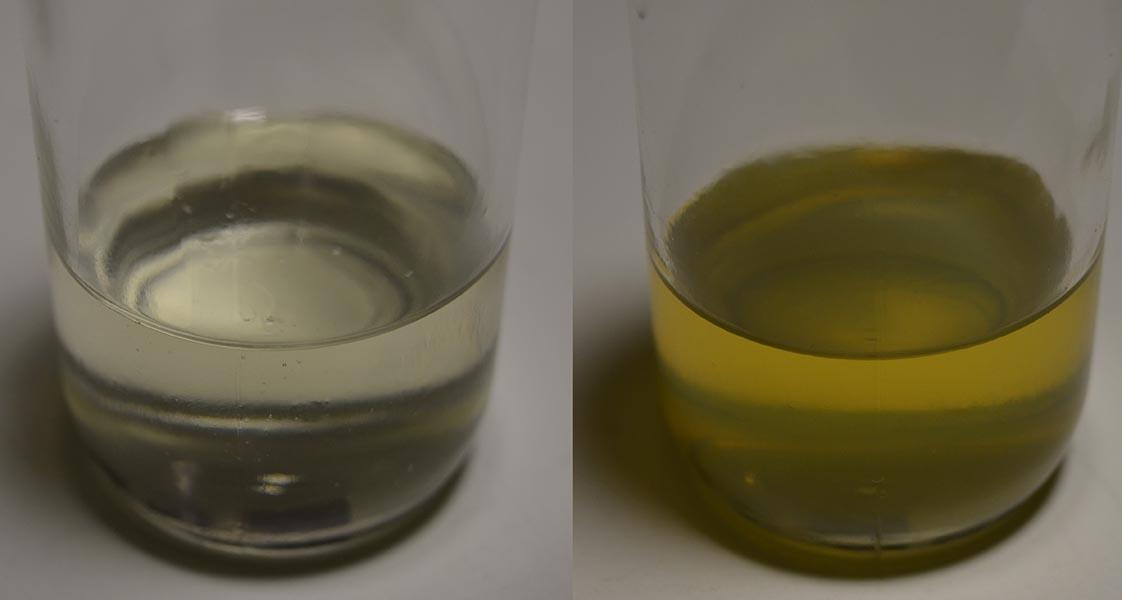
5) Bearing cleaning in preparation for vacuum oiling isn’t critical. I tried to thoroughly clean one set of bearings and skipped the prep work on another. Either way, the before/after of the oil bath was the same. I attribute the change of color to the old amber colored oil coming out of the bearings.
6) I ran a some experiments to refine the process for vacuum oiling. This is beyond what I would want to describe in this post. One thing that I will mention is that I’m skeptical about being able to a good job at vacuum oiling without a proper vacuum pump.

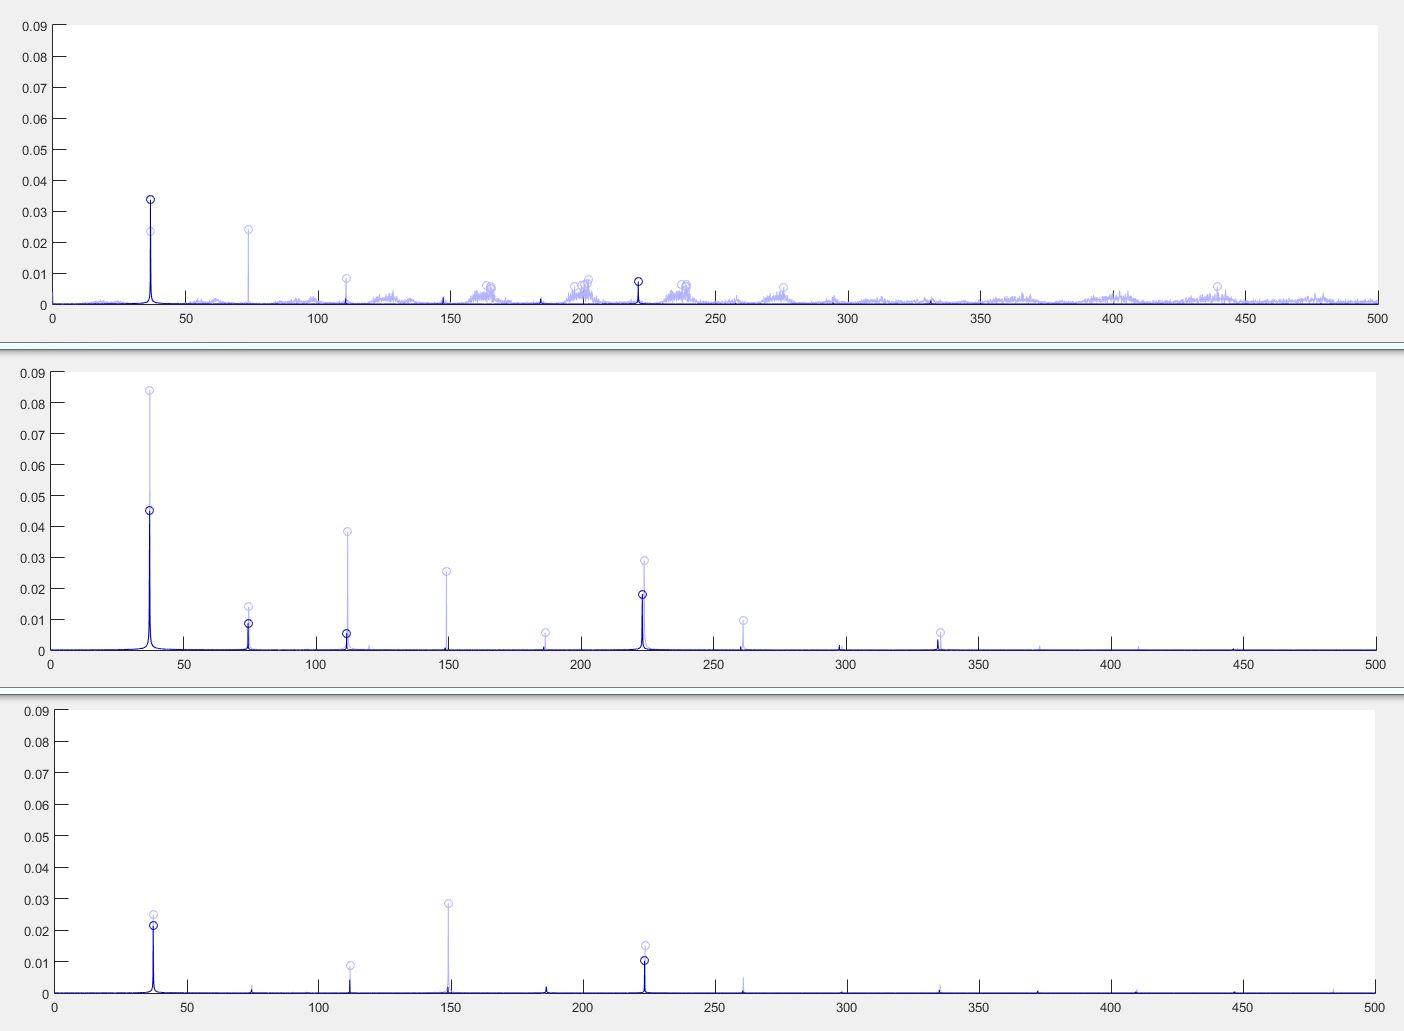
7) I measured the performance of the motors using several methods. The plots above are FFT’s of the motor vibration. The motor in the first plot was obviously noisy. The motor in the second plot was the one with the burnt armature, but was quiet. The third plot was from my BC9000 which started in very good condition. The light blue is before, the dark blue is after vacuum oiling. All three motors are now performing more similarly. I have a more data, but I assume that I’m the only one that geeks out on data analysis.
8) I also vacuum oiled other sintered bearings from the tape transport. I weighed all the bearings before and after to get a feel for how much oil that I added to the bearings. There were things that I found very interesting in the data analysis, but the bottom line is that a well done vacuum oiling is worth the effort. …but you already knew that!
I was able to repair both of the broken Beocord 8000’s and get them 100% working. I did the normal stuff like replace a few bad caps, new belts, rubber tires, LED display rebuild, reflowed solder joints, etc. Now the hard part… figuring out what to do with extra tape players ;-).
Glitch
9 May 2023 at 05:59 #44753sonavorBRONZE MemberThat is great information. I’m so glad you discovered a way around using a Dremel. That will save a bunch of time and effort.
Can you go into detail of what you did for your performance measurements?
Thanks,
sonavor9 May 2023 at 14:35 #44754GlitchBRONZE MemberI’m so glad you discovered a way around using a Dremel. That will same a bunch of time and effort.
It also avoids creating metal dust around the motor magnet. This kind of contamination is very difficult to remove.
Can you go into detail of what you did for your performance measurements?
I tried many different things. I did the obvious stuff like measuring motor current. I also added an encoder to measure motor speed. The brass encoder adapter is also machined to attach to the capstan shaft. For the motor vibration, the simplest setup was a mechanics stethoscope coupled to a microphone.
The data from the various sensors is logged and post-processed offline. I tried to run a variety of experiments, like comparing the “drop of oil” method against the “vacuum oiling” method. Unfortunately, my number of samples is statistically insignificant so it is hard to make truly conclusive statements without caveats.
I can go into a lot more detail, but it would be helpful if you had specific questions. It is hard to provide the appropriate level of detail without understanding someone’s interests and technical background.
Glitch
-
AuthorPosts
- You must be logged in to reply to this topic.