


Home › Forums › Product Discussion & Questions › BeoGram › Beogram 4002 Restoration
Tagged: Beogram 4002 4000c plinth frame restoration record player cabinet woodworking furniture making
- This topic has 46 replies, 15 voices, and was last updated 11 months, 2 weeks ago by
 alf.
alf.
-
AuthorPosts
-
1 April 2024 at 03:49 #53980
 ChristianHakBRONZE Member
Hi all,
I have just gotten my hands on a pretty trashed BG 4002 so I am trying my hand at doing a full restoration on it. I received it in a really bad condition – the power cable and phono cable had both been cut and are missing, I have no idea if any of the internal electronic components work, the plinth has had water damage, the aluminium strip on the dust hood is wrecked, the chassis paint job is in total disrepair. So in short, I have a mammoth task ahead of me, but considering it is in such bad shape, I don’t feel bad having a crack at it as if I make a mistake, at least I’m not ruining a fully functional record player.
My plan of attack is to start with the cosmetic and physical stuff, which I feel most comfortable with, followed by the electronics and internals (which I have next to no experience with and as such will take a lot of research and help).
Feel free to chime in with advice and tips! There is much knowledge and experience here which I am hoping to draw upon.
Thanks in advance!
Christian
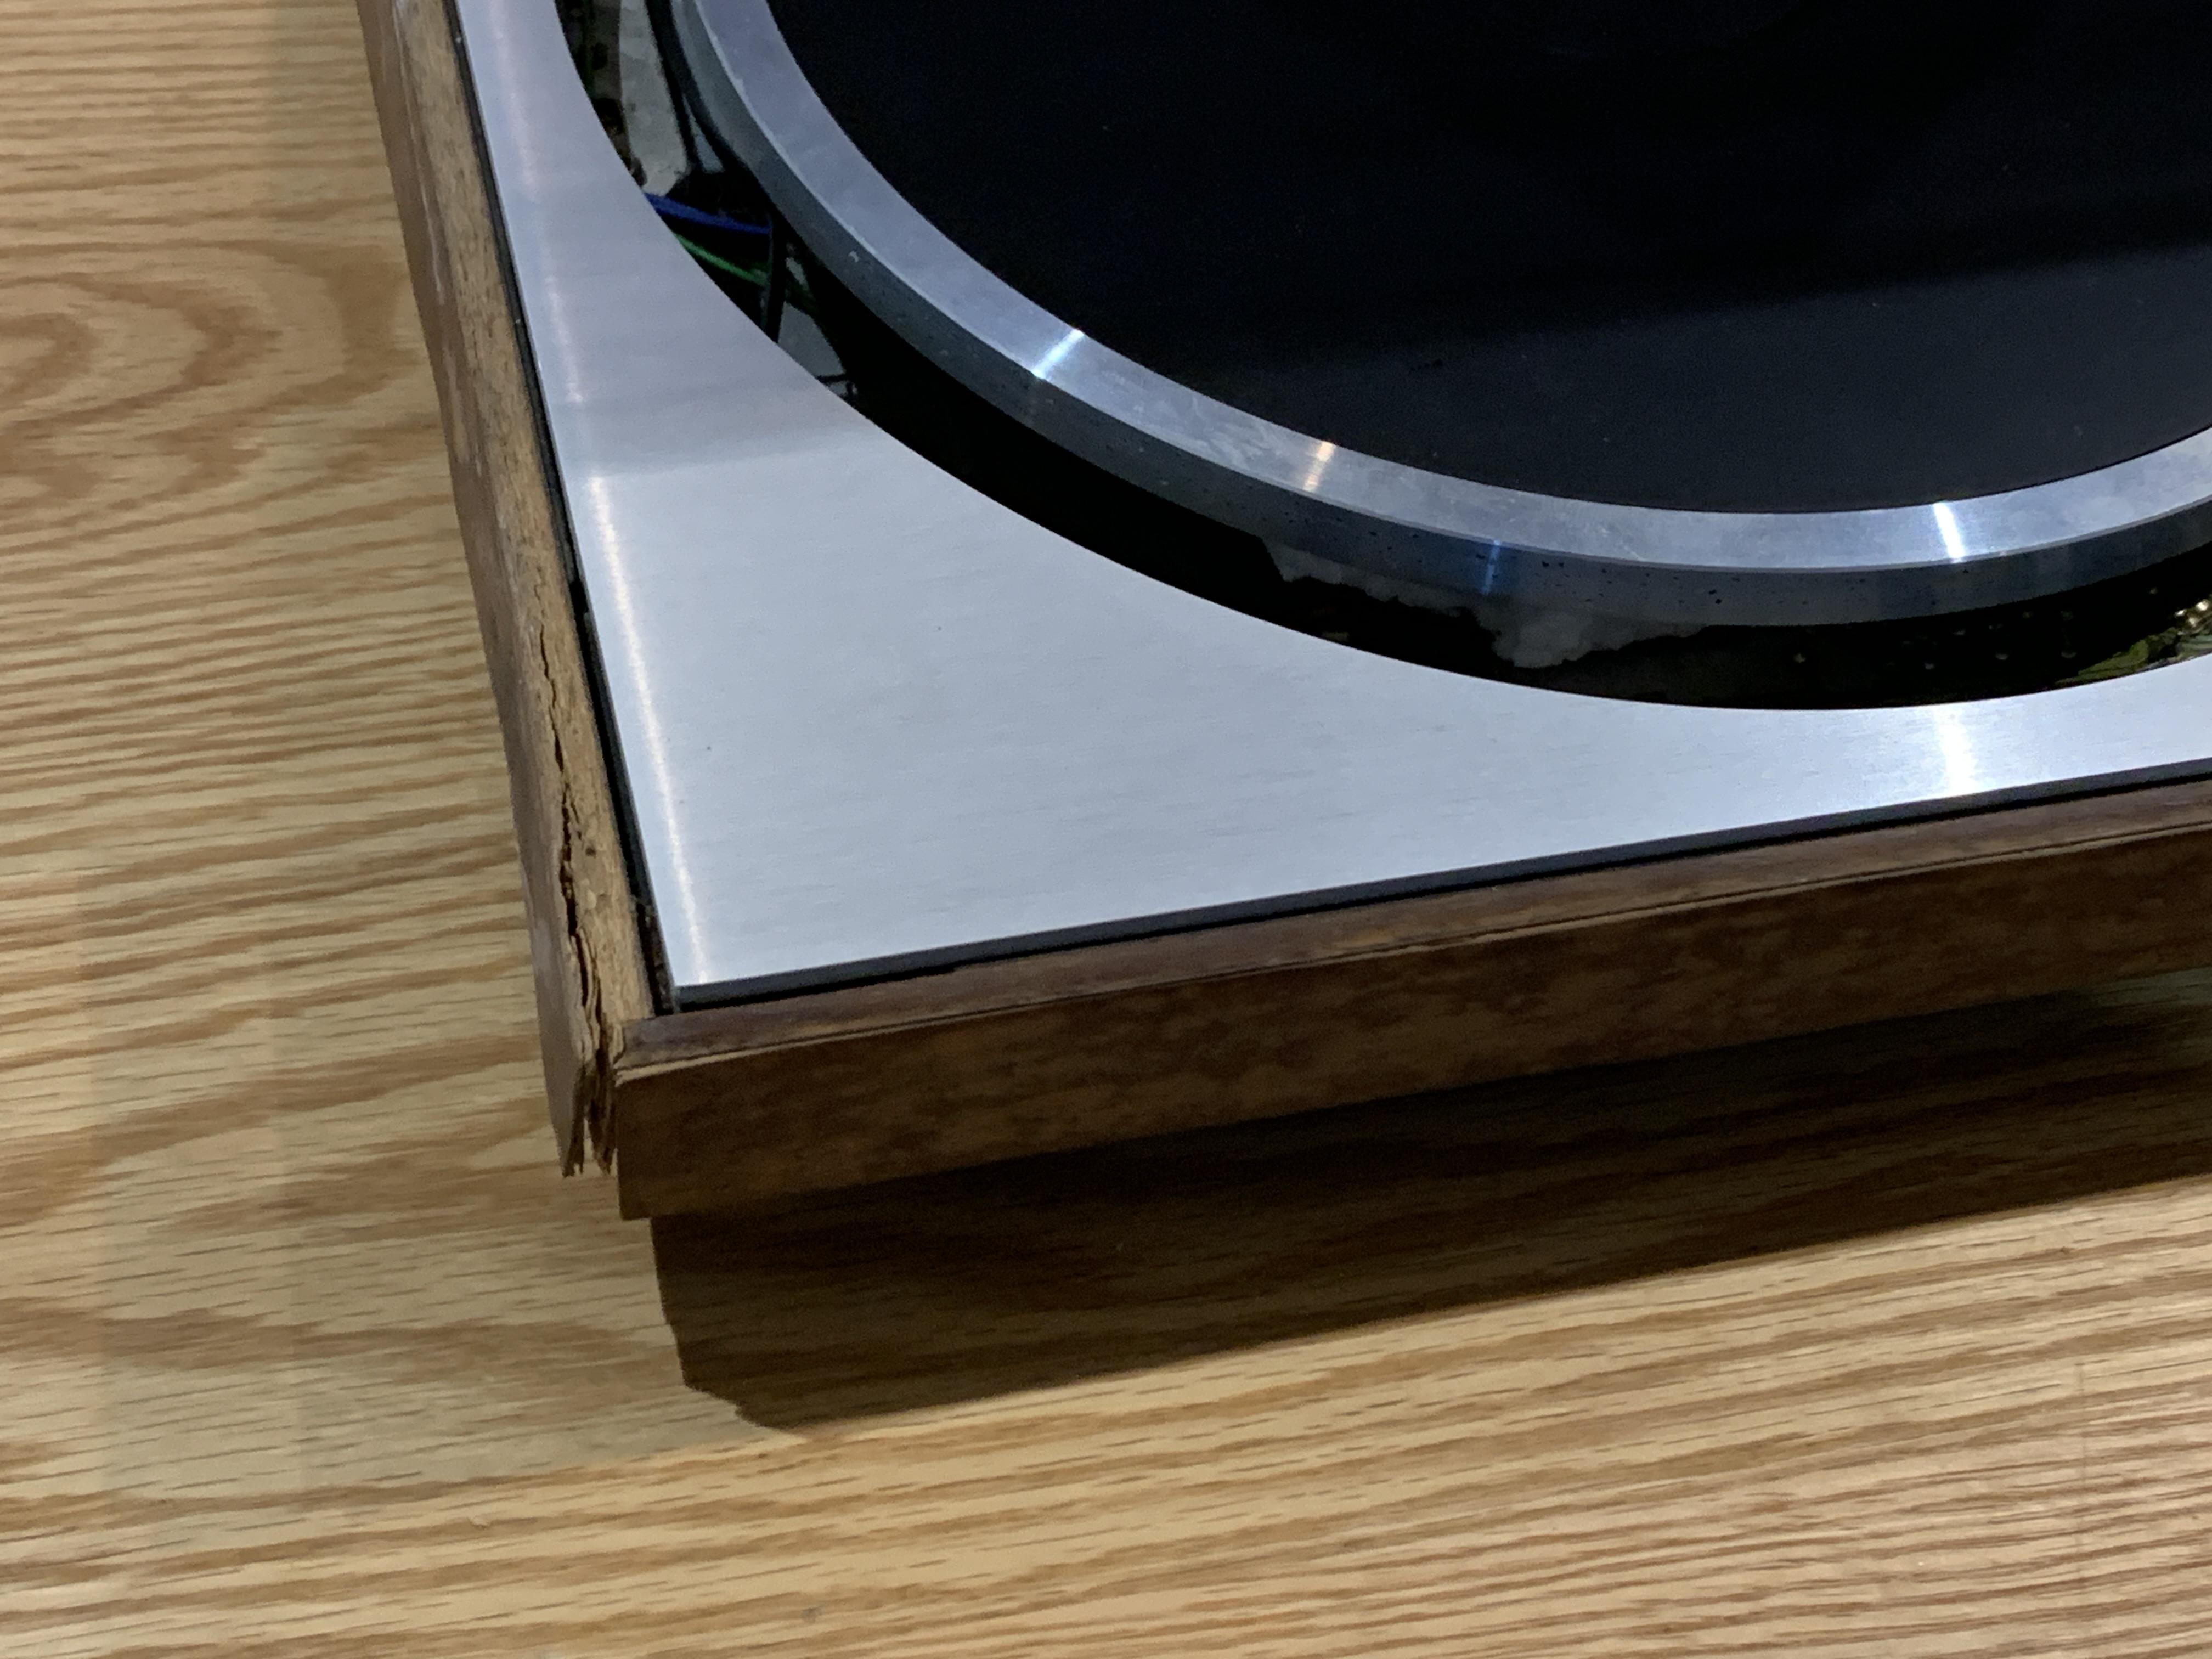
1 April 2024 at 04:08 #53981ChristianHakBRONZE MemberFirst step was to remove the plinth to make a new one. The original was chipboard with rosewood veneer. I assume it has been exposed to water at some point as the chipboard was swollen, and the metal was rusted in parts.

I decided to remake the plinth in oak to match the furniture at home.
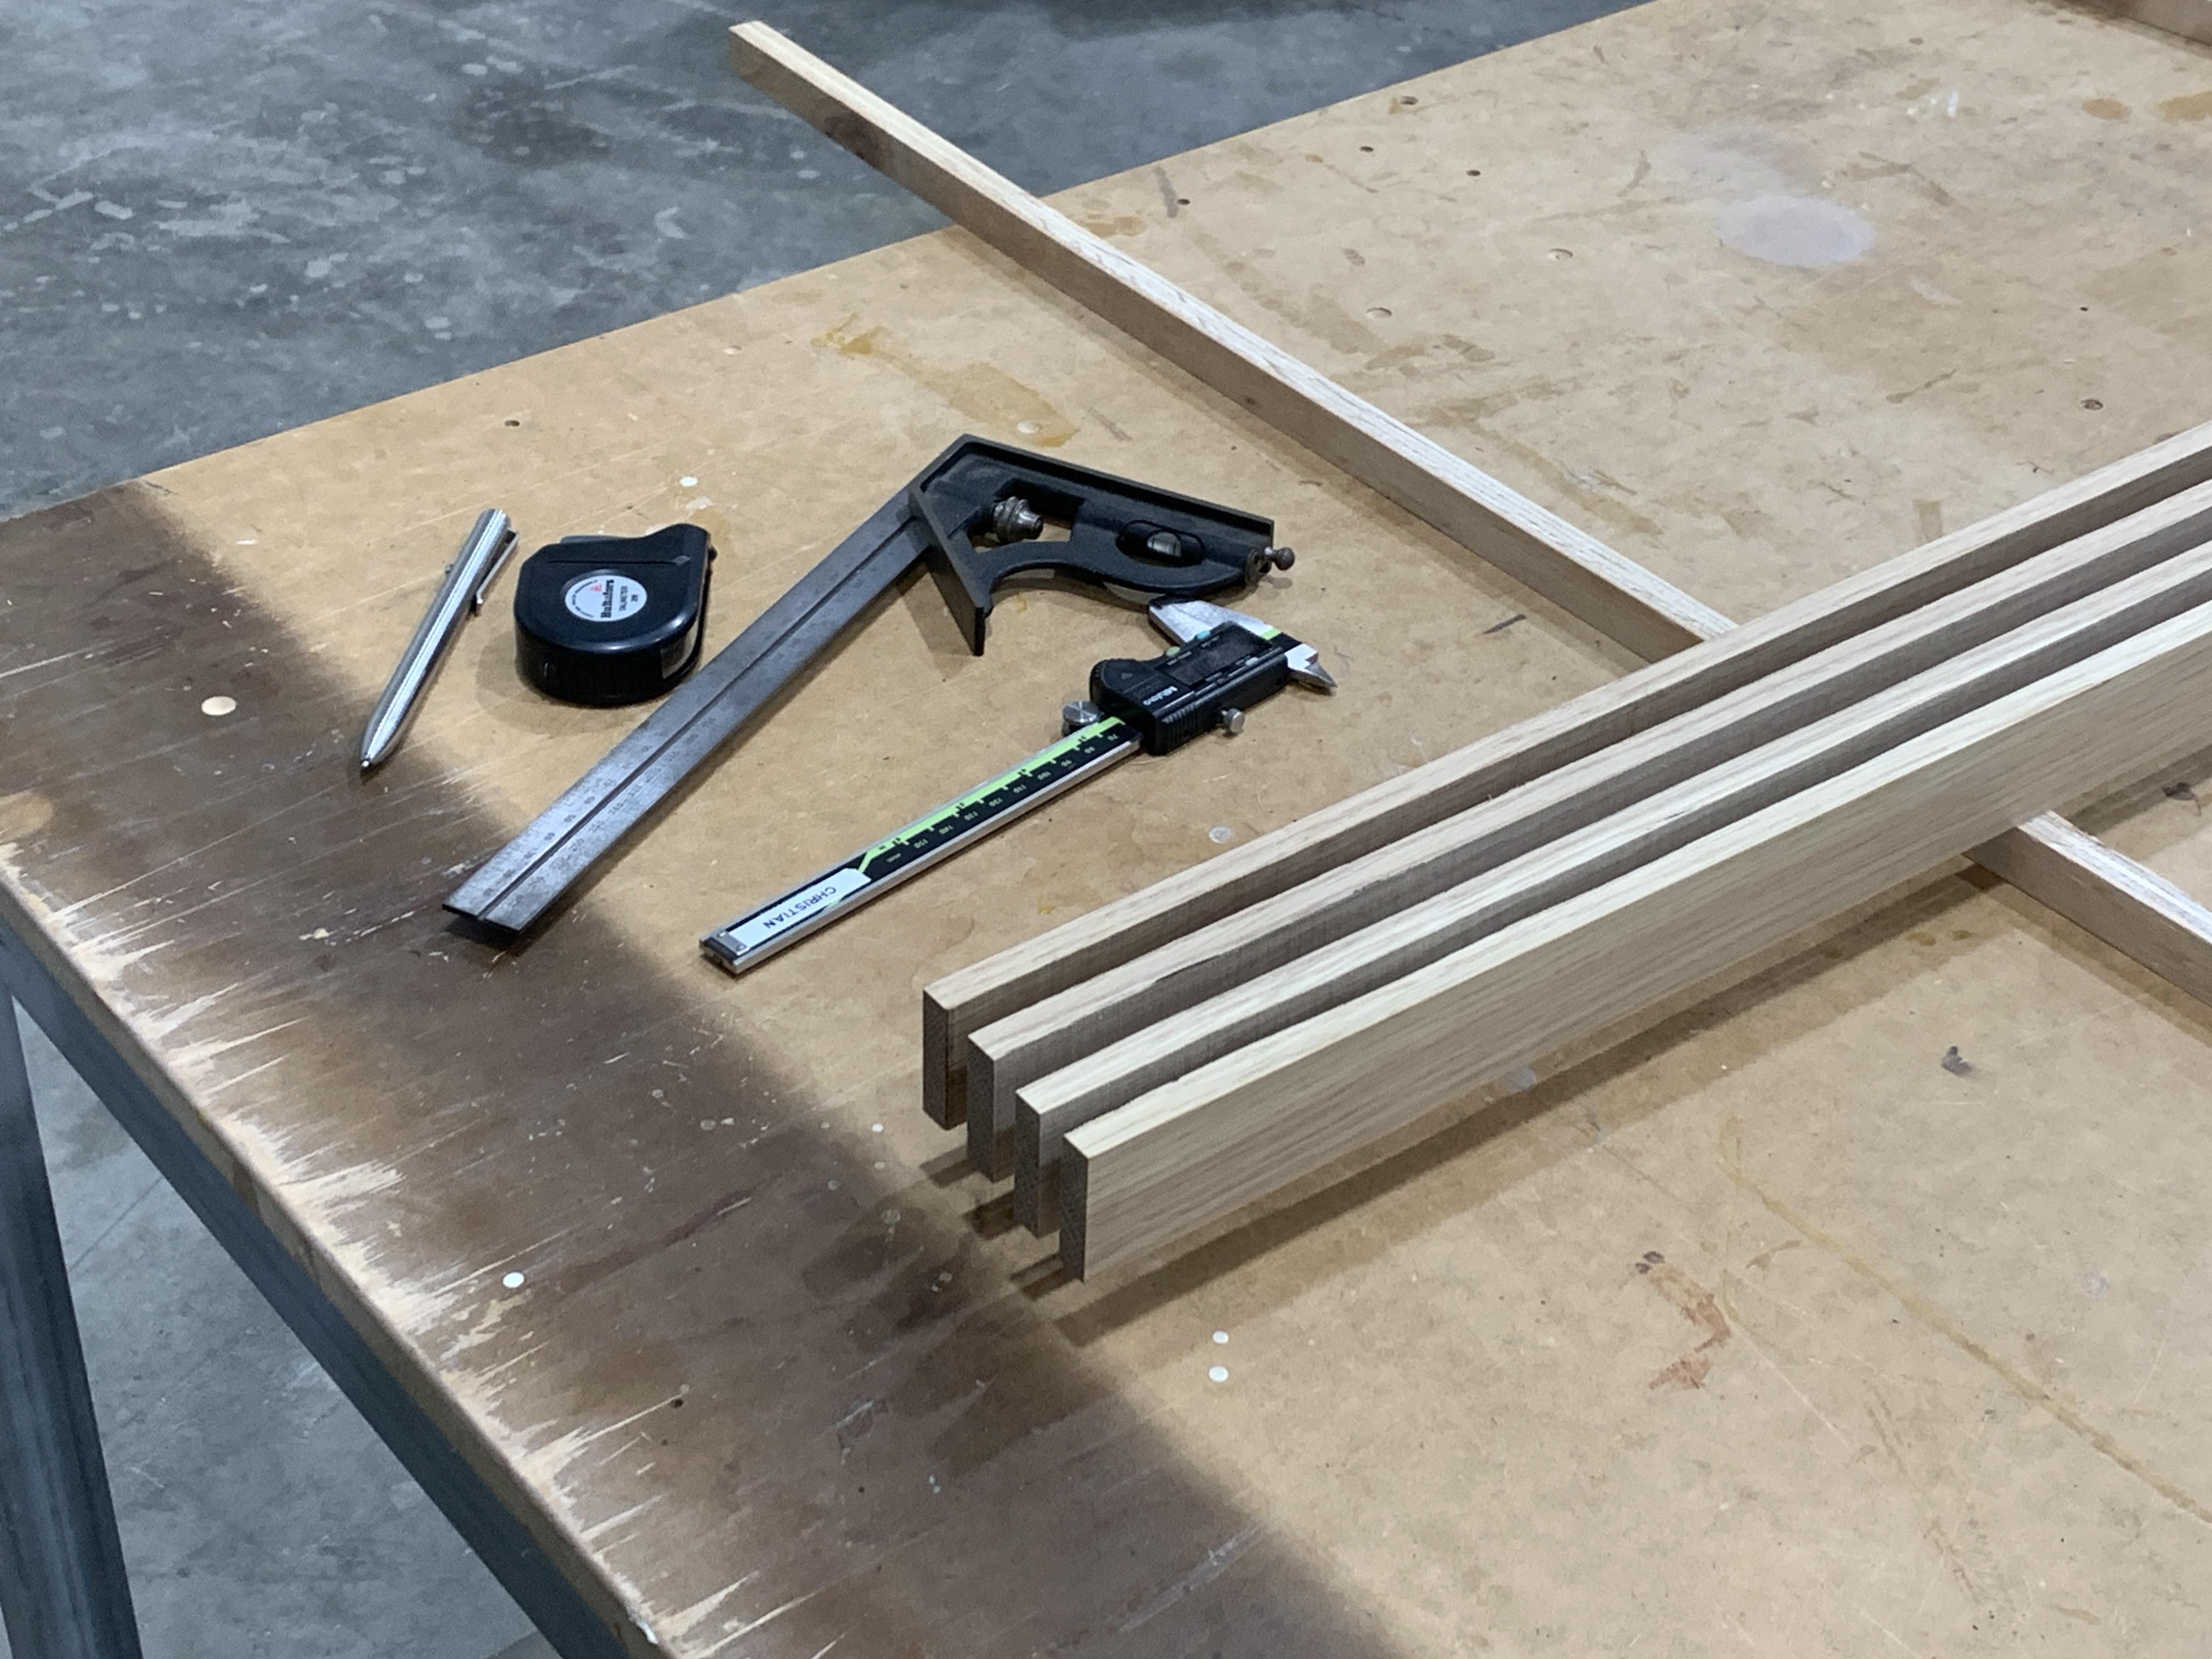
I milled a few oversize pieces of oak and let them sit for a few days to relieve any tension in the timber before milling them to their final size. I milled up a few extra pieces in case I made any mistakes and so I can test a few different finishes. Each strip of timber will make one plinth so that the grain will be continuous.
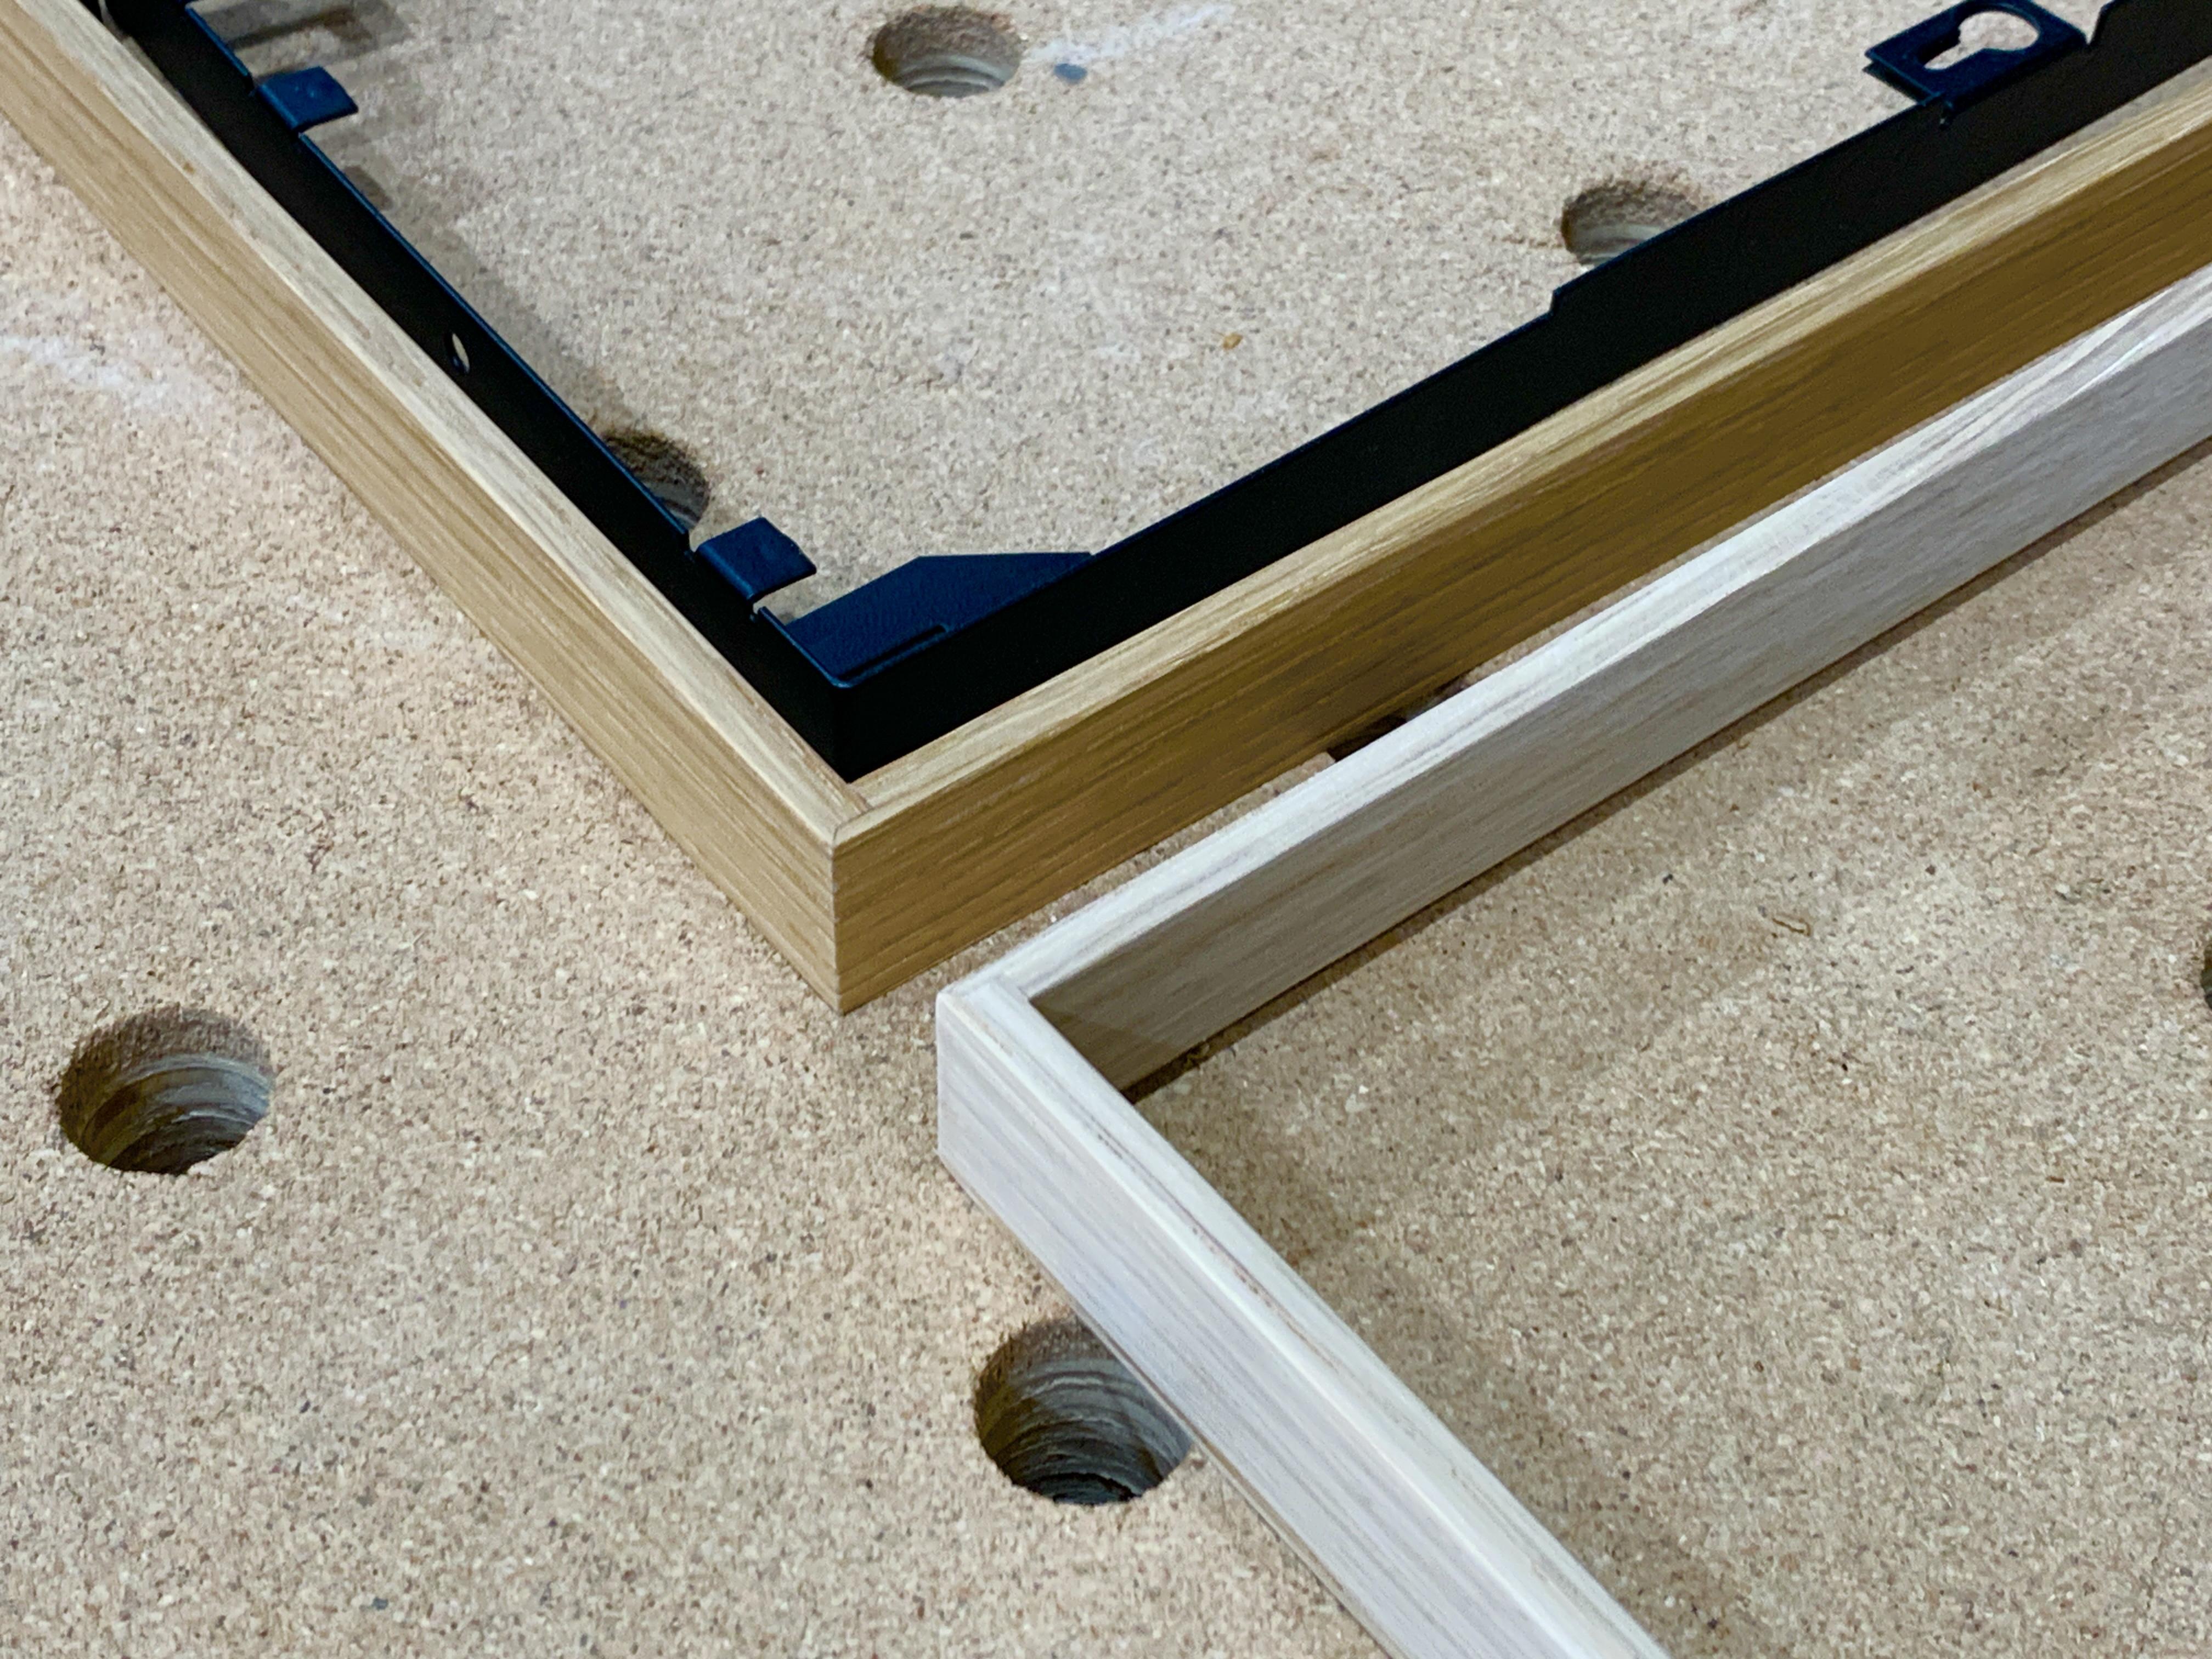
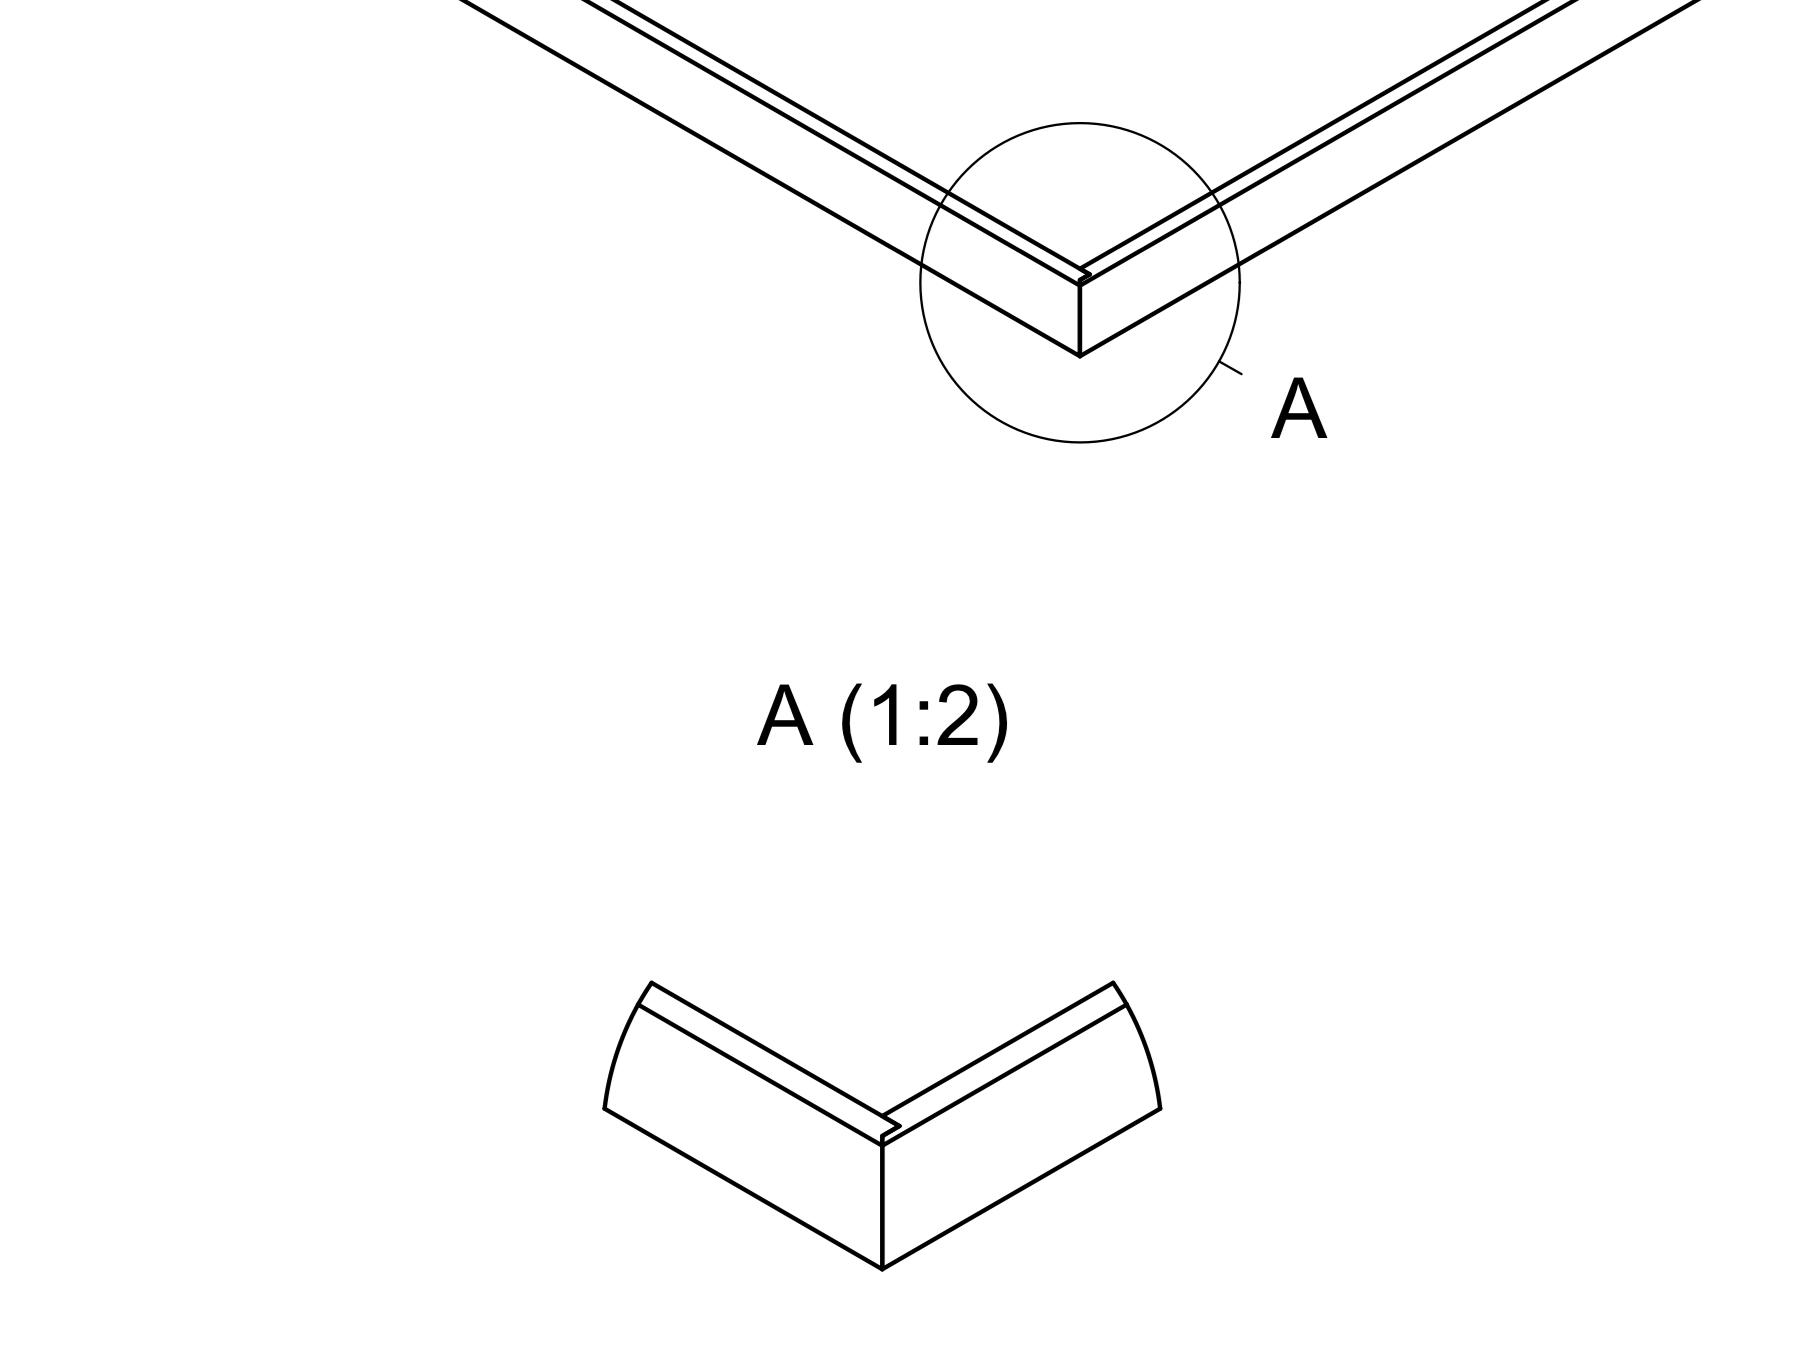
I have seen a few restored plinths made with a mitre and splines but I think I prefer the original joinery so decided to go with that instead. I programmed the CNC to do all the joinery. I had to make a vacuum hold-down jig as the parts are so small and difficult to secure when milling.
The joinery ended up really well. The small details look great and are a nod to the original. This is what it looked like before gluing.
Here is the end result. I have oiled one (the darker looking one). I will spray the other one with lacquer. Afterwards I will decide which one I like the best.
The metal fixtures had some chipped paint and surface rust so I removed the rust, sanded them down and refinished them with flat black paint. They turned out great!
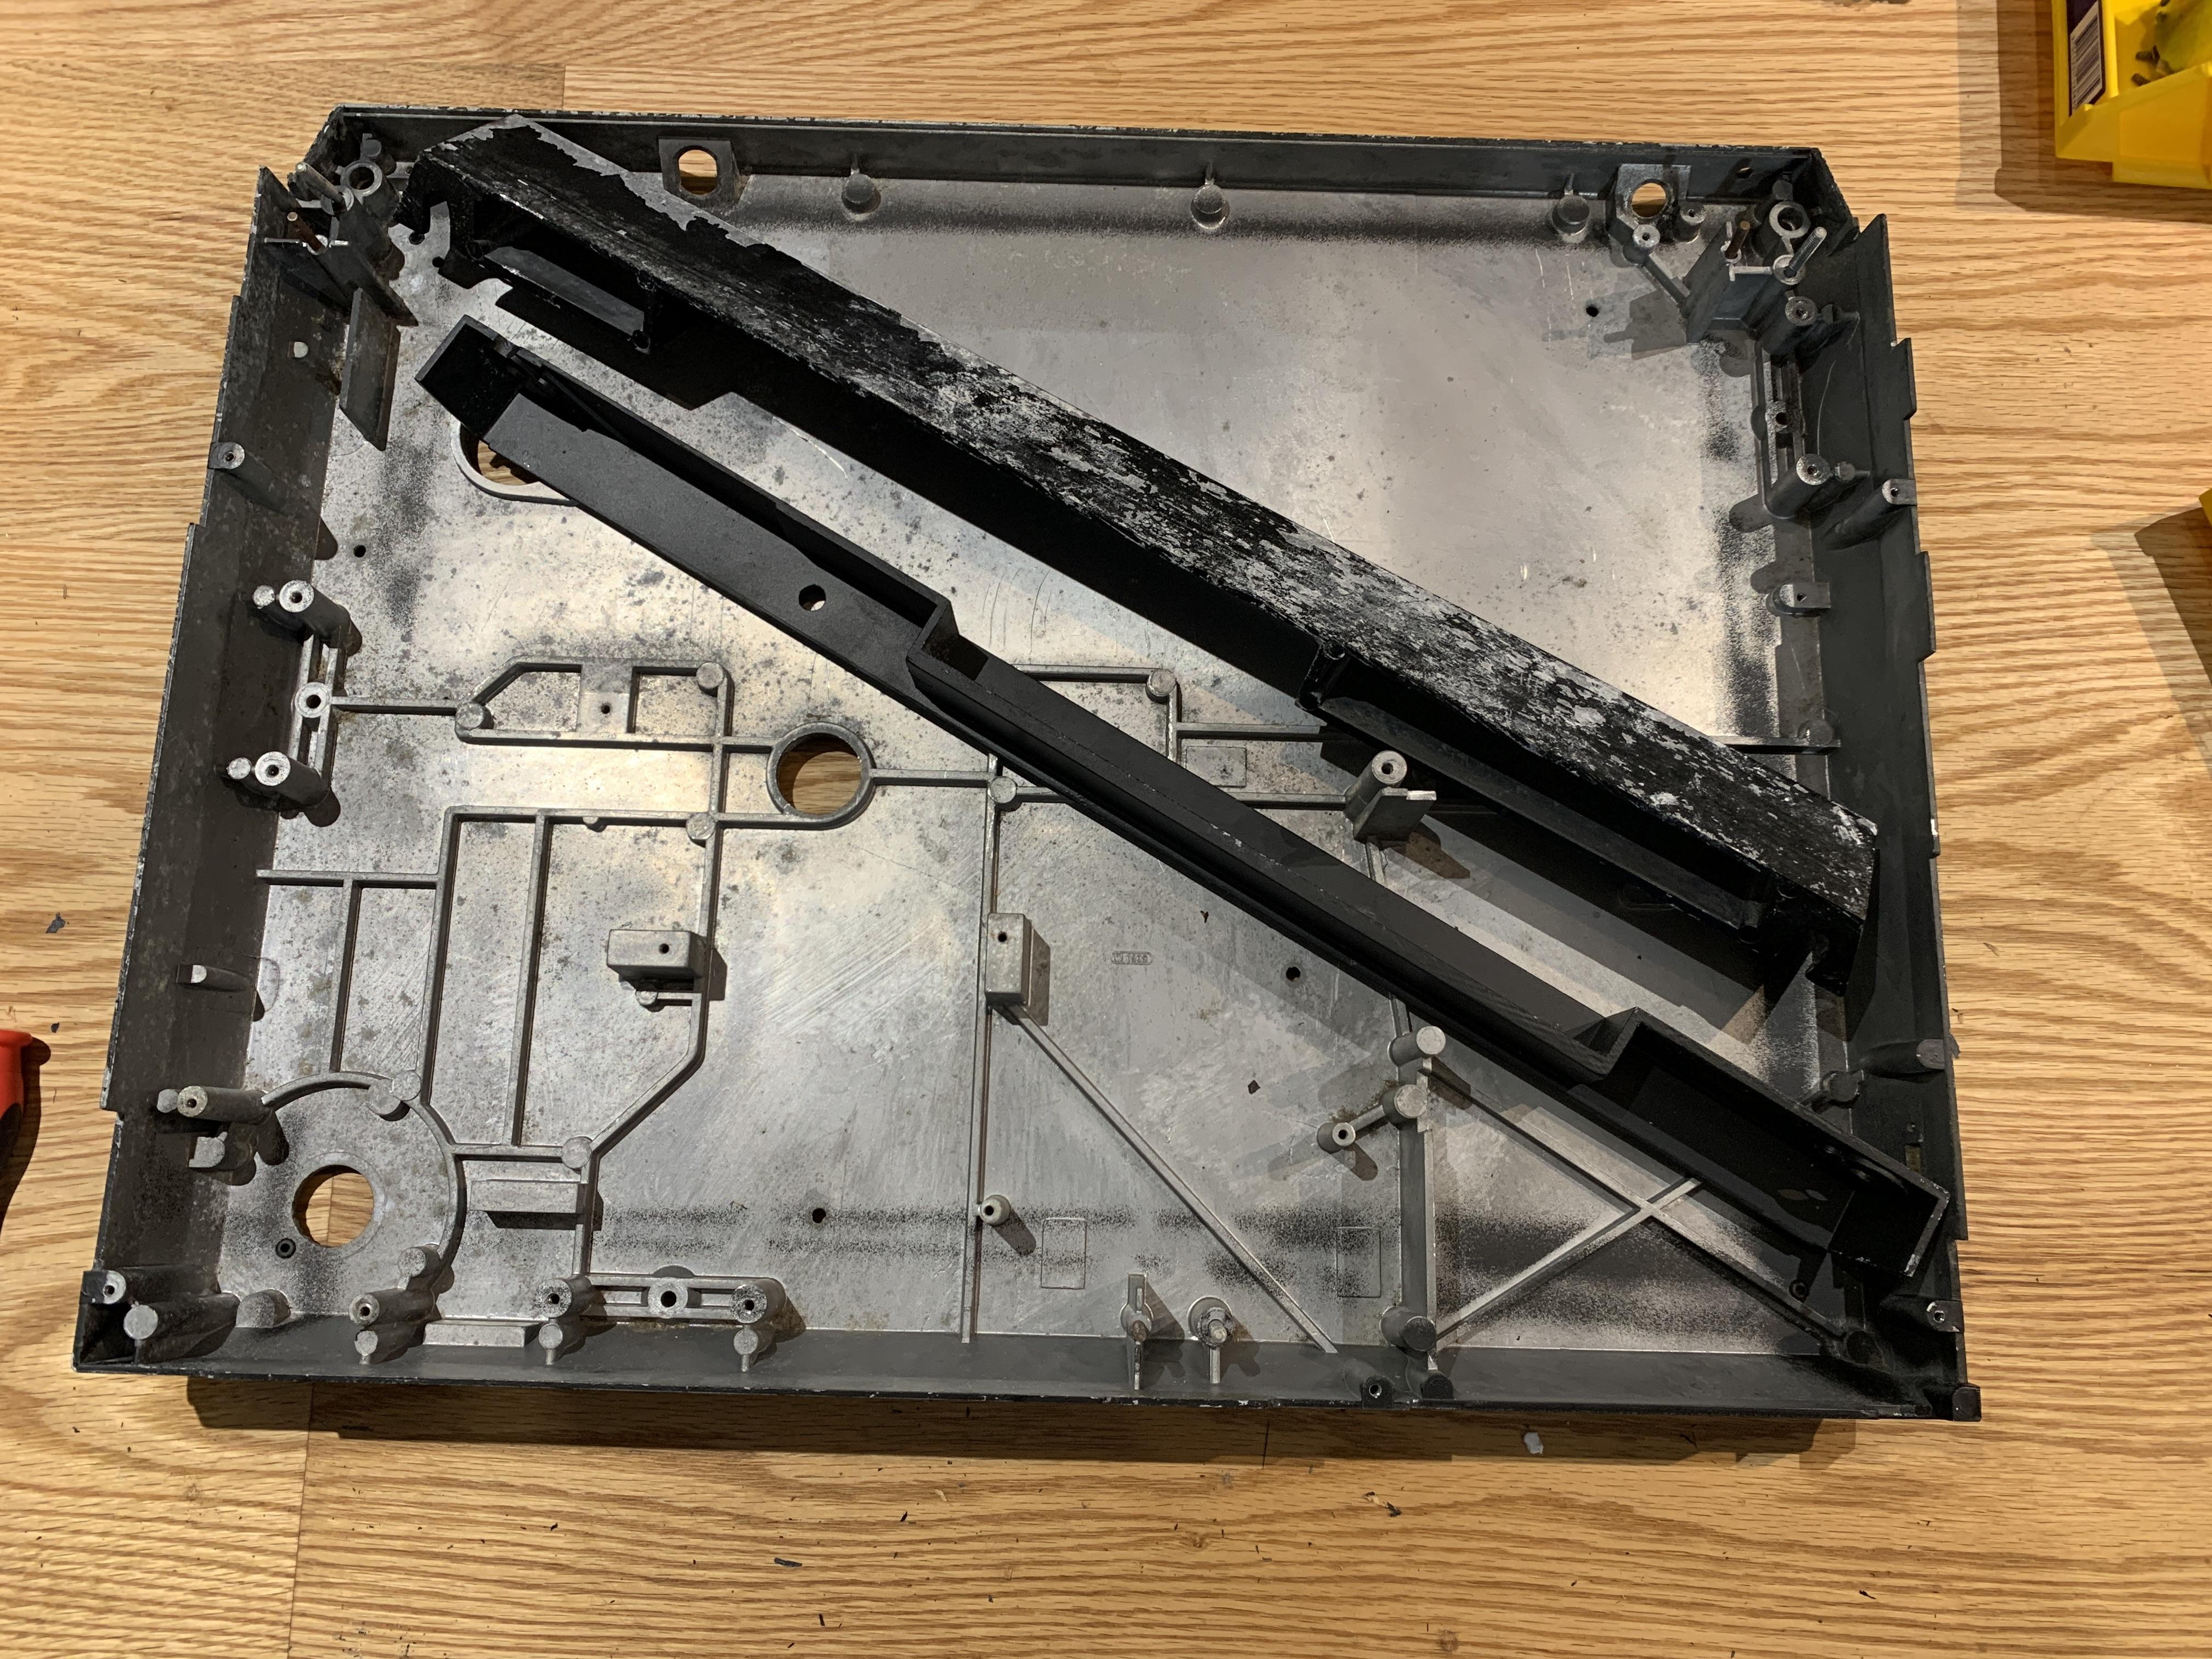
1 April 2024 at 04:20 #53982ChristianHakBRONZE MemberNext step was to disassemble everything from the chassis and the back piece of the dust hood. The current condition is horrible. The previous owner had made an attempt at starting a restoration and it seem he had tried to sand off the paint.
It was very interesting disassembling the turntable. I enjoy seeing how things are put together and work. I made sure to label everything and take a million photos of how it goes back together. I removed the old sticker labels so that I can adhere them again after it has been refinished.

My plan is to have these pieces sand blasted to remove the old paint before refinishing it myself. I have sent off a few emails to get some quotes on the sand blasting. Has anyone got any experience with restoring the chassis?
1 April 2024 at 08:50 #53983That joint for sure looks amazing to start with!
Location: Netherlands
My B&O Icons:
 2 April 2024 at 05:35 #53984auricBRONZE Member
This is beautiful work Christian!
2 April 2024 at 06:36 #53985hcraig244SILVER MemberException work so far……you should offer to provide those wooden plinths to others, not everyone has access to the equipment required to give such a finish.
Well done
2 April 2024 at 10:39 #53986ChristianHakBRONZE MemberThanks for the kind words!
I would be open to making these for sale.
I was thinking that I could provide them unassembled (not glued together) as that way they can be shipped efficiently in a poster tube.
If shipping them assembled, it would cost a bit more for shipping, packaging and labour.
If anyone is interested, I can make them in walnut, oak, ash and can likely source rosewood, teak and other timbers.
4 April 2024 at 05:37 #53987auricBRONZE MemberWould be wonderful if you can make them available!
Your joint work is much better than B&O 4000c recreation wood trim joint.
I’ve seen many 400x with banged up corners. This would be a great fix/upgrade!
4 April 2024 at 20:53 #53988ChristianHakBRONZE MemberYour joint work is much better than B&O 4000c recreation wood trim joint.
Have you seen a 4000c in the flesh? Does anyone on this forum have a 4000c or know of anyone that has one? I have a few questions for them regarding the upgrades.
Also, has anyone had their 400x serviced with the upgrade kit?
4 April 2024 at 23:02 #53989auricBRONZE MemberI haven’t seen one in the flesh.
Here’s a video of the restoration program: https://www.youtube.com/watch?v=c9f6hXYk8ac&t=71s
You can email the company featured.
5 April 2024 at 09:09 #53990schanzenbaecherMemberI am interested in assembled plinths in rosewood and smoked oak.
My B&O Icons:
6 April 2024 at 08:31 #53991bulldog123BRONZE MemberI am interested in a rosewood surround.
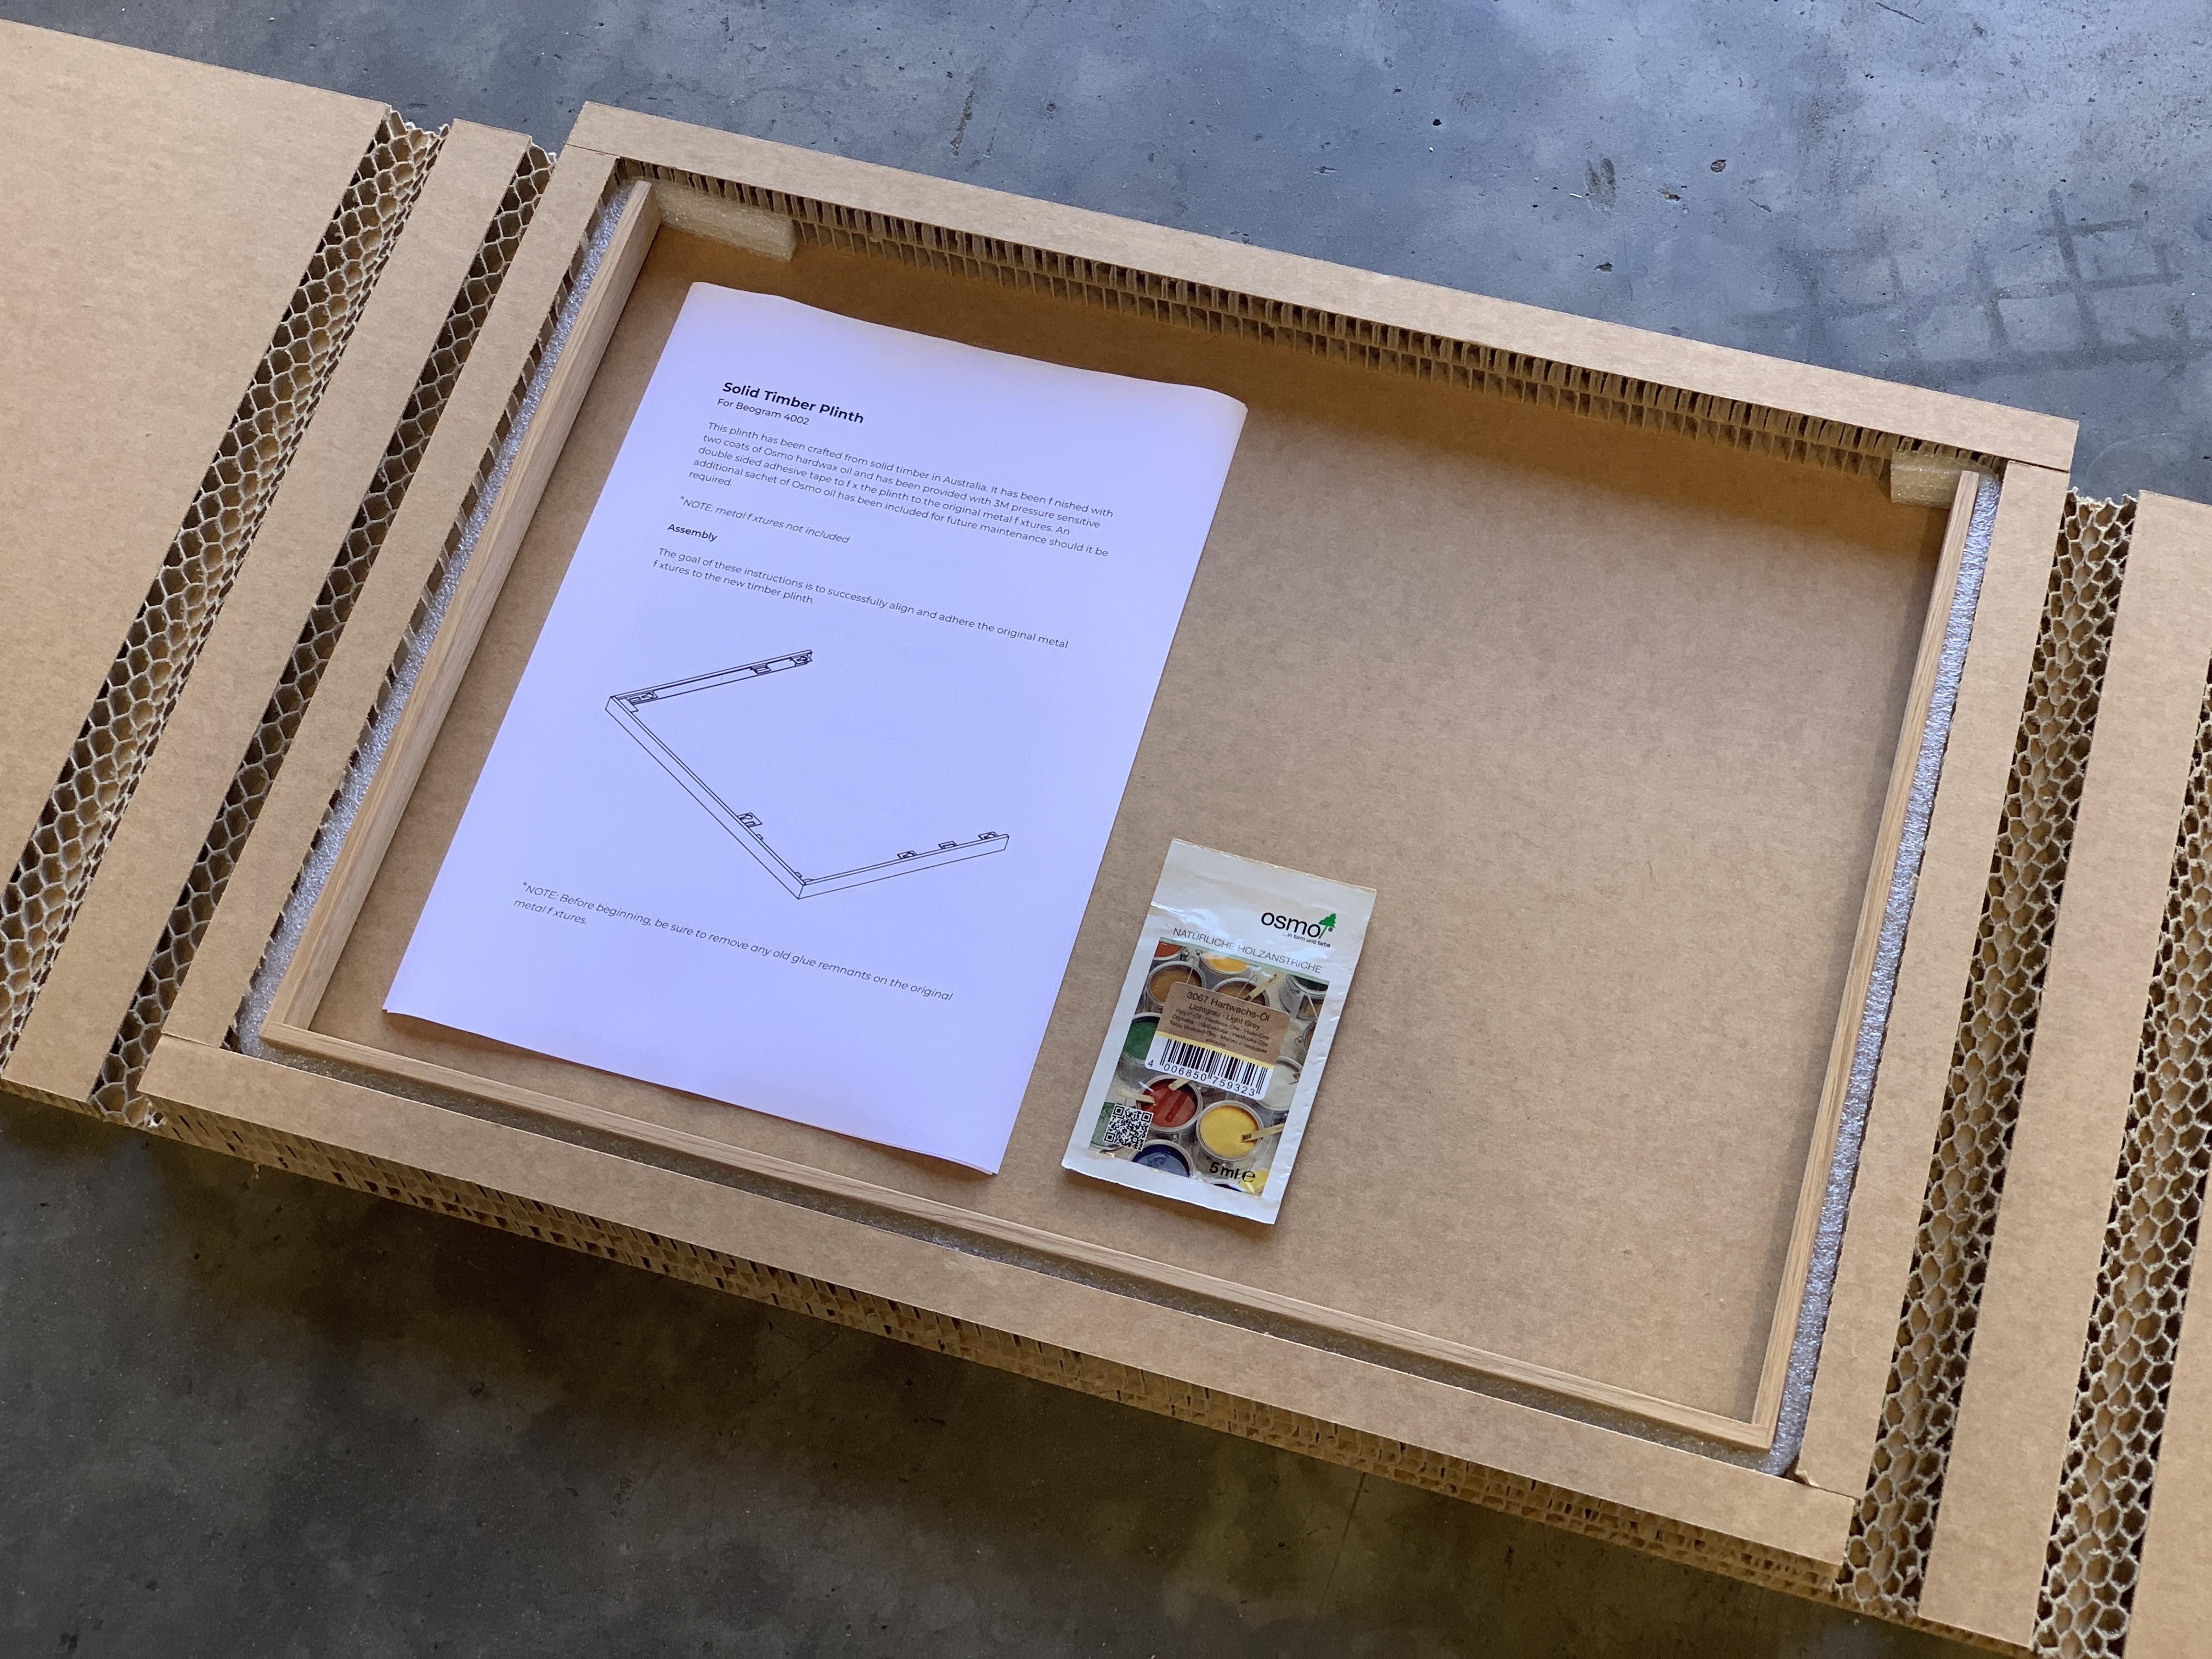
15 April 2024 at 09:49 #53992ChristianHakBRONZE MemberAfter a few people have shown interest in the timber plinths, I’ve decided to make them available to others to buy.
I spent some time researching and working out a way to send such a fragile piece, and I think I have found a good solution. I will custom make the boxes which should be able to withstand international shipping. The aim was to make a box that doesn’t compress or twist and which weighs less than 1kg in total to make shipping more affordable.
The plinths will be made to order, in solid timber, and come with 3M industrial strength double sided adhesive tape, instructions on how to fix the plinth to the metal fixtures, and a spare sachet of hardwax oil finish for future maintenance.
I currently have access to oak, walnut, ash, maple and cherry, but depending on demand, I could possibly source mahogany, teak and potentially rosewood (Brazilian rosewood seems almost impossible to get, but Indian rosewood might be an acceptable alternative).
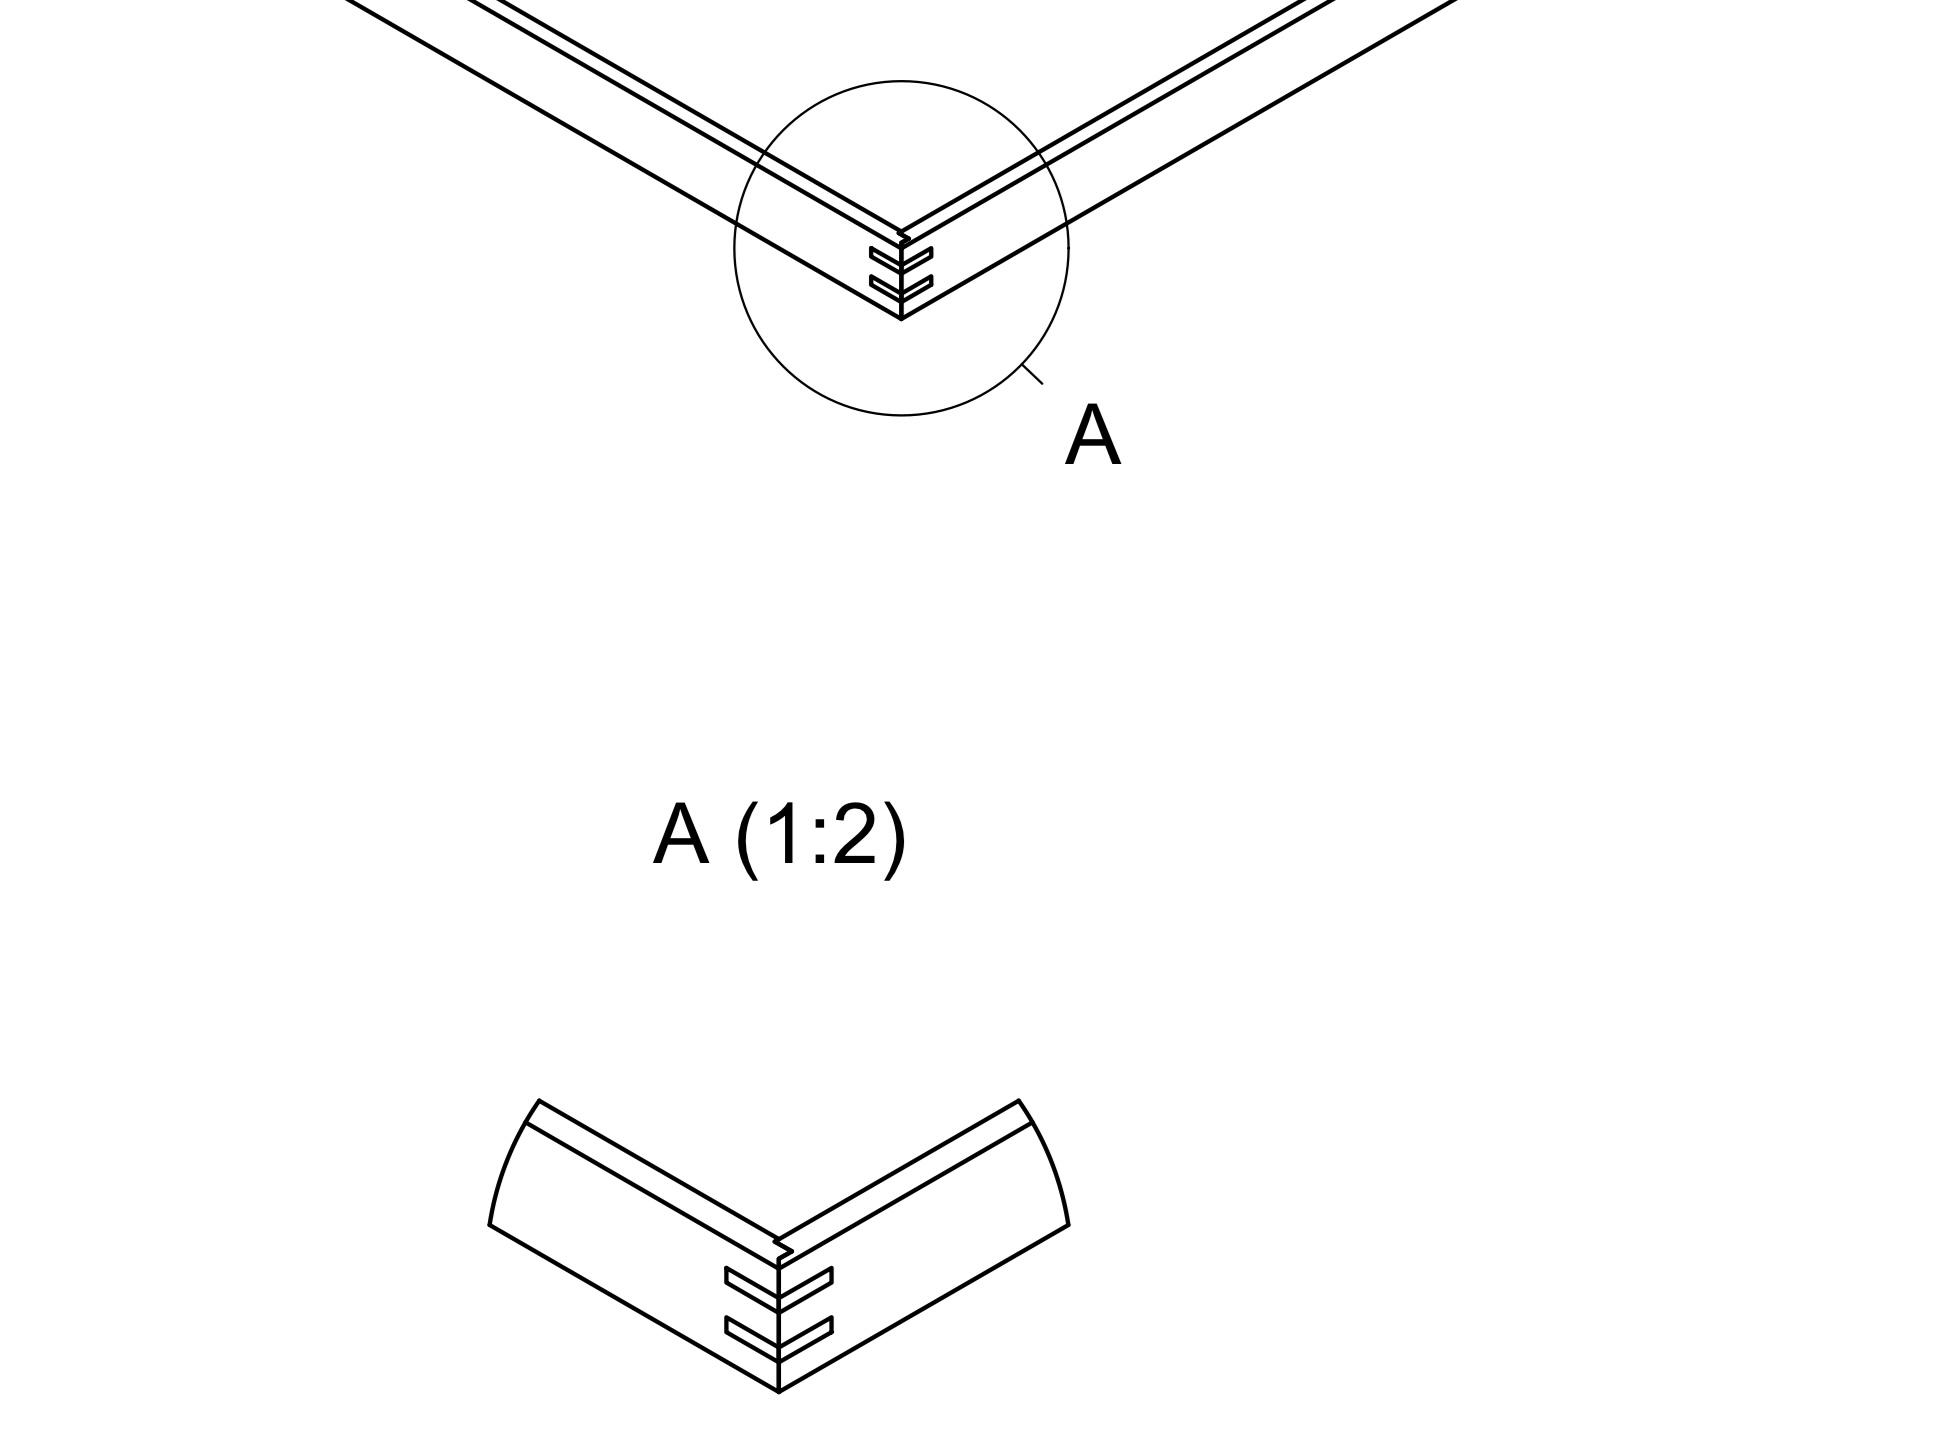
I will offer two different joints; the classic joinery as per the original plinths, or the Beogram 4000c joinery which is slightly different and has splines.
Currently I will use Osmo hardwax oil to finish the timber, but am open to UV stable lacquer, soaped finish, and other finishes if requested.
15 April 2024 at 09:53 #53993ChristianHakBRONZE MemberThis is a detail diagram of the classic joint.

And this is the 4000c joinery. Note, this joint has an extra rebate as well as splines.
 15 April 2024 at 10:19 #53994ChristianHakBRONZE Member
Let me know if you have any questions or suggestions!
15 April 2024 at 14:15 #53995etype76BRONZE MemberNice work! You’ve clearly put a lot of thought into not only the plinth and wood choices but also the practicality of shipping them around the world. It would be useful if you could show sample wood grains/colours etc. When my 4000 has been working a while without issue 🙂 I’d be interested if they are also compatible with the 4000.
15 April 2024 at 15:21 #53996DillenModeratorVery nice indeed.
For shipping considerations, it would also be good to know where you ship from.Martin
15 April 2024 at 17:18 #53997Hi ChristianHak, also that honeycomb pack is very nicely made! Respect.
Now I need to find a bad BG4002 :-). Johan
Location: Netherlands
My B&O Icons:
15 April 2024 at 18:20 #53998GlitchBRONZE MemberI spent some time researching and working out a way to send such a fragile piece, and I think I have found a good solution. I will custom make the boxes which should be able to withstand international shipping. The aim was to make a box that doesn’t compress or twist and which weighs less than 1kg in total to make shipping more affordable.
I like the box. Very neat. A minor improvement would be to add some support between the ends of the “U” (i.e. make it structurally more like an “O”). This would reduce the chance that the plinth breaks due to its own mass during a hard impact.
I’m always a bit surprised by how brutal shipping can be. When I pack something for shipping, I imagine it being dropped off a moving vehicle, then sat on by a toddler. 😉
Glitch
15 April 2024 at 20:46 #53999ChristianHakBRONZE MemberIt would be useful if you could show sample wood grains/colours etc. When my 4000 has been working a while without issue ? I’d be interested if they are also compatible with the 4000.
I’ll put together some samples of the different timber options.
I’ll be making plinths for both the 4000 and the 4002. From my understanding they are slightly different lengths. Would you mind measuring the outside lengths on the front and side of your 4000? I don’t currently have a 4000 on hand to measure. Thanks!
-
AuthorPosts


- You must be logged in to reply to this topic.