


Home › Forums › General Discussion & Questions › General Discussion & Questions › 3 out of 4 Beolab 8000 not working anymore
Tagged: #BEOLAB8000
- This topic has 9 replies, 3 voices, and was last updated 1 year ago by

-
AuthorPosts
-
10 February 2025 at 13:11 #63663
 Nicolaas DekkerBRONZE Member
I have 4 Beolab 8000 since 1994. I have them connected to the RCA connector and that worked fine for years. 3 of them stopped working. i never threw them away as i like them so much. I also read about the foam I opened one and saw the foam problem. I can throw them away or try to save them. As i have 3 not working i think they all have the same problem. Maybe someone here has an idea what the problem can be. if that can be repaired then i can clean them and buy the new foam for them.
i looked on you tube and saw someone make little bridges with wire over the motherboard. i can see that the lines on mine are not fully intact anymore but i do get a signal.
As you probably already understand i am new here with small knowledge of this matter.
Just don´t want to throw them away just like that…..
Attachments:
You must be logged in to view attached files.10 February 2025 at 15:09 #63667Hi Nicolaas,
Good that you post here and share what you have already seen.
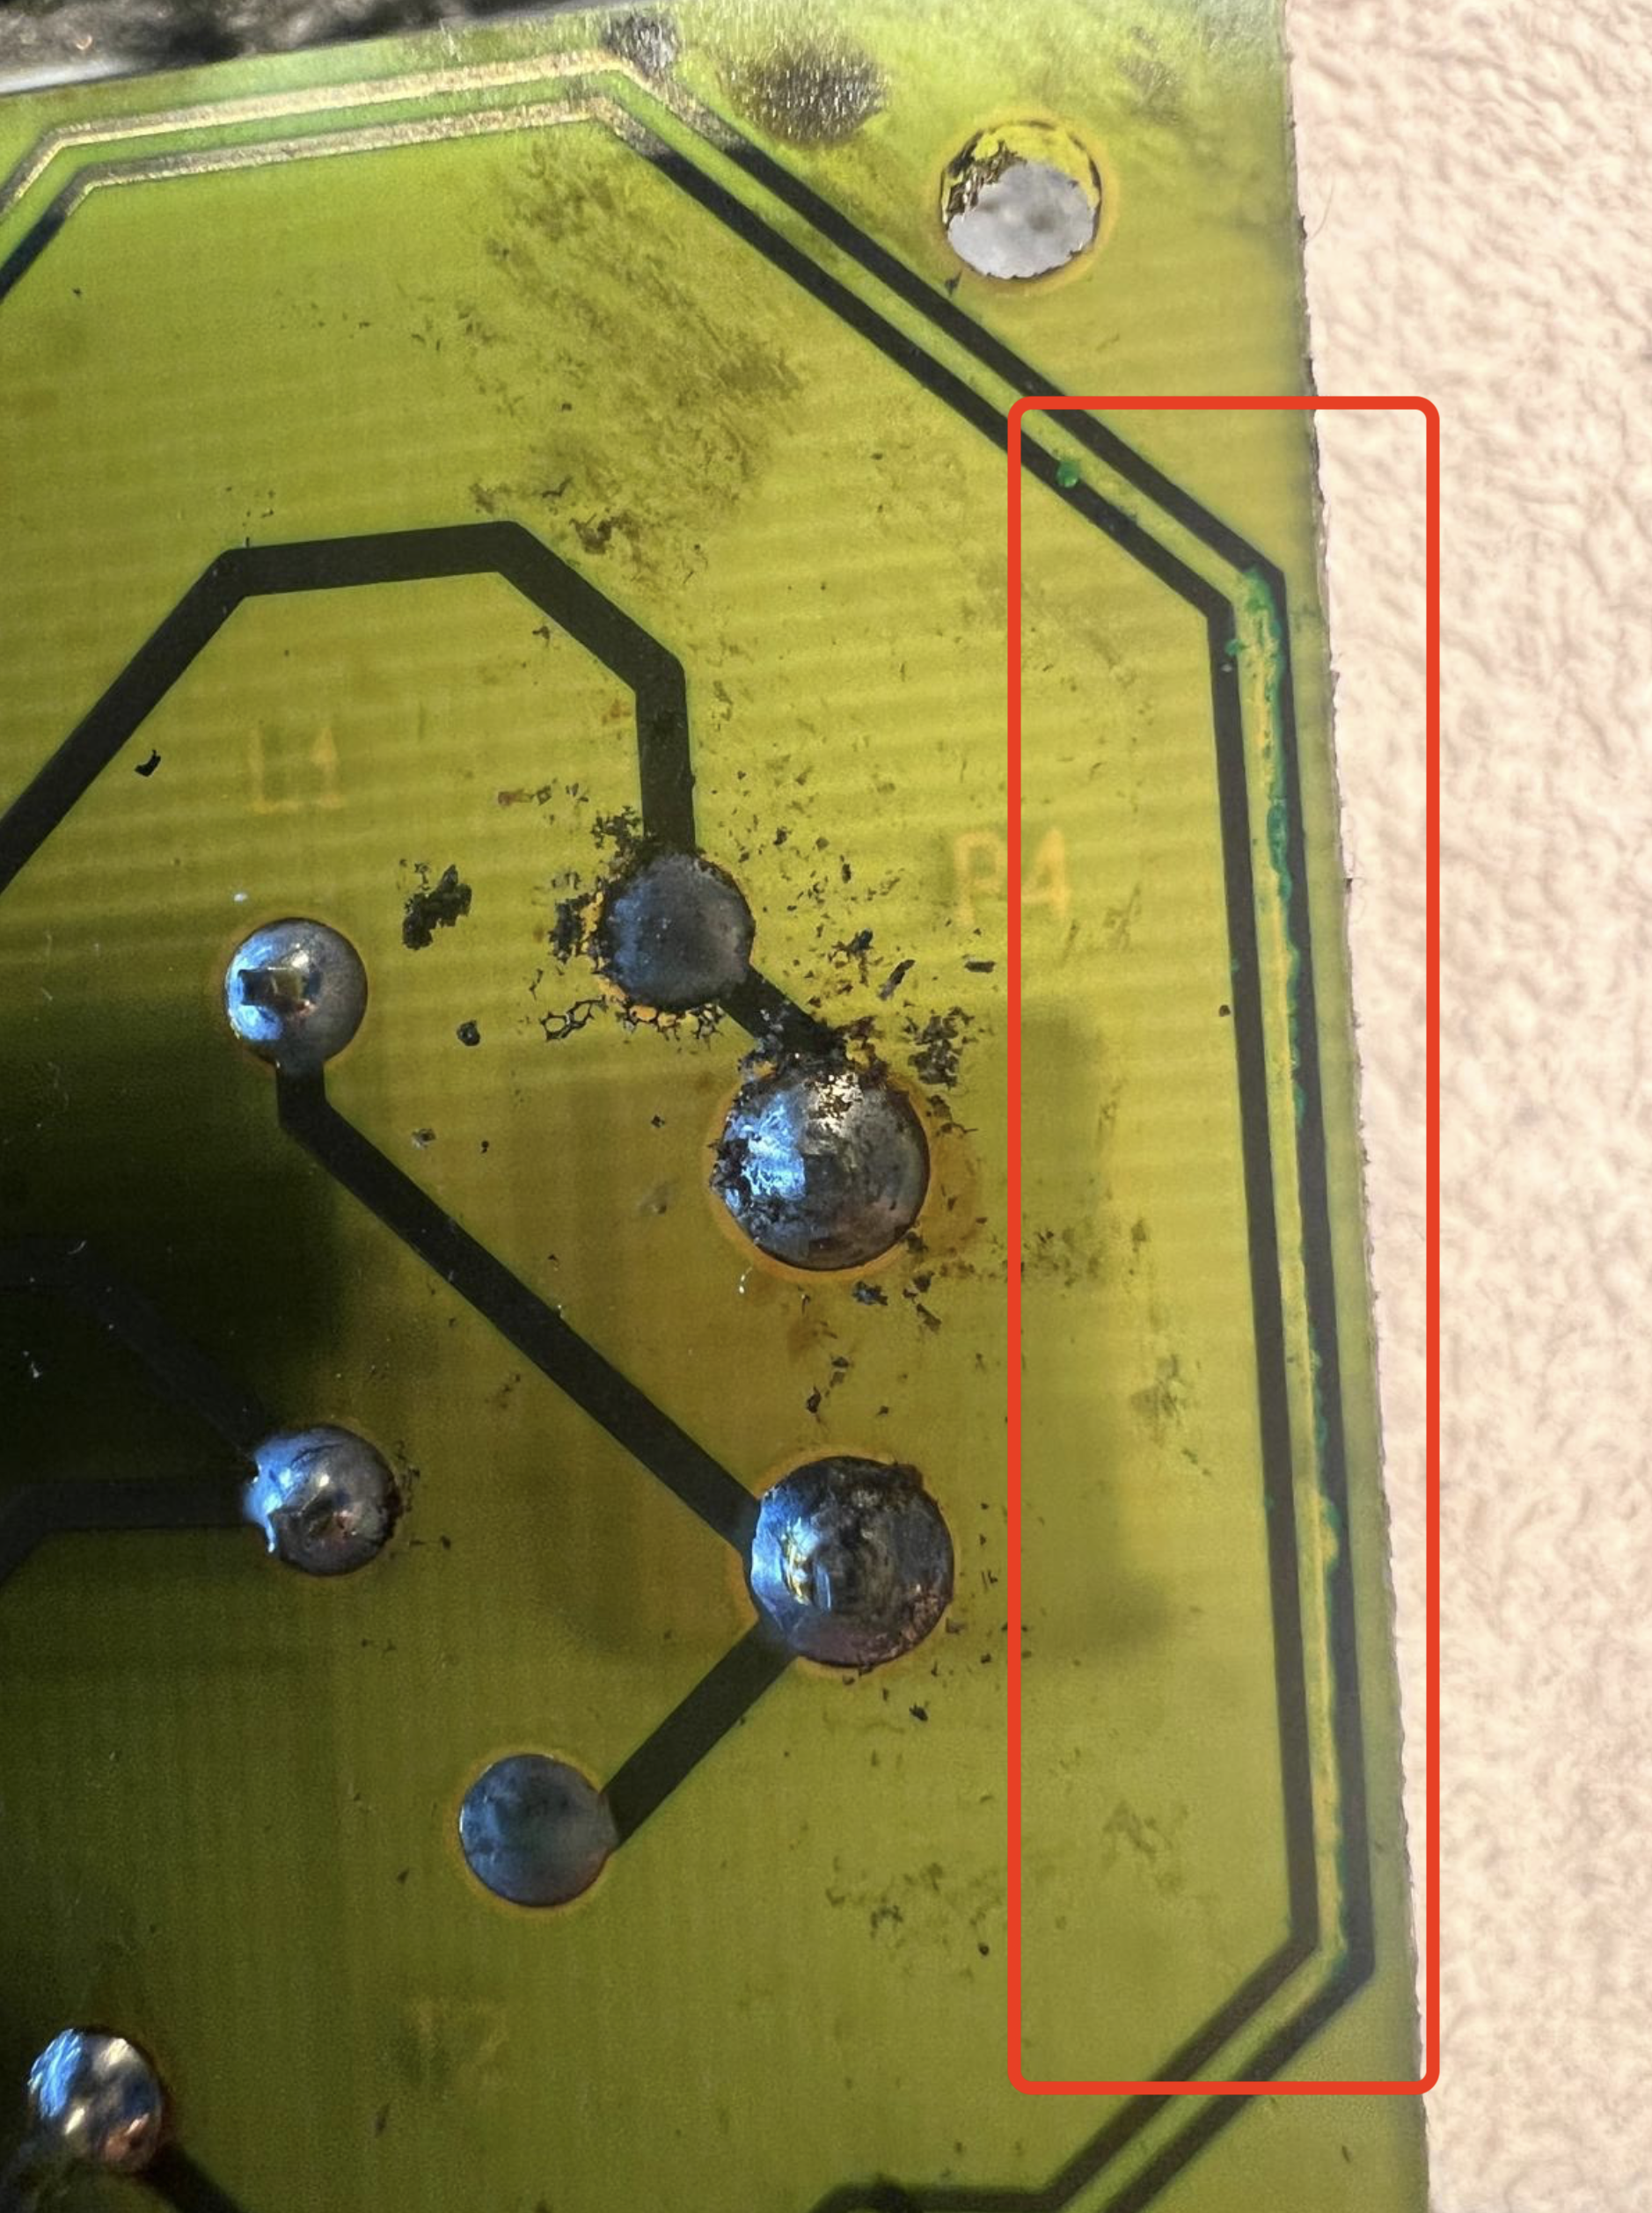
As I can see from your picture, the deteriorated foam has definitely done ‘its work’. Especially on the right side of your picture, one can see that the two copper tracks have been damaged. The foam ‘eats’ the tracks away (like bite marks in the traces), and this in many cases causes the Auto stand-by to not be activated or to switch back and forth continuously.

Here’s my suggestion
I t could be there are also other problems, but I would start with this.
- Remove the Amplifier & Power Supply panel from the alu casing. Do the same with the speaker panel. Be careful. The speaker panel has one cable and connector connected to the amplifier side. And the Amplifier/Power Supply has three cable connectors that connect to the botttom of the alu casing.
- Remove all the foam particles from all places where you see them. This can be a time consuming work, because it can be everywhere. Make sure you clean it away from PCB’s, connectors, components, … You can use isopropyl alcohol to get the sticky parts away.
- When done, create a bypass as shown in the picture underneath.

When this is all done, put all parts back in the alu casing and reconnect. Power up the BeoLab, put an audio signal to the PL or RCA input and check if the auto stand-by turns on.
Let us know the outcome.
By the way, are you Dutch?Location: The Netherlands
Favourite Product: BeoSound 9000
My B&O Icons:
 10 February 2025 at 15:43 #63670Nicolaas DekkerBRONZE Member
Hi !! Thanks for your quick reply !! is the alcohol you mention a special one ? i have 96 % from the pharmacia here. can i use that ?
Do you think that the damage on the lines you see in my pic can already make the speaker not work ? it also seemed like the rca connectors made a bad contact before the speakers went to complete silense. when i touched the rca plugs it sounded like the did not make a good contact.
I was searching for B&O and came on Marktplaats to the Beloab Penta speakers. i use to own 4 of them in the beginning of the 90ties and i think the seed has been planted to buy a set on markplaats in the future.
the active ones. Still remember the sounded great. I sold them with the house in those days……
And yes !! i am dutch. I live in the south of Spain since 2017.
Best regards !!
Nico
10 February 2025 at 16:07 #63673You are welcome Nicolaas!
We kunnen dit ook in het Nederlands voortzetten, but for the B&O community we’ll continue in English.Isopropyl: yes, if you have the 96% alcohol from the pharmacy, it will do. For some parts of the cleaning I dip earths in the alcohol to rub the foam dirt away. For the surface of PCB’s (printplaten) ~I dip a small (soft) toothbrush in the alcohol and gently brush the PCB.
Yes, this type of damage on the copper traces can already cause the malfunction.
If you experience bad contact of the RCA connector, I would check this:
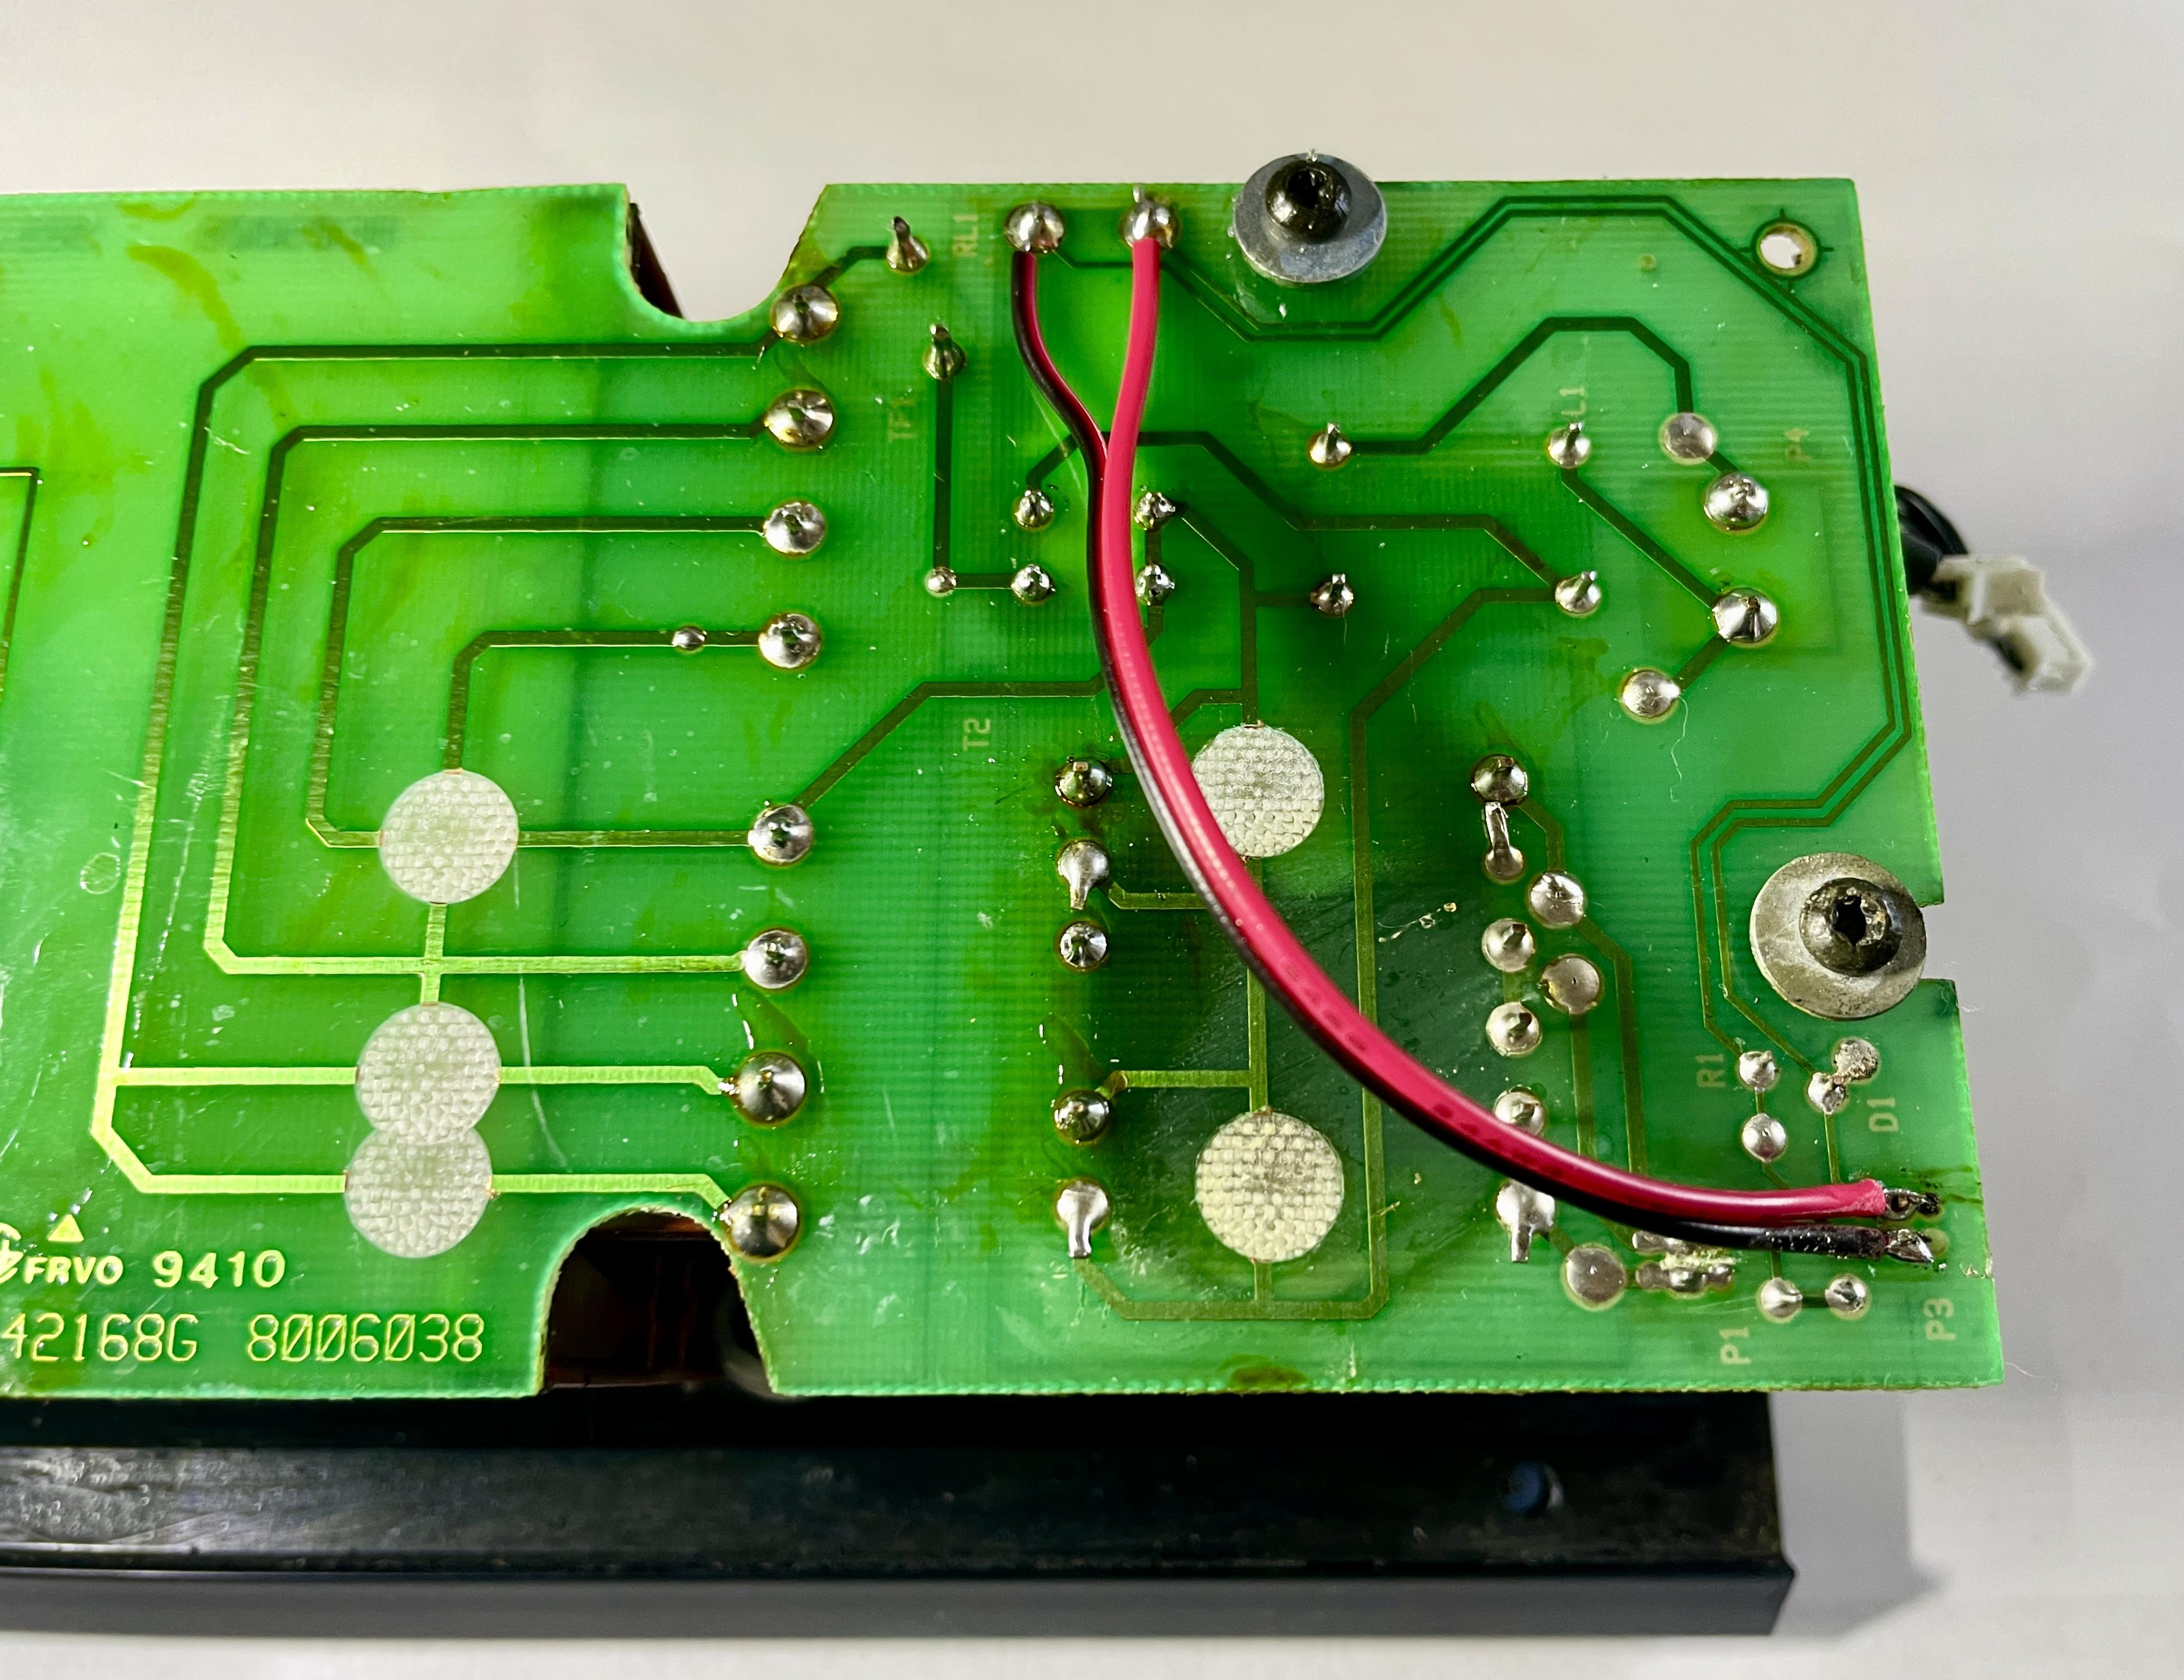
- The RCA connector has a flat nut on the bottom side of PCB05 (see picture). You will have to remove the cone cover on the top/point of the foot to get access. If you get there, check if the nut is still tight.
- What I have also seen, is that the foam dirt was sitting on PCB06 (see picture). This PCB connects PCB05 and all electronics inside the alu casing. It therefore also influences the auto stand-by function. So check if this one is dirty too and clean it if necessary.

BeoLab Penta; yes they are great!
Location: The Netherlands
Favourite Product: BeoSound 9000
My B&O Icons:
10 February 2025 at 16:16 #63675Nicolaas DekkerBRONZE MemberThanks again !! going to try it now or tonight !!
Will keep you informed !!
10 February 2025 at 18:34 #63676Nicolaas DekkerBRONZE MemberYes it works !!
Thanks for your help !!
i am going to clean this one and order the sets of foam for the inside.
I saw them online as sets. i also saw a long thread about it with you in it. Do you know where to get te good one for the best price ?
10 February 2025 at 18:43 #63677Nicolaas DekkerBRONZE MemberDo you know if the Beolab MK2 also have the wrong foam ?
10 February 2025 at 19:03 #63678Congratulations, great this solves your issue!
BeoLab MK II does not have the ‘foam rot’ issue. BeoLab MK II is serial number 1699 2475 and up.
BeoLab MK I ‘younger’ serial numbers also have the newer (white) foam. I am not sure from which serial number onwards B&O started using the newer foam. But I think they started somewhere 16xx xxxx.
Location: The Netherlands
Favourite Product: BeoSound 9000
My B&O Icons:
12 February 2025 at 22:53 #63750LeHeBRONZE MemberTo get the last serial numbers more accurately.
My BeoLab Mk1 serial numbers 1547 xxxx have already the newer (white) foam in the housing and under the amplifier print.
The other like sealing tape for the housing and the wiring harness protection are still fitted with the old sticky black insulation strips.
My B&O Icons:
13 February 2025 at 12:20 #63770I just looked back in my logs. I found:
- 1477 xxx with the old foam
- 1486 xxx with the new foam
So probably it changed somewhere between them.
Location: The Netherlands
Favourite Product: BeoSound 9000
My B&O Icons:
-
AuthorPosts


- You must be logged in to reply to this topic.