


Home › Forums › Product Discussion & Questions › BeoCom › Beocom 2 Repair
- This topic has 39 replies, 6 voices, and was last updated 10 months, 4 weeks ago by
 Manfred Hans.
-
AuthorPosts
-
14 June 2024 at 17:30 #56488
 Moderator
As described briefly in the ‘What are you working on now’ thread I have recently purchased a spares or repair BeoCom2 to have a play with. Despite a charged battery, the display would just show random lines on switch on, and then shutdown. I stripped it down making use of a blurry YouTube video here.
Here’s the stripped down phone again. It burst into life after I disconnected and re-connected the ribbon connector for the display (a technique that I have used on Beocom 6000s, albeit with a different different connector). It connected to my PSTN without problem, and I could use the usual functions:
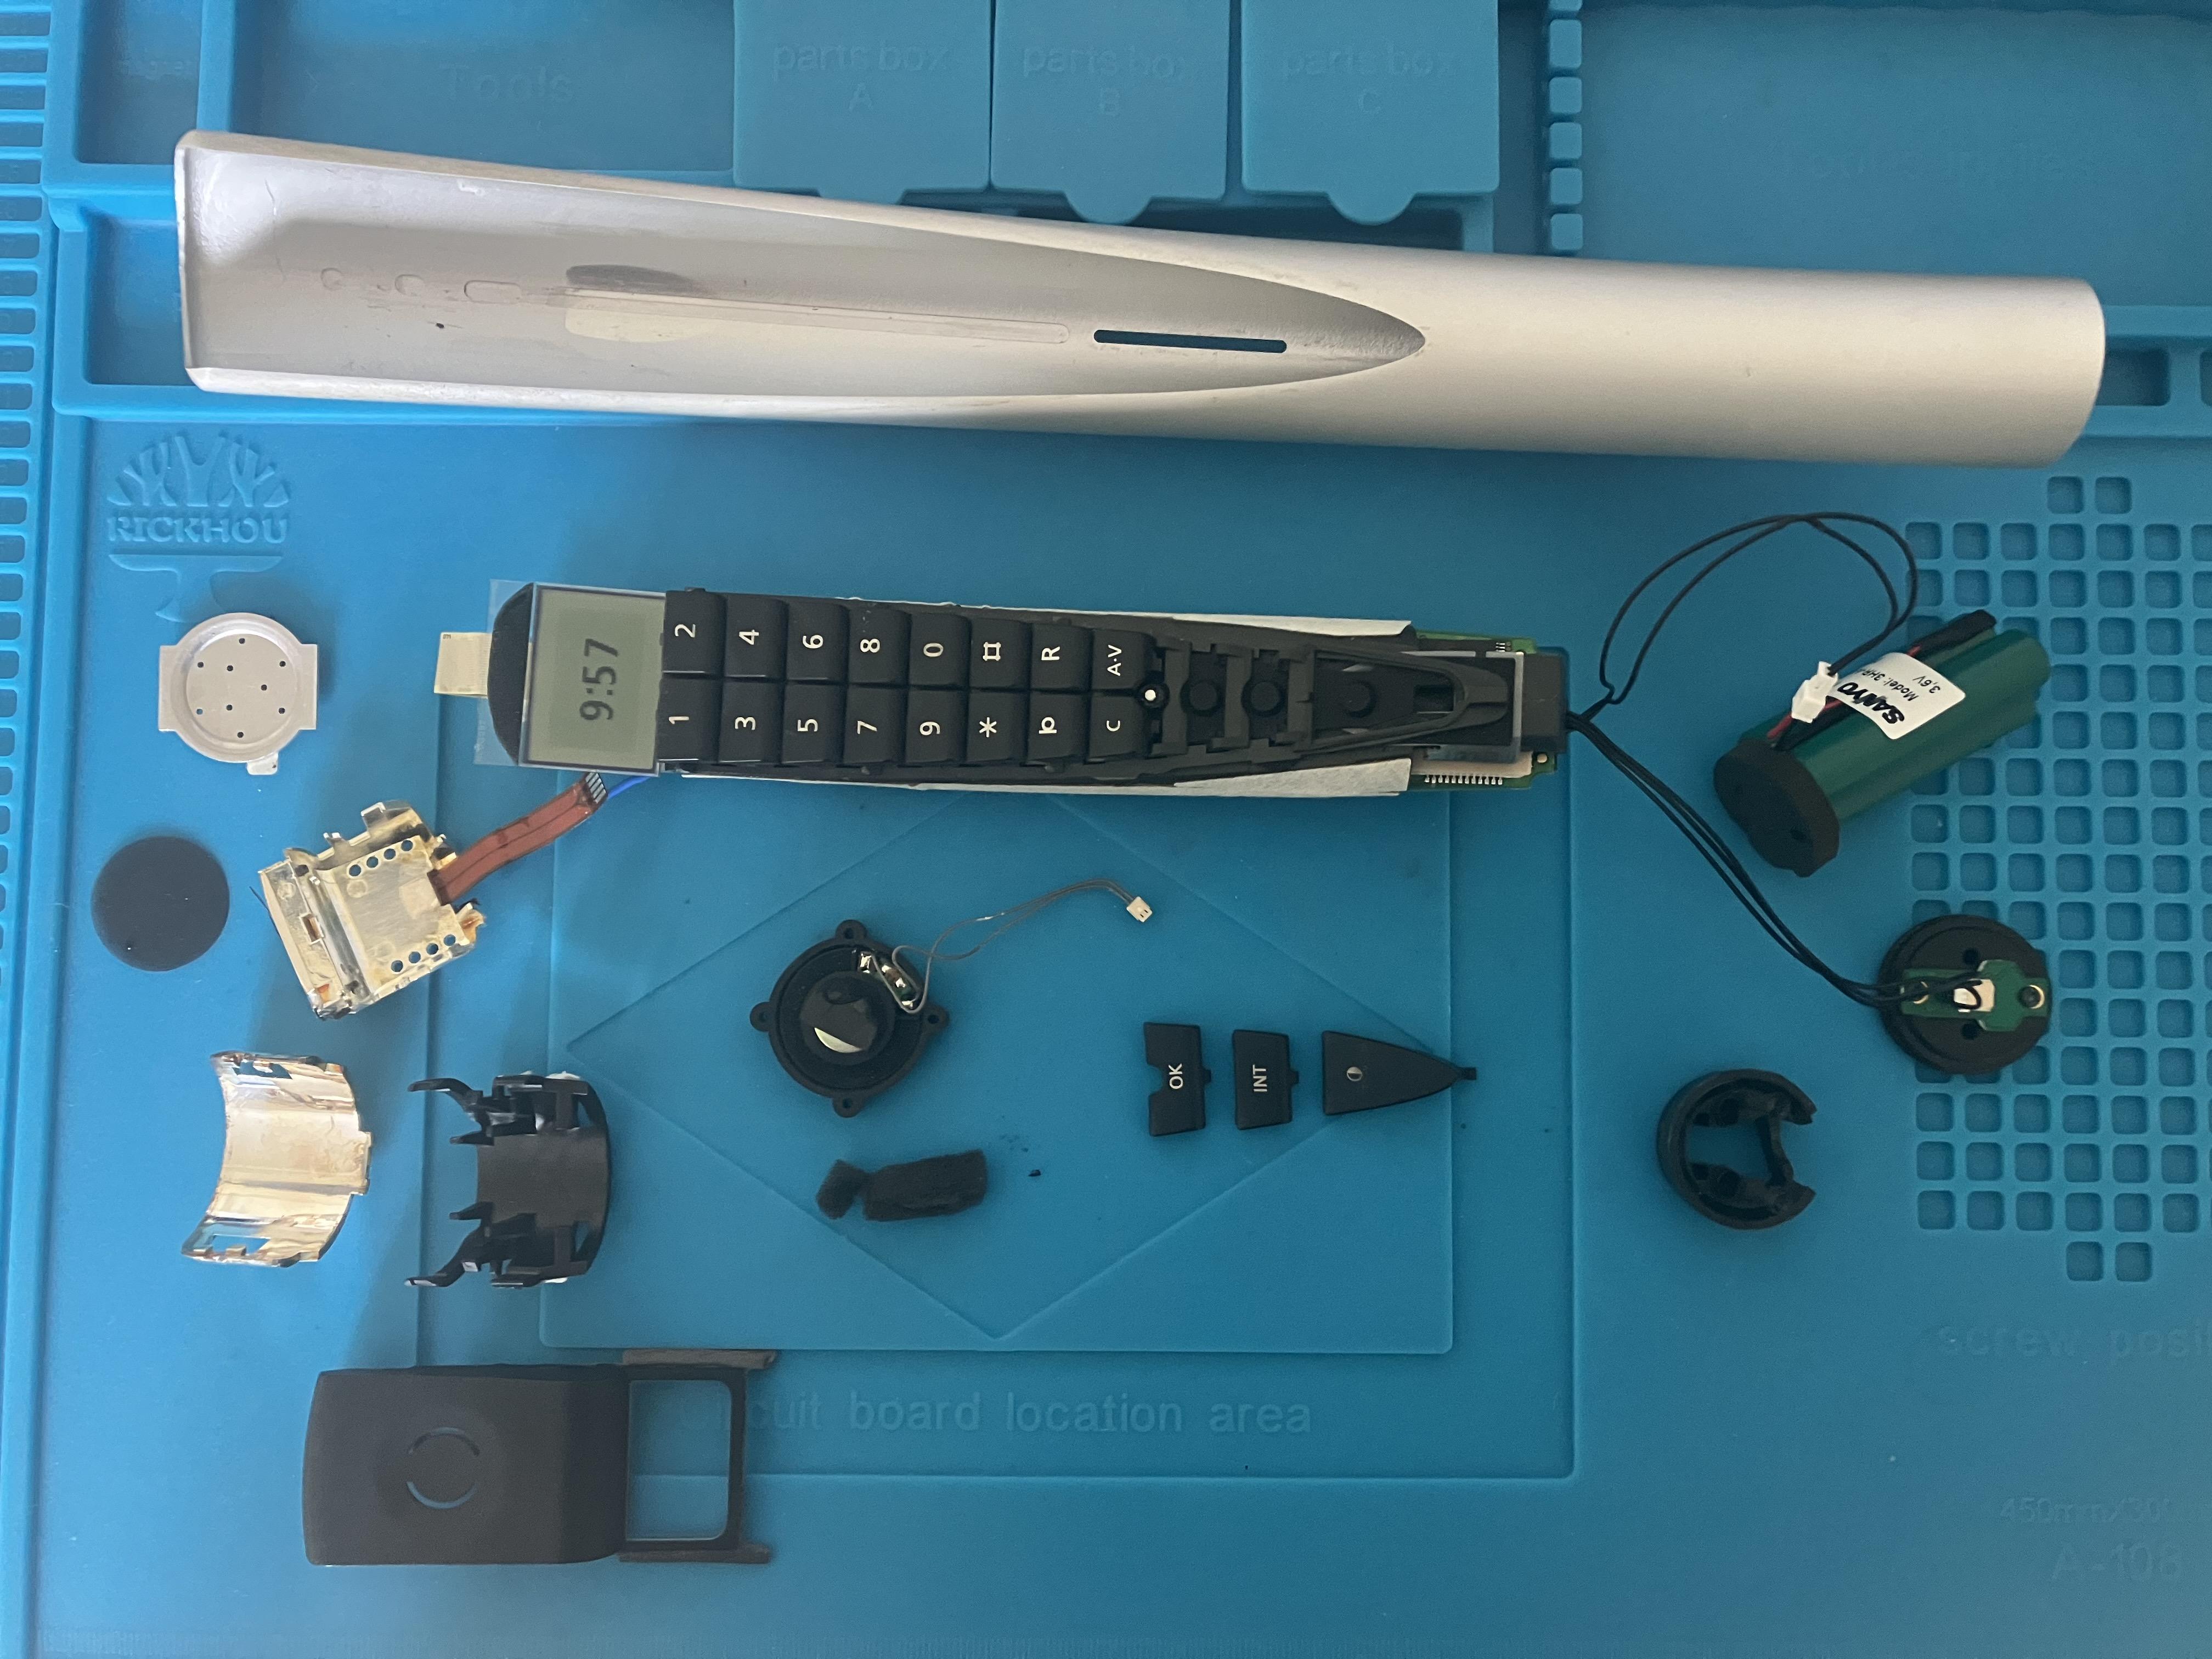
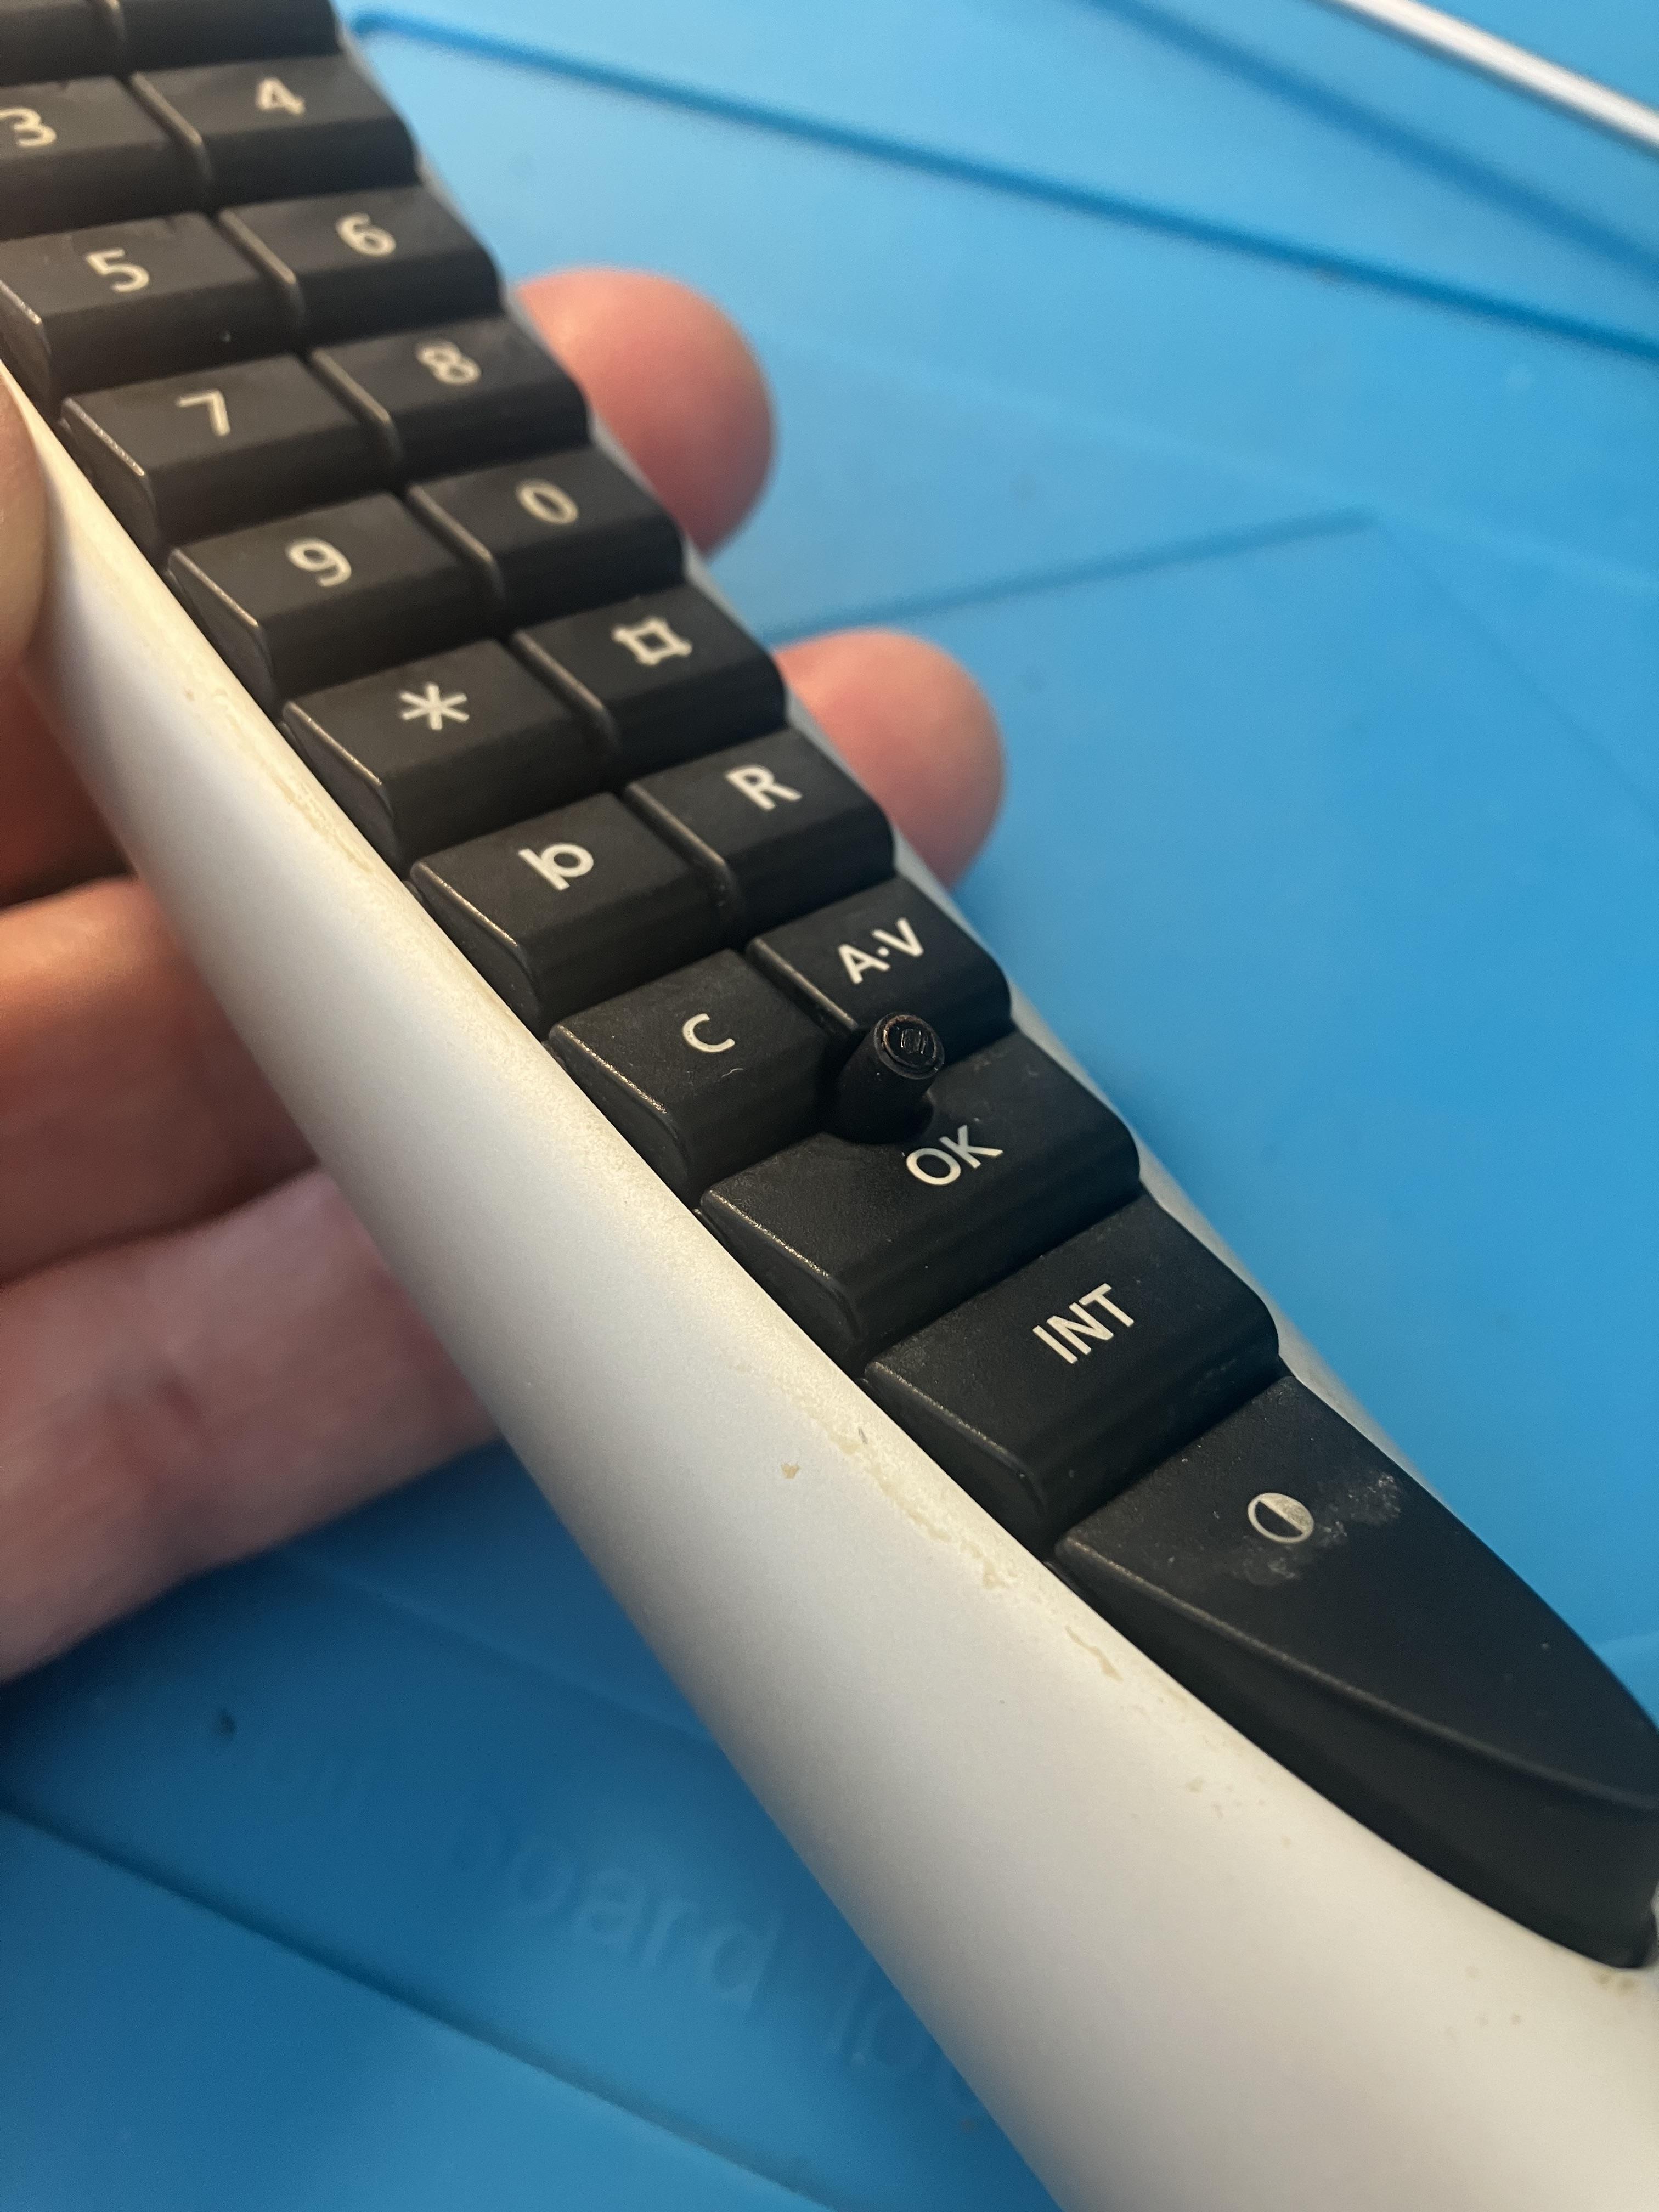
However, as seems common with these phones the little ‘nipple’ scroll button had snapped off, hence I was having to use a small screwdriver to move the pointer – not ideal. I therefore stripped it down further, removing the keyboard.
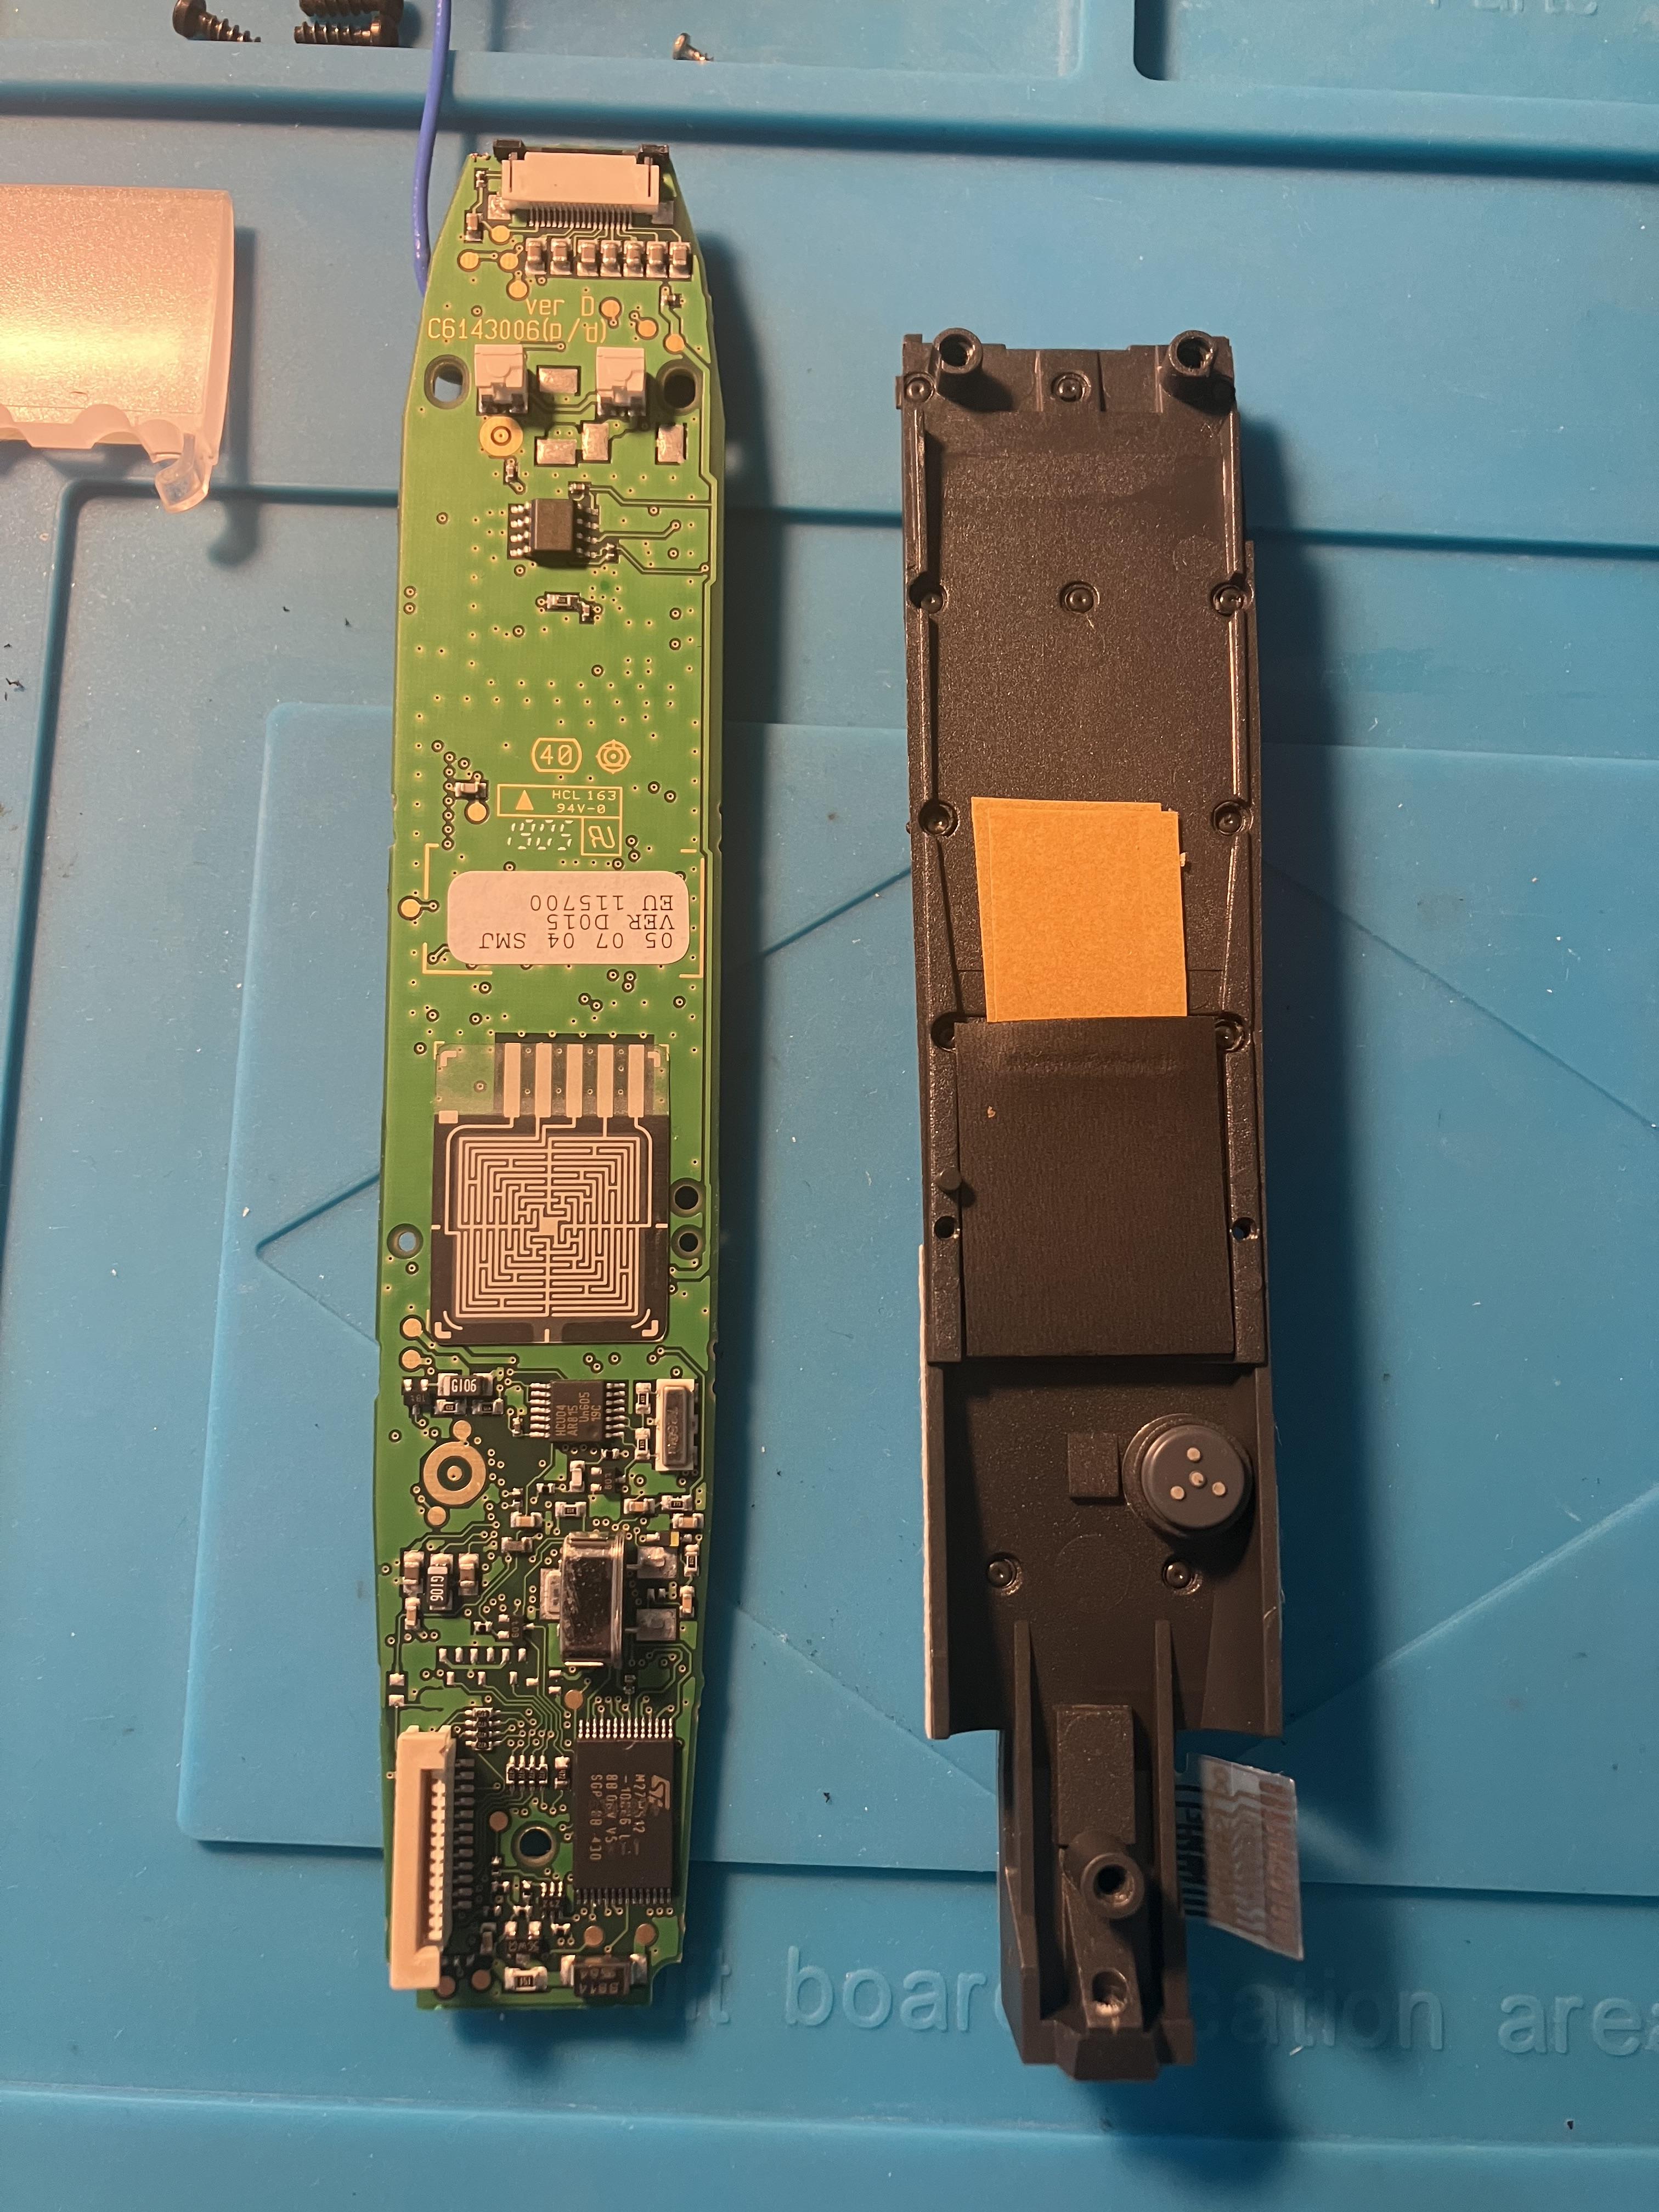
The photo shows the main PCB and the reverse of the keypad. I realised that the pointer is not part of the keypad, but uses a small plastic disc with extension to press a conductive sheet against the small square array on the main PCB. Here’s the sheet held up to reveal the hole, with the broken pointer to the left:

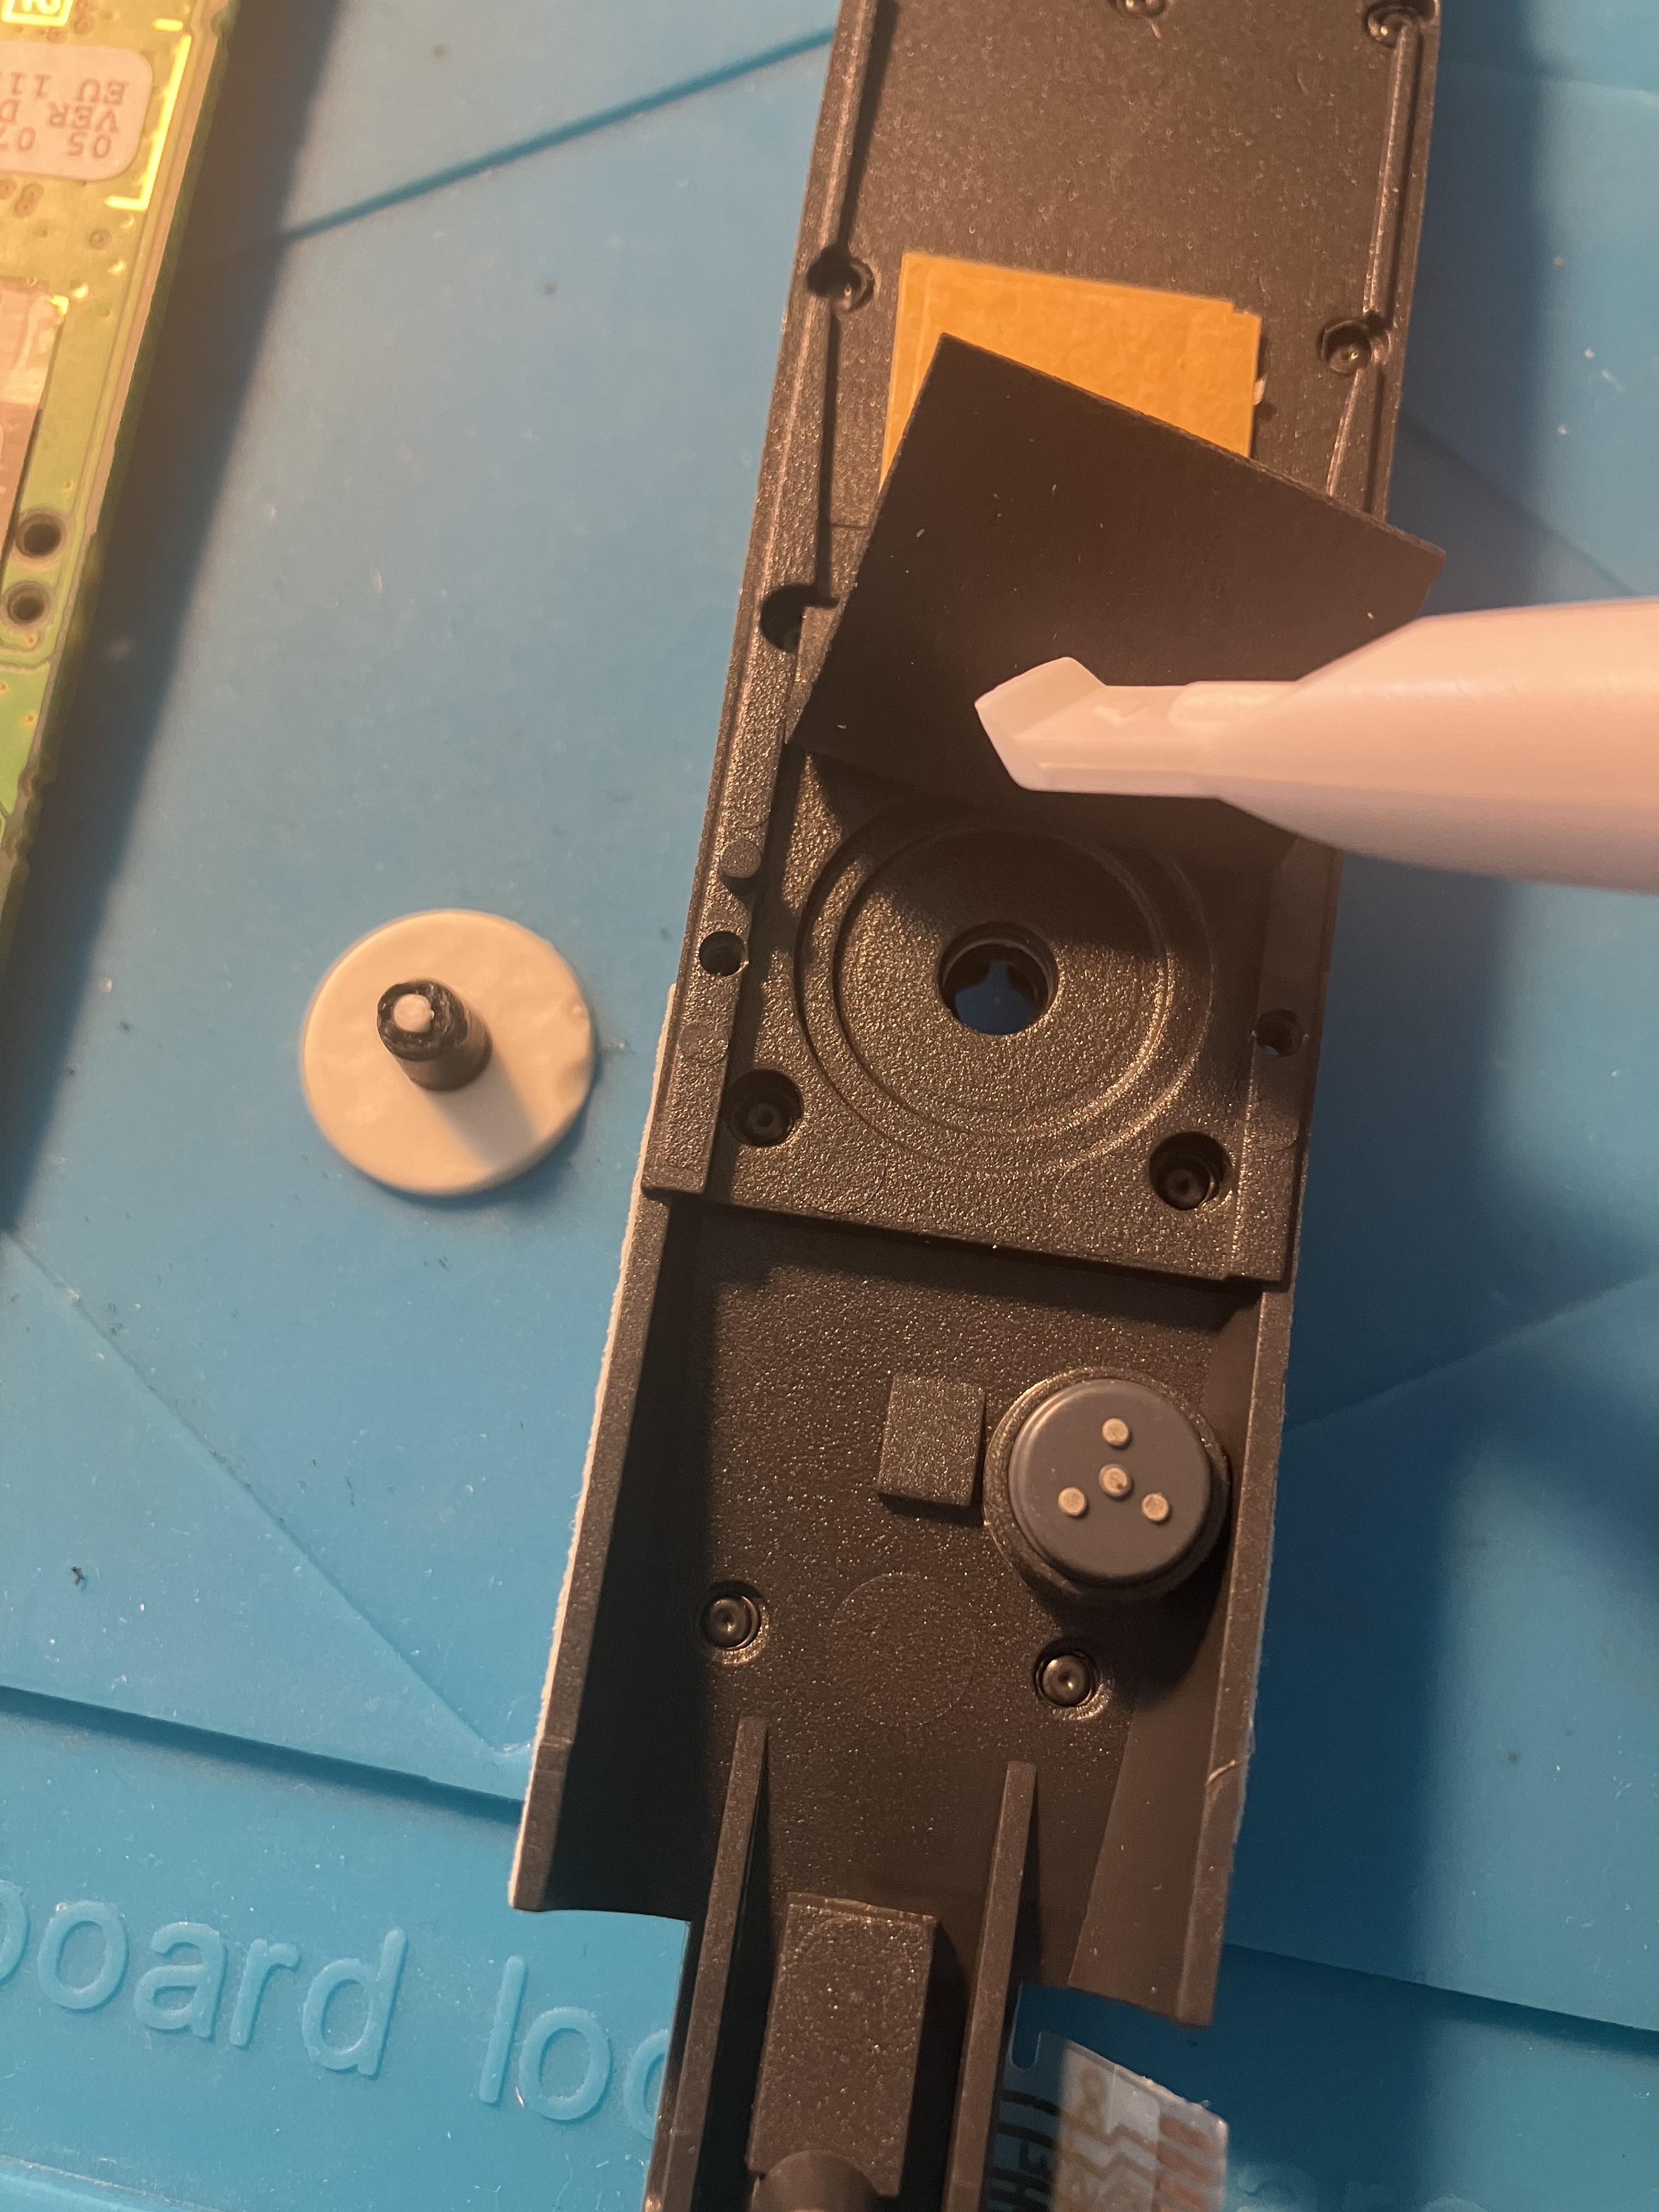
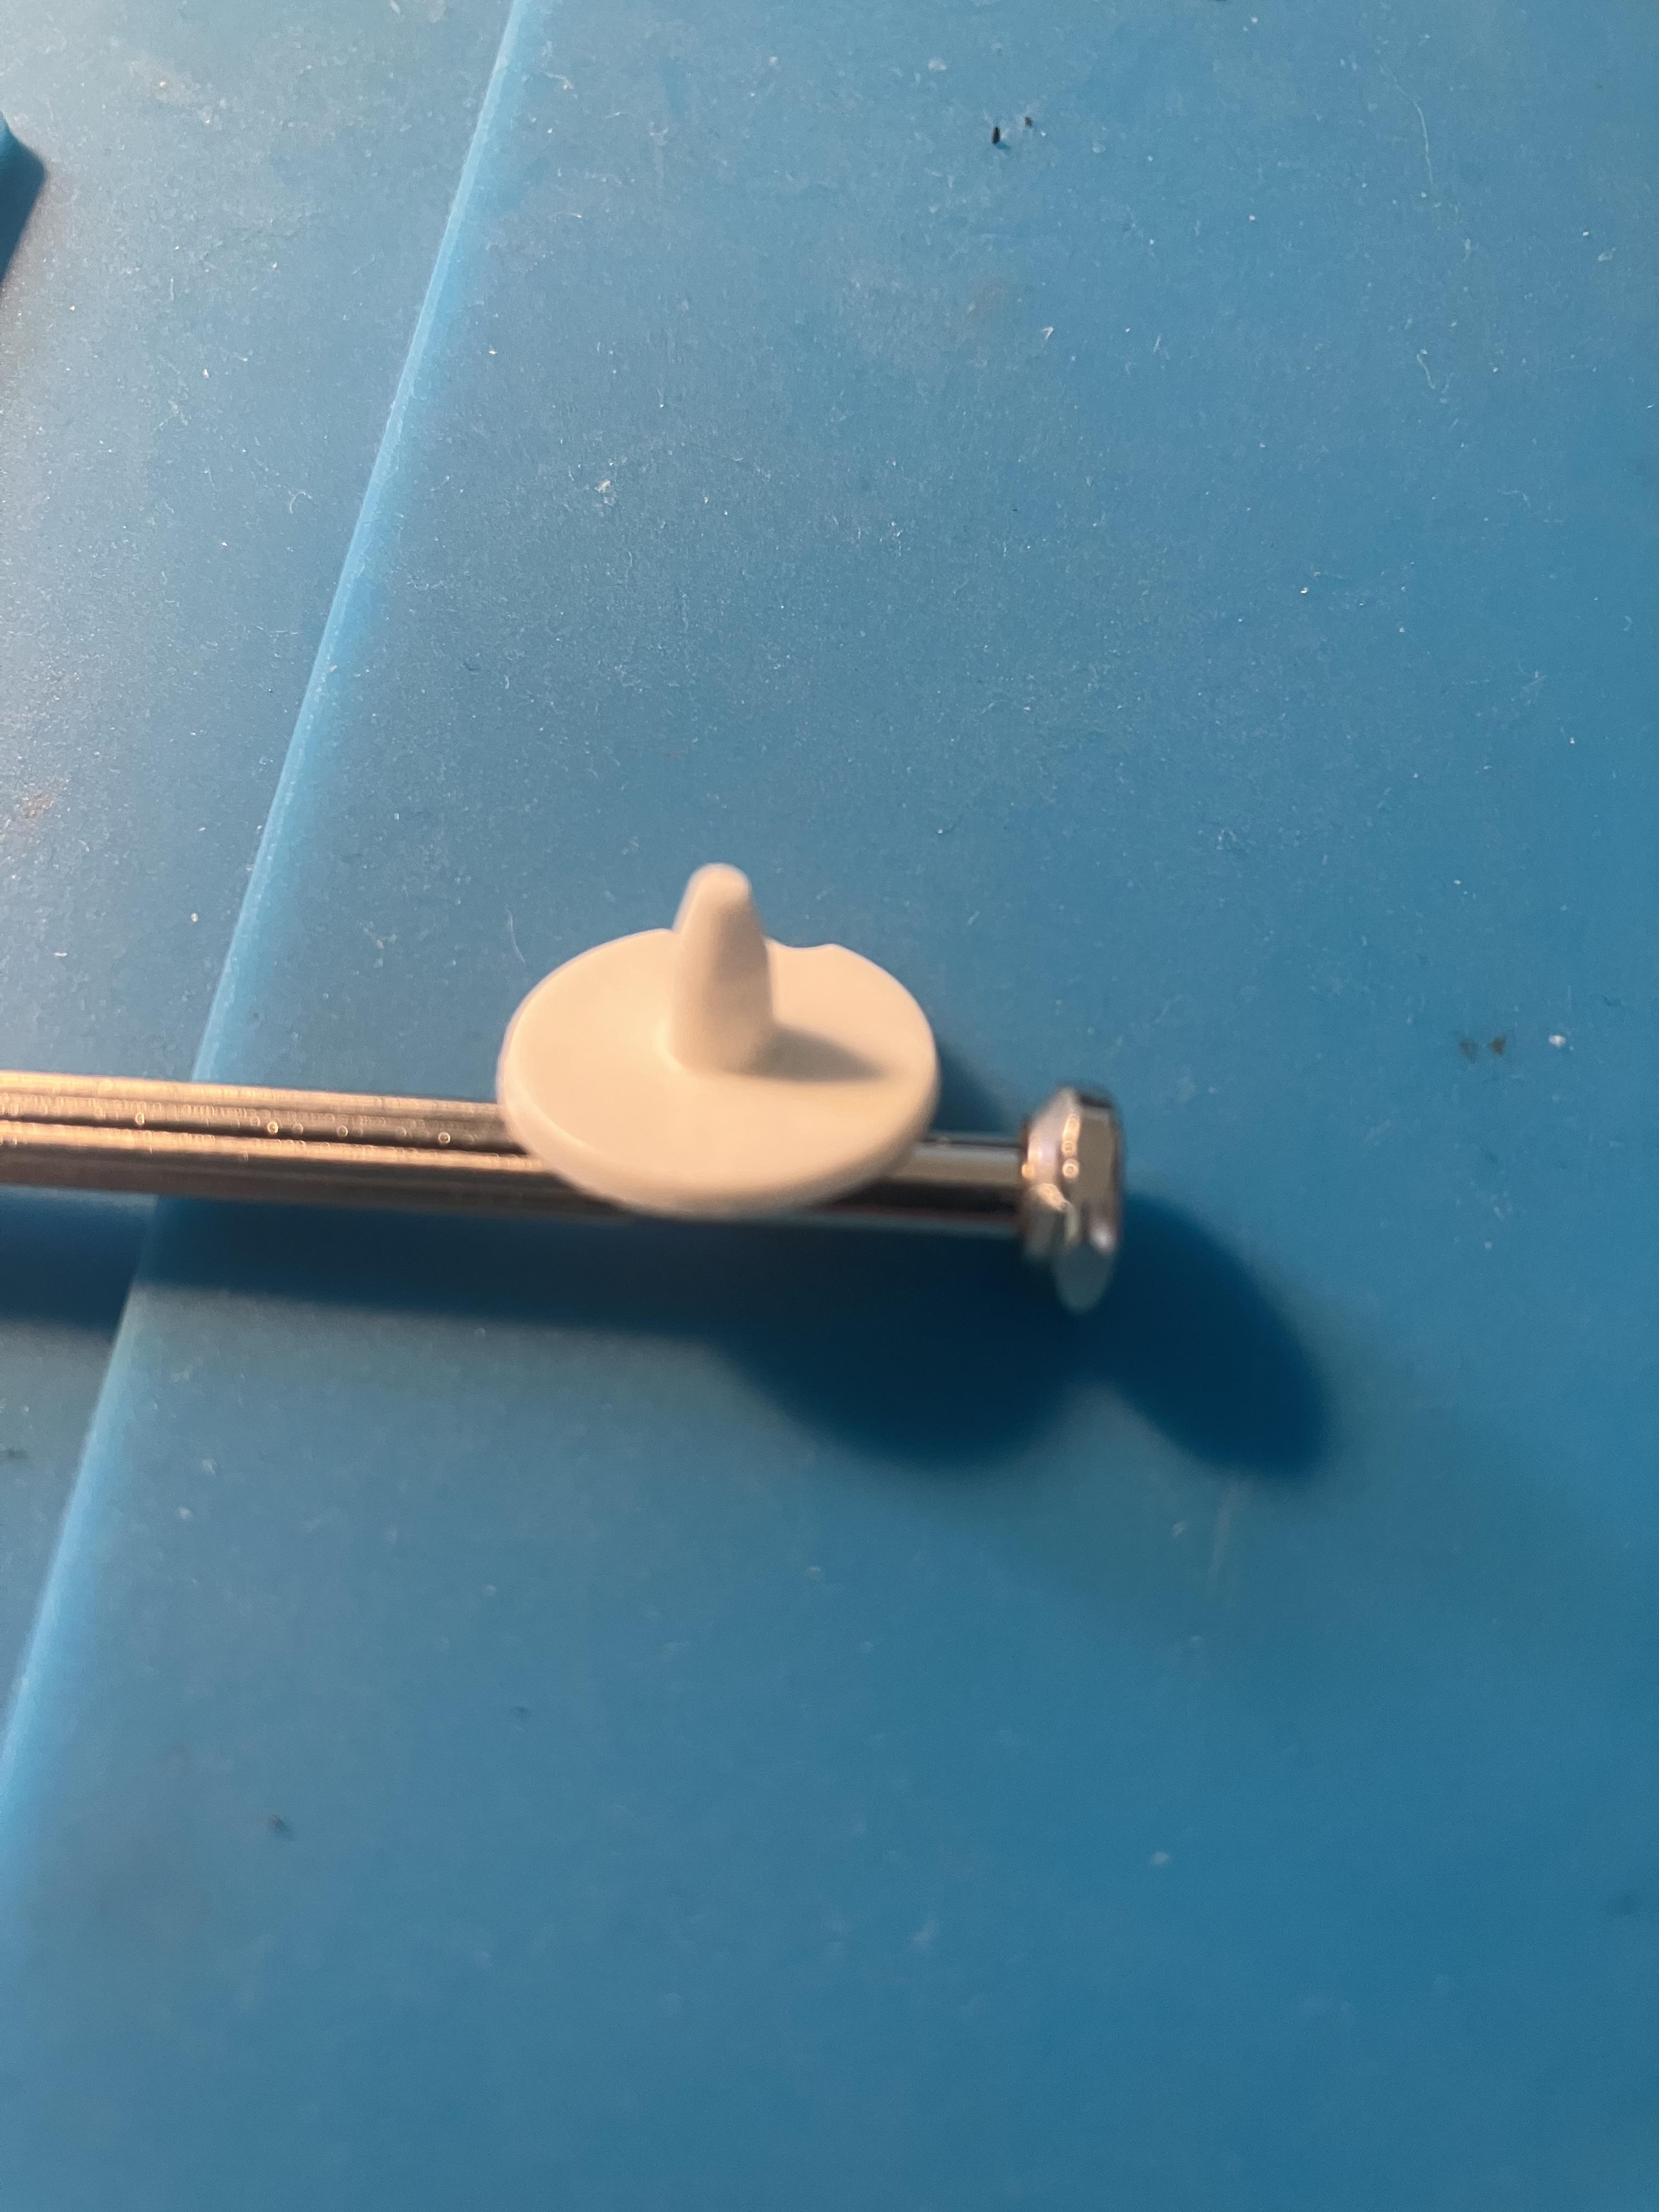
I stripped the remaining perished black plastic from the pointer, to reveal this:
I then used a small (12mm long) piece of heat shrink tubing that fitted tightly over the white plastic, and added part of the shaft from a small back plastic bolt to give it some rigidity. I heated slightly to shrink the rubber and hold the black plastic thread in place at the top. I didn’t heat shrink onto the white plastic because friction seems to be sufficient.
I re-assembled (almost as tricky as dismantling!) and it all works! Tested by scrolling through menus and adjusting volume on BeoSound 1. The pointer is a fraction too long but I could probably make a shorter one and replace without disassembly.
Needs a good clean now, and I may even invest in a new battery so that I don’t have to keep charging after each stage of repair!
As always, happy to answer questions.
Location: Warwickshire, UK
My B&O Icons:
 15 June 2024 at 06:29 #56508
 Valve1GOLD Member
Nice work Guy, I have a few of these waiting for a winter project.
My B&O Icons:
15 June 2024 at 12:15 #56512Nice work Guy, I have a few of these waiting for a winter project.
Many thanks. I have just ordered a new battery, and I may drop AVA Services an email to see if they stock any Beocom 2 spares – it would be good to get the proper track/point joystick if it’s still stocked. I will report back here if they have it.
Location: Warwickshire, UK
My B&O Icons:
2 July 2024 at 10:40 #57137This arrived in the post today!

Location: Warwickshire, UK
My B&O Icons:
18 July 2024 at 13:55 #57492Manfred HansBRONZE MemberHello Guy! Nice work. Please can you explain how you got the display cover off? And with which tool without breaking anything? How many brackets does this plastic part have? I have two handpieces here with broken displays. Maybe the plugging and unplugging trick will work for me too. Thanks Manfred from Germany
Signature: "Be excellent to each other!" Bill S. Preston and Ted "Theodore" Logan
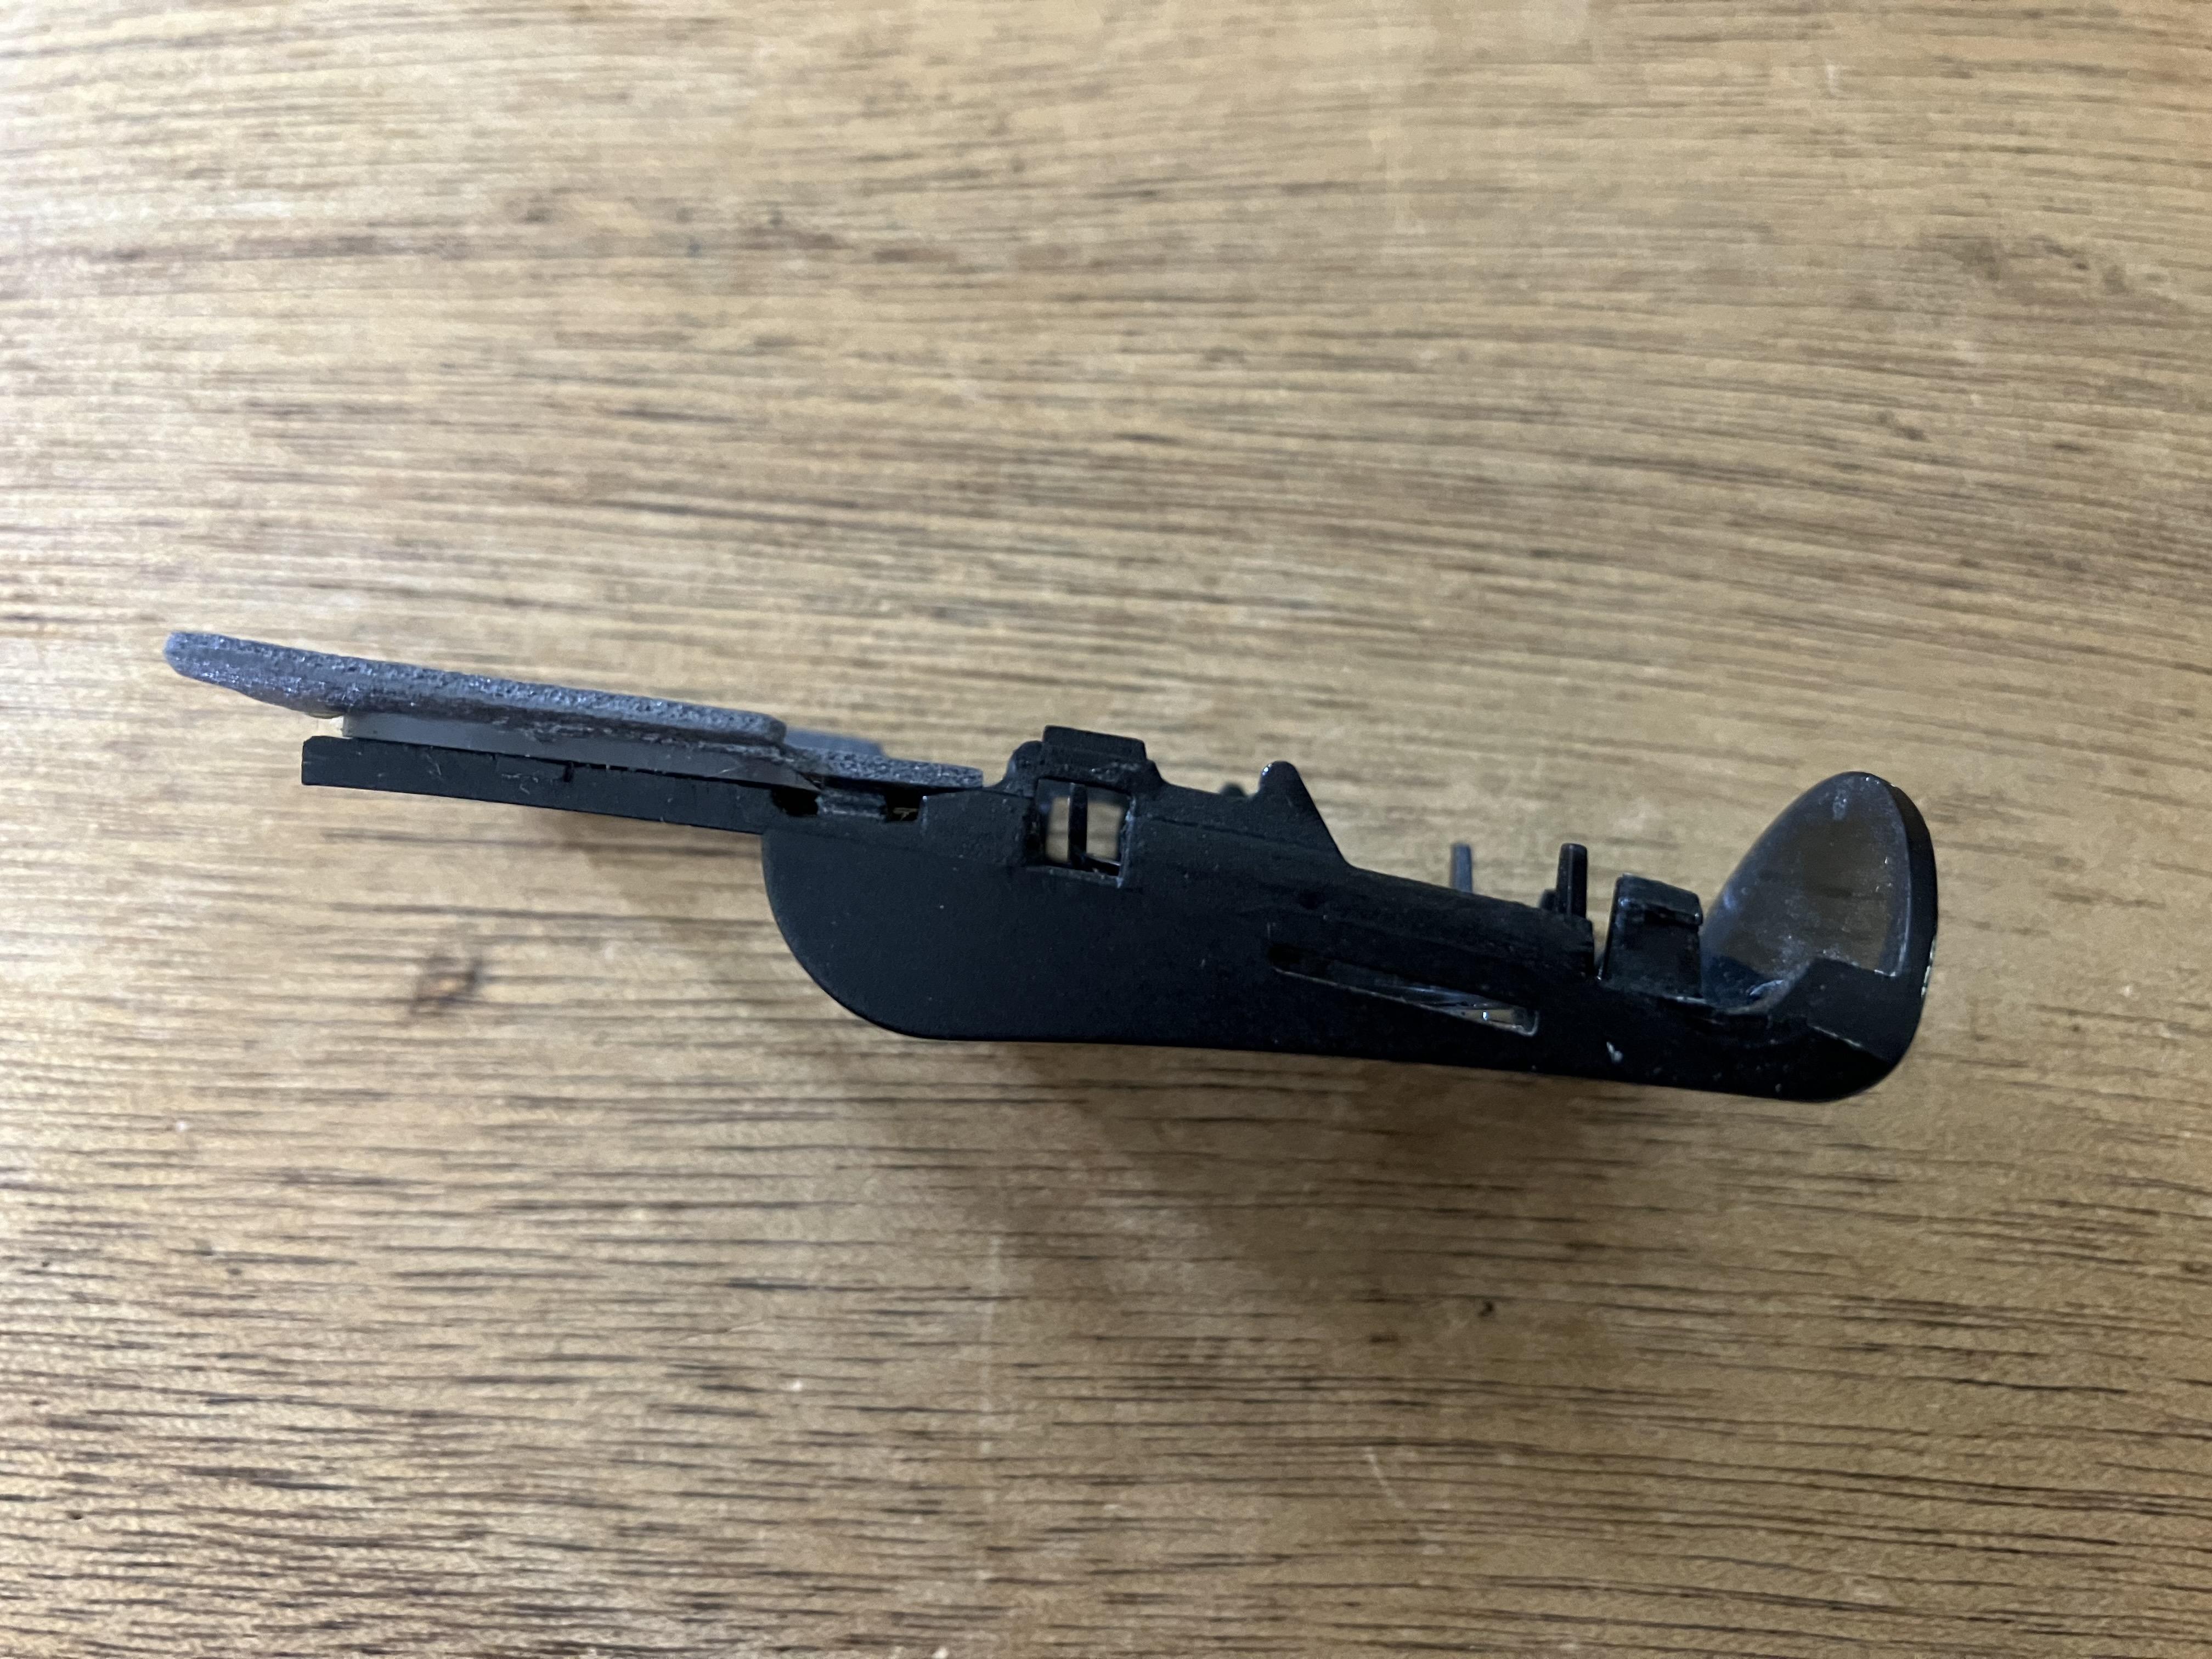
(Bill and Ted's Excellent Adventure)18 July 2024 at 14:11 #57493I used two thin guitar plectrums, and slid them down each side of the display cover from the top. There are actually four little clips on the display cover, two at the top and two at the bottom. The display cover then lifts up away from the LCD. (You don’t have to remove any of the keyboard buttons, as the display cover is not clipped in this area).
Co-incidentally I took mine to pieces again yesterday to fit that new pointer. It works, but for some reason the LCD display fades and disappears after several hours. I can refresh the screen by turning off and on again, but there is obviously still something wrong. Perhaps the LCD itself is faulty.
Location: Warwickshire, UK
My B&O Icons:
18 July 2024 at 19:42 #57501Manfred HansBRONZE MemberThanks for the answer. Are the tools better made of metal or plastic? I’m afraid of ruining the paint. Thanks Manfred
Signature: "Be excellent to each other!" Bill S. Preston and Ted "Theodore" Logan
(Bill and Ted's Excellent Adventure)18 July 2024 at 20:23 #57502The guitar plectrums were very thin plastic. You could also use the corners of bank or credit cards but they may be too thick.
Location: Warwickshire, UK
My B&O Icons:
20 July 2024 at 15:26 #57535Manfred HansBRONZE MemberPlease can you tell me where this Plectrums are from, can’t find it anywhere. Thanks Manfred
Signature: "Be excellent to each other!" Bill S. Preston and Ted "Theodore" Logan
(Bill and Ted's Excellent Adventure)20 July 2024 at 17:20 #57536Please can you tell me where this Plectrums are from, can’t find it anywhere. Thanks Manfred
Like these, from any music shop or Amazon: https://www.amazon.co.uk/Different-Thickness-Non-slip-Plectrums-Electric/dp/B09Y1VXHK4
Location: Warwickshire, UK
My B&O Icons:
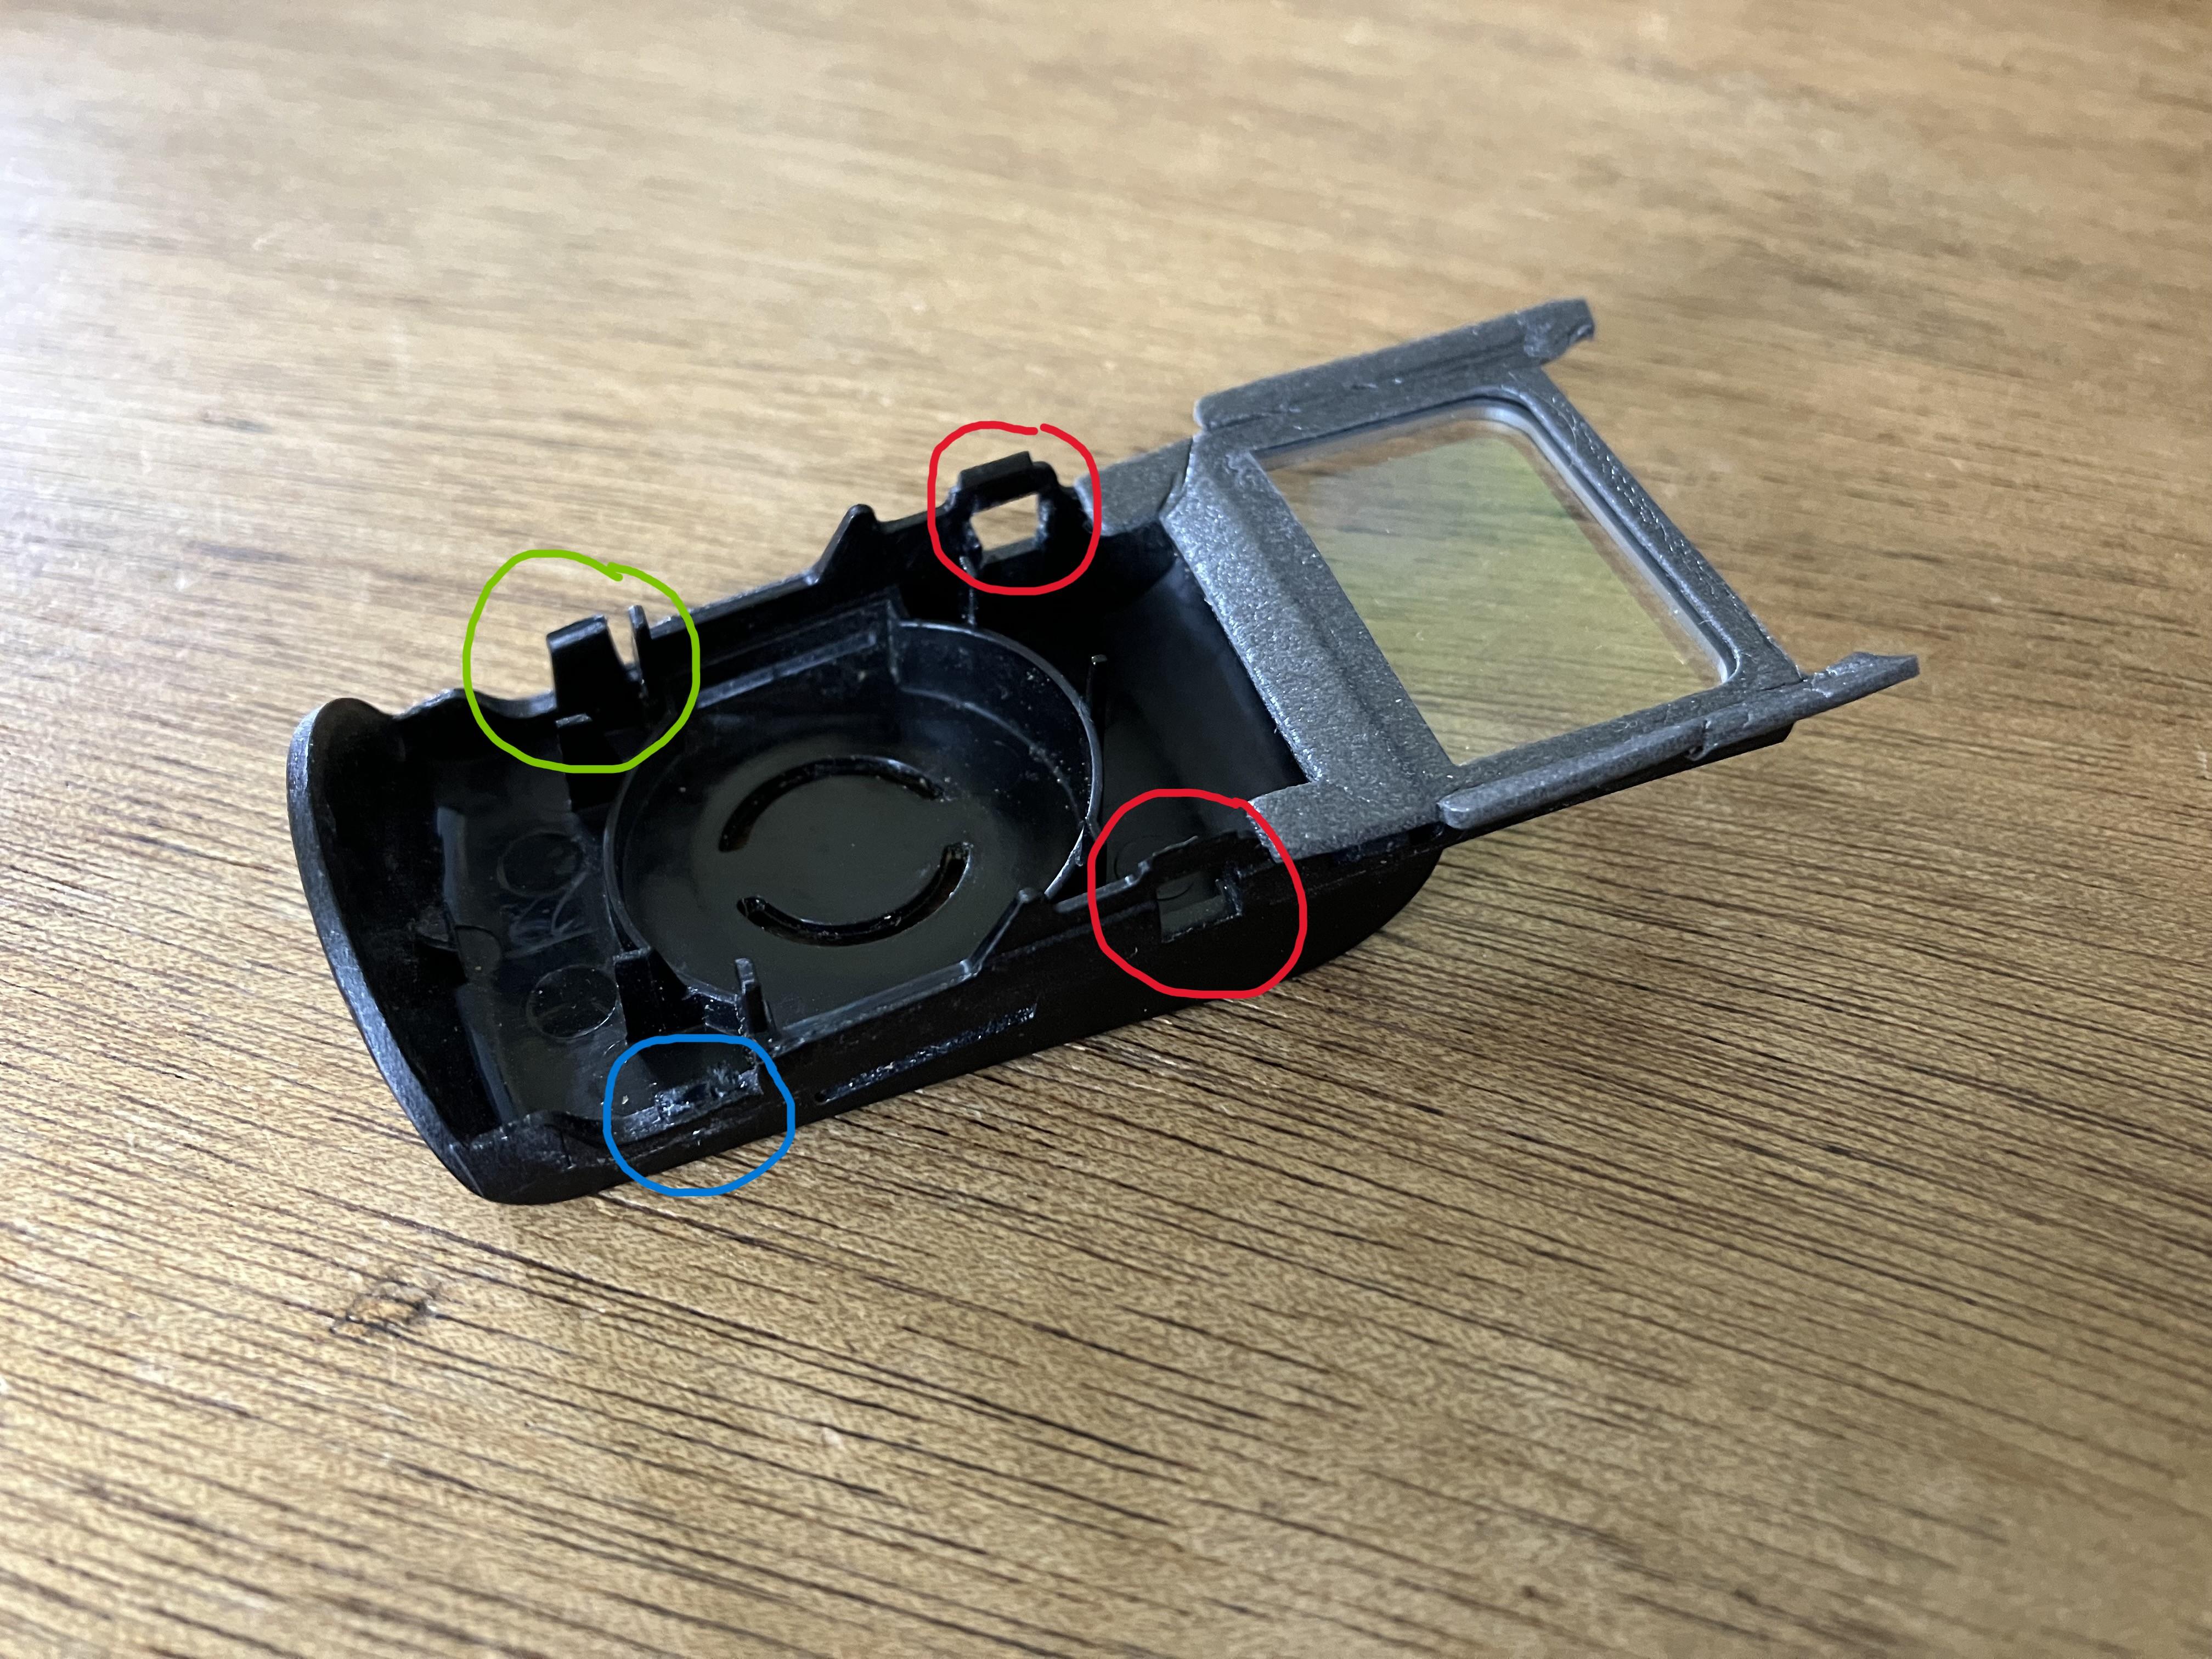
20 July 2024 at 19:10 #57537Manfred HansBRONZE MemberThanks! Ordered now. A photo of the back of the display frame would be helpful so that we know what the retaining lugs look like.
Manfred
Signature: "Be excellent to each other!" Bill S. Preston and Ted "Theodore" Logan
(Bill and Ted's Excellent Adventure)21 July 2024 at 10:43 #57545A photo of the back of the display frame would be helpful so that we know what the retaining lugs look like.
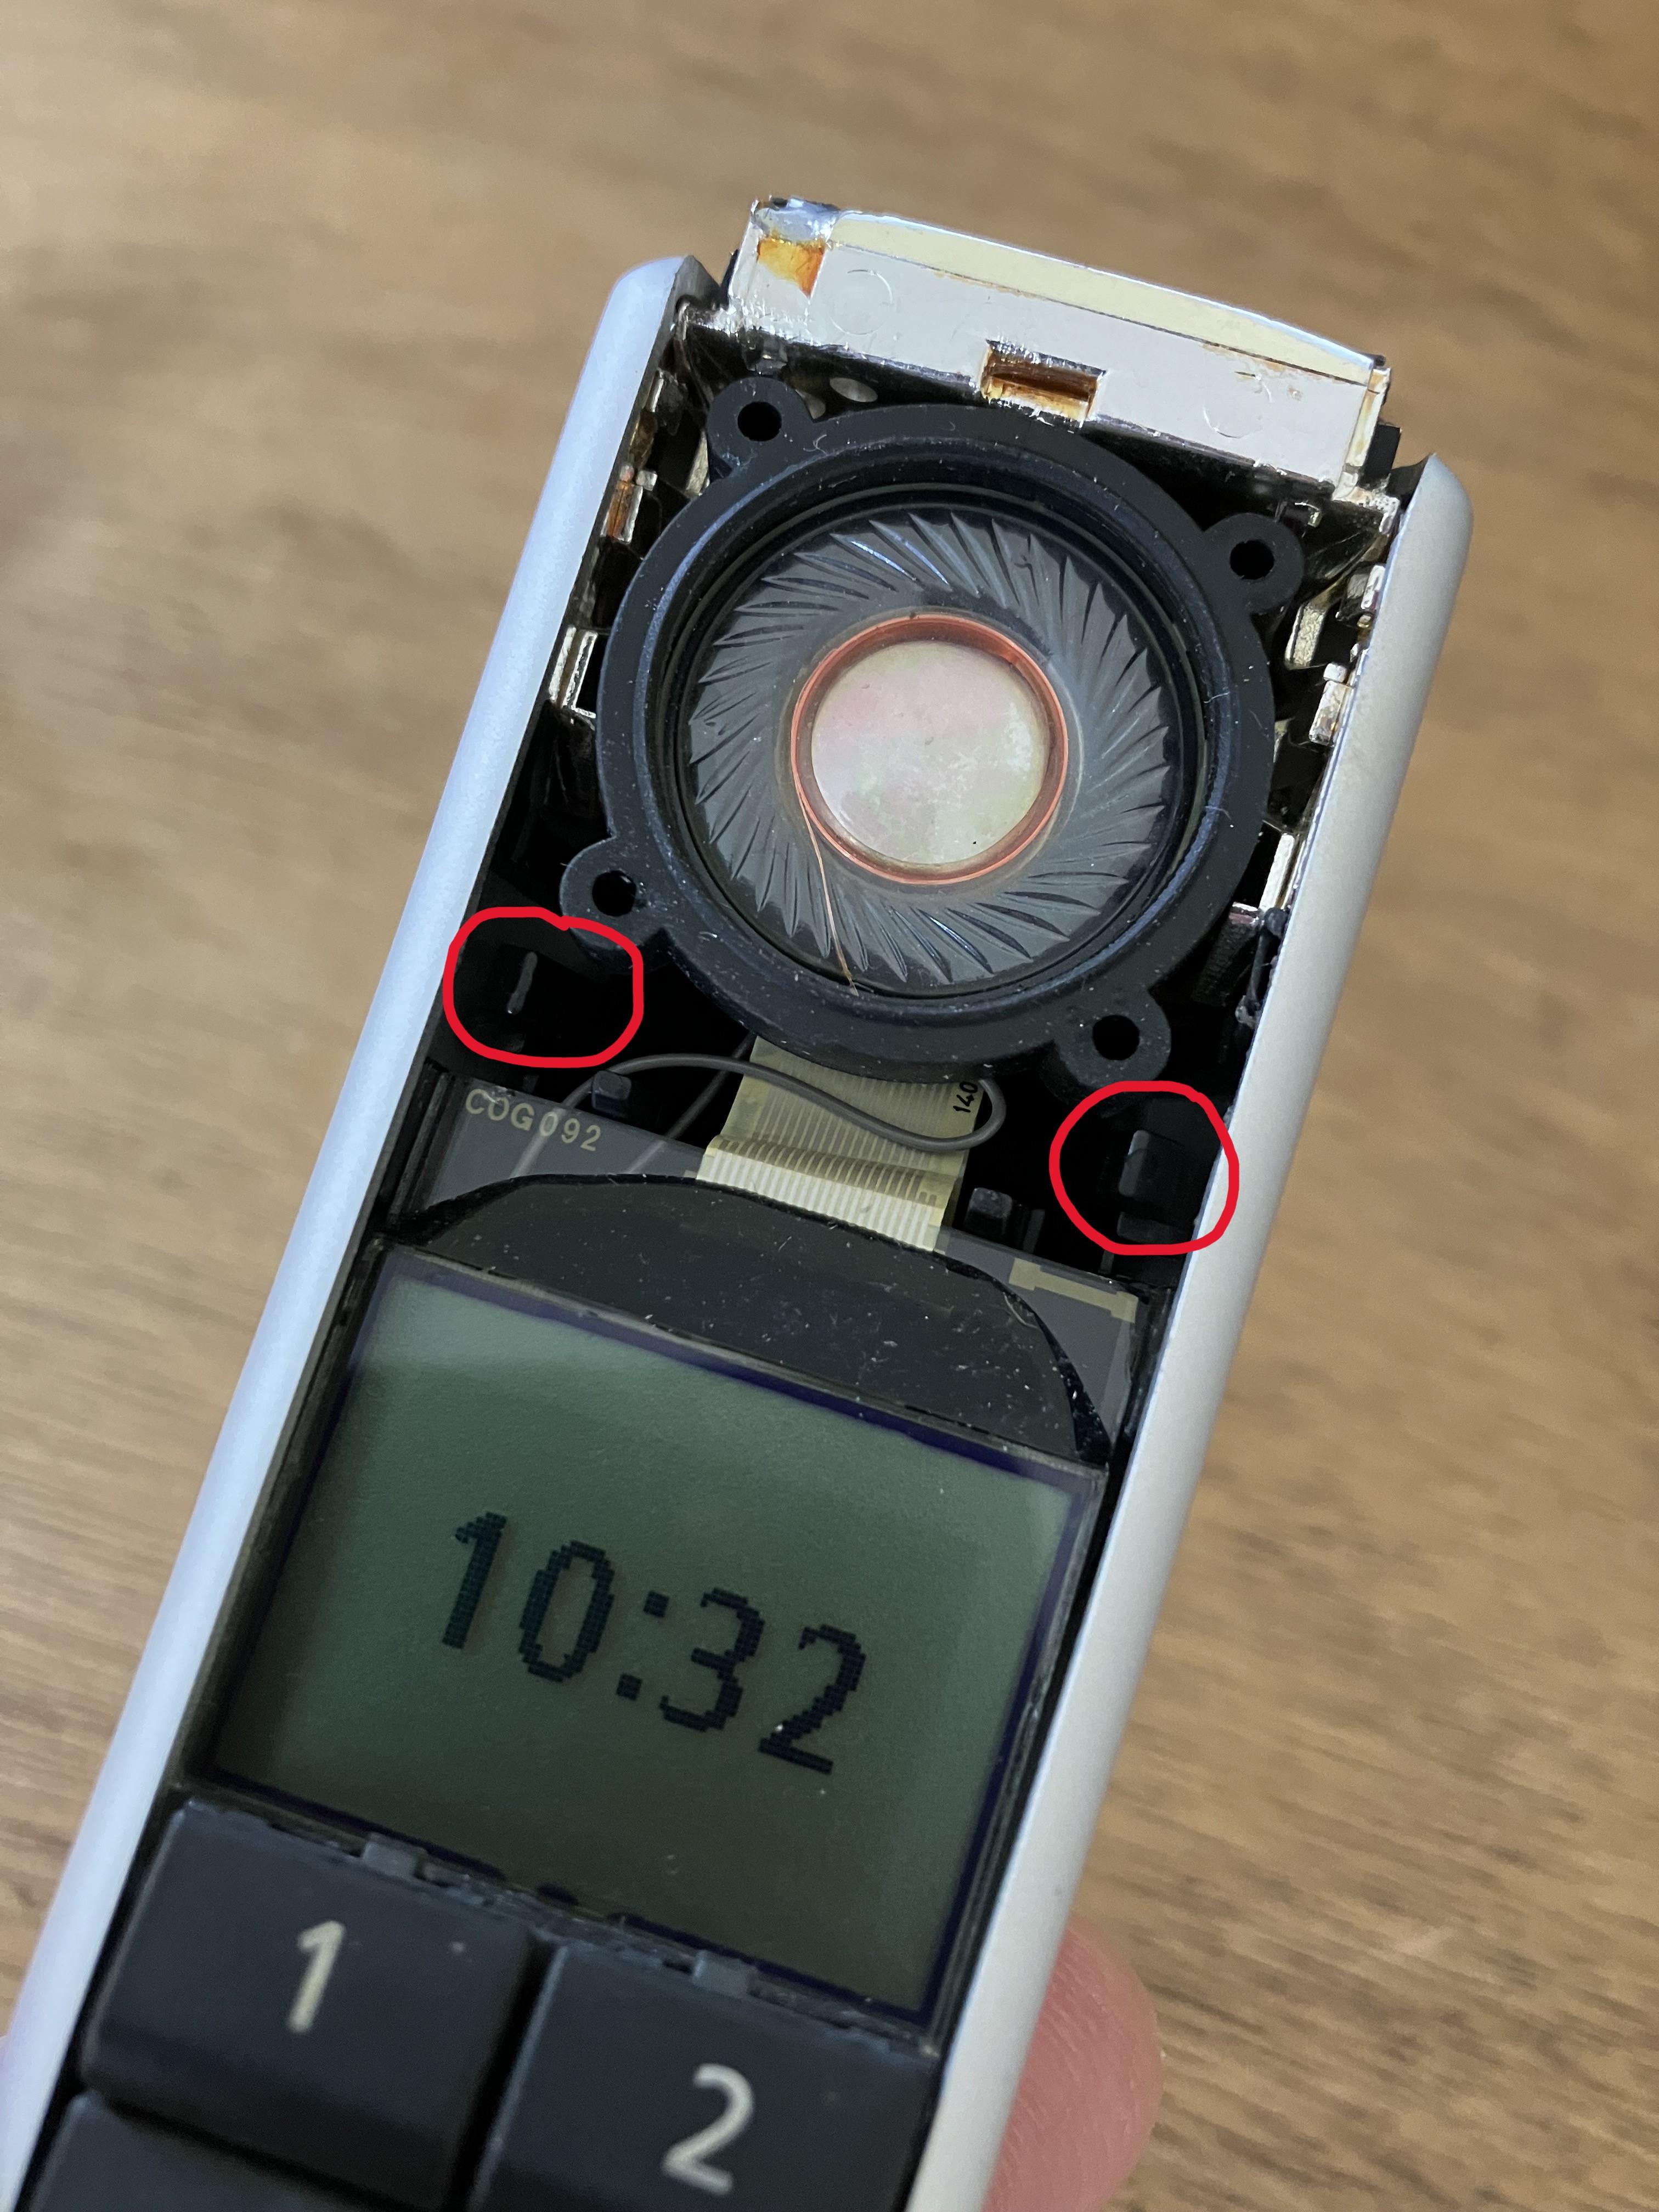
I just removed it again to take a couple of photos. I noticed that one of my clips is indeed missing (blue circle), but it still seems to hold together well. The red circles show where the clips in red in the bottom photo hold.
EDIT: There are some very small clips just above the keyboard no 1 and 2 buttons. The cover pivots away from these as you remove it; there is no need to apply any tools in this area.


Location: Warwickshire, UK
My B&O Icons:
21 July 2024 at 13:39 #57549Manfred HansBRONZE MemberWonderful, thanks a Lot! Waiting for plectrums.
Manfred
Signature: "Be excellent to each other!" Bill S. Preston and Ted "Theodore" Logan
(Bill and Ted's Excellent Adventure)22 July 2024 at 13:59 #57560Manfred HansBRONZE MemberThe trick with the plectrum worked really well. But then I also found a metal disk and a felt disk. Can you tell me in which order? So earpiece -> felt -> metal or earpiece -> metal -> felt? And how can I separate the display? At the display or at the circuit board? Sorry for the many questions, but you really have the know-how because you’ve already dismantled it. Or do I have to take out the circuit board first?
thanks at all Manfred
Attachments:
You must be logged in to view attached files.Signature: "Be excellent to each other!" Bill S. Preston and Ted "Theodore" Logan
(Bill and Ted's Excellent Adventure)22 July 2024 at 16:56 #57567I think that the correct order is earpiece, gauze (thin black sheet), felt/foam, metal. My foam had perished so I didn’t bother with that. When re-assembling, it can be held in place in the plastic cover using the small piece of tape on the metal piece.
The display disconnects at the circuit board. In my first post in the thread, you can see the white ribbon connector at the top left of the second photo. So, yes you will need to dismantle further following the YouTube video that I linked.
Location: Warwickshire, UK
My B&O Icons:
22 July 2024 at 17:14 #57570Manfred HansBRONZE MemberSo I’ve managed to take the phone apart, it wasn’t that difficult. When I see how hard the guy in the video struggled. Unfortunately the display is still broken, I’ll have to get a new one. The unplugging trick didn’t work for me. I’ve got a new battery now too. Thanks for your great help, Guy!
Manfred from Germany
Attachments:
You must be logged in to view attached files.Signature: "Be excellent to each other!" Bill S. Preston and Ted "Theodore" Logan
(Bill and Ted's Excellent Adventure)22 July 2024 at 17:25 #57574Good work – I’ll be interested to hear if you can get hold of a new display and whether it cures the fault.
Hopefully this thread will encourage others to fix their BC2s while replacement parts still exist.
Location: Warwickshire, UK
My B&O Icons:
23 July 2024 at 23:24 #57590Manfred HansBRONZE MemberGuy, one other Question, how much is the stick from AVA Service? The new Display is £75 each.
Thanks Manfred
Signature: "Be excellent to each other!" Bill S. Preston and Ted "Theodore" Logan
(Bill and Ted's Excellent Adventure)24 July 2024 at 06:01 #57596Valve1GOLD MemberHopefully this thread will encourage others to fix their BC2s while replacement parts still exist.
… And people still have land lines
My B&O Icons:
24 July 2024 at 09:22 #57597how much is the stick from AVA Service?
£4.96 including 20% VAT
Location: Warwickshire, UK
My B&O Icons:
-
AuthorPosts


- You must be logged in to reply to this topic.