Home › Forums › Product Discussion & Questions › BeoGram › Beogram 8002 cleanup
- This topic has 17 replies, 5 voices, and was last updated 3 years, 4 months ago by
-
AuthorPosts
-
6 July 2022 at 09:33 #36025
WallyGator
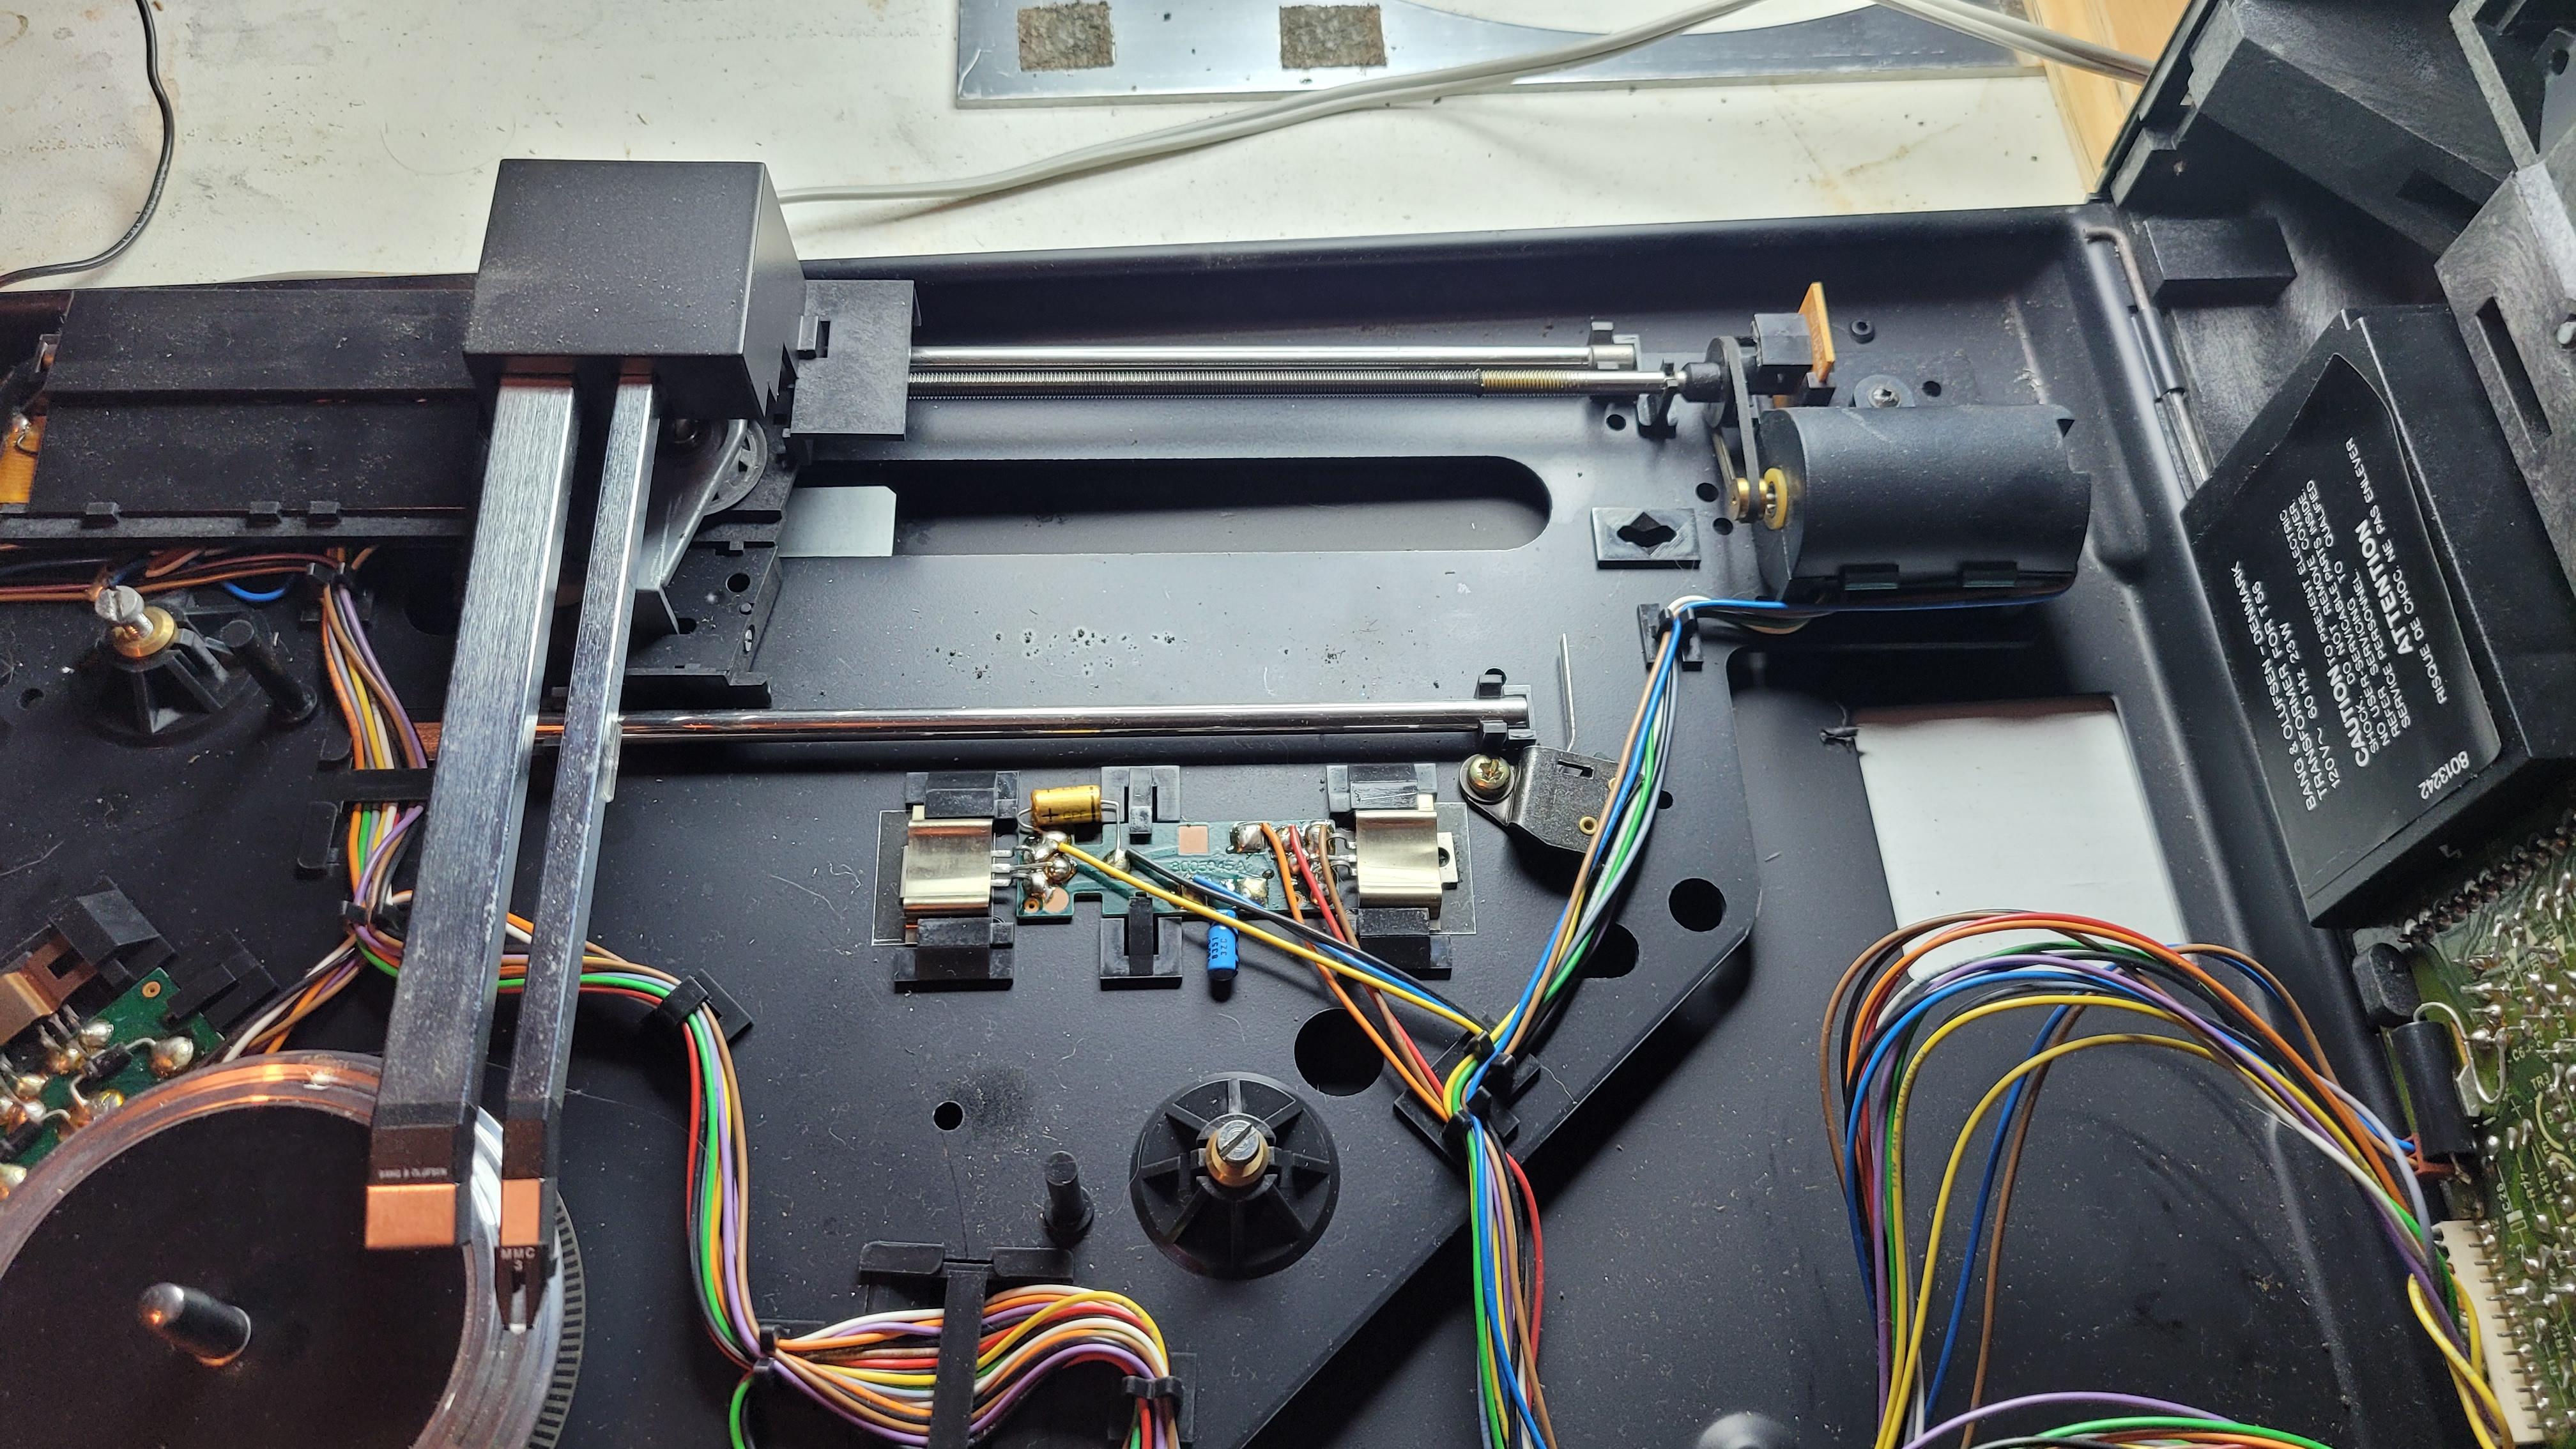
BRONZE MemberFirst post for me. Trying to cleanup the worm gear under the tone arm assembly. I’ve seen pix of a unit with the tone arm removed but how do you remove the tone arm assembly? The unit is pretty old an I’d imagine those plastic parts are fragile.
What do I lube the worm gear with?
After that, it’s a new belt and then onto fixing the dust cover mechanism.
Here’s where I’m at…..
6 July 2022 at 22:11 #36026Hi and welcome to Beoworld.
I can’t answer your question, but what I can advise is to remove and safely store the MMC3 before going any further in your work!
Location: Paris France
6 July 2022 at 23:37 #36027sonavor
BRONZE MemberHi Wallygator,
Here are three different posts that have detailed photos of the BG8002 spindle components.
BG8002 1I don’t know what your capabilities are so I will just warn you that if you are not mechanically inclined I wouldn’t attempt to disassemble the tangential arm assembly spindle.
The first step is to remove the servo belt.
After that you rotate the spindle so the slotted, black plastic wheel is lined up so the small photo sensor board can be removed.
There is a plastic spring clip holding that sensor board in position so you need to carefully release that.The spindle must be released from the plastic clip holding it but that is not all.
The spindle has a nylon nut the drives the tangential arm assembly and it is attached to the spindle and arm assembly transport by a plastic clip that the bottom (shiny) rail fits through. So you will be removing that as well.I use plastic pry tools to detach the spindle and rails from their clips.
Just work slowly and carefully (and take plenty of before photos) so you know how things go back together.
Hope that helps.
-sonavor
7 July 2022 at 20:49 #36028WallyGator
BRONZE MemberThanks, Sonavor.
I’ll try to clean as best I can without removing the tonearm assemply. That last link had the best photos for this part of the job. If that doesn’t fix the reluctant tonearm assembly, I’ll have to dig a little deeper. Thanks for the info!
7 July 2022 at 23:54 #36029sonavor
BRONZE MemberFrom your photo the spindle doesn’t look bad.
When you say reluctant tonearm assembly what do you mean?How old is the servo belt and did you get a proper one from Beoparts?
A worn or incorrect belt is the source of a lot of problems.
If you have an arm assembly that moves a short way then seems to hang up (and the belt is not the problem) then it is likely a problem with the electronics controlling the servo.
Old capacitors, bad connection somewhere and, sometimes, faulty photo sensors.
There are also two adjustments on the control button panel for the left and right scan control. The service manual specifies what the steady-state voltages need to be for those two controls. If they are not correct they will cause problems with the arm assembly movement. If you dive deeper into the related threads I linked to there should be some posts about those scanning sensors.If the BG8002 is still operating on original electronic parts then circuits could be trying to operate with out of tolerance components (like electrolytic capacitors that are no longer in spec).
-sonavor
8 July 2022 at 09:28 #36030Hi
One thing I’d like to mention is that, if you’re cleaning the wormgear be very carefull with solvents like contact cleaner, thinner or acetone, the black coating of the chassis is not very resistant against solvents and will be solved and looking very bad….
Put some papertowels under the wormgear and exchange from time to time while cleaning.
Don’t ask me why I know this ;-))
Regards
Christian
8 July 2022 at 16:28 #36031sonavor
BRONZE MemberHi One thing I’d like to mention is that, if you’re cleaning the wormgear be very carefull with solvents like contact cleaner, thinner or acetone, the black coating of the chassis is not very resistant against solvents and will be solved and looking very bad…. Put some papertowels under the wormgear and exchange from time to time while cleaning. Don’t ask me why I know this ;-)) Regards Christian
Yes, even isopropyl alcohol will start stripping the black coating on the base of the cabinet. Don’t ask me why I know this either. 😉
-sonavor
11 July 2022 at 16:21 #36032WallyGator
BRONZE MemberThe belt on the TT is original so I bought a new belt. Should get here next week.
When pressing play on the TT, the tonearm moves out slightly but doesn’t reach the edge of the record. It then returns home and shuts off. If I use the < & > keys to move the tomearm back and forth across its entire range a few times, the play button begins working correctly. It’s almost as if it neeeds to stretch & warm up before exercising. Seems to work OK after a “warm up”.
I’ll be carefull with any cleaner I use.11 July 2022 at 18:46 #36033sonavor
BRONZE MemberStrange behaviors like that are common for Beogram 8000 and 8002 turntables that need restoration. It’s difficult to say offhand what the fix for the symptom is because there can be several problems going on. The problems result from bad information from failing circuits reporting what is going on back to the Beogram microcomputer IC.
For certain you want to begin with replacing the old electrolytic capacitors.
While doing that you should reflow solder joints of all the board connectors.
Once those things are done you can retry and see where your Beogram is at.
It is a good idea at that point to measure all of the key power supply voltages and perform the service manual adjustments.
I also like to check the health of the sensor signals (using an oscilloscope).
Those steps should catch any problems.I hope you sourced your servo belt from Beoparts.
-sonavor
12 July 2022 at 10:12 #36034Looks like the sysmtoms you get if:
Caps are not excanged, ALL incl. the 47uF in the CPU can. Just have one on the table where the 47 uF was divided into two parts. The Beogram made quiet funny moves ;-))
Lightbulb in the Control panel not working or weak, misadjusted voltage at the light sensors (620mV) for << and >>
Fact is if you try to renew only some of the old caps nobody knows when the next will die, so please no “quick and dirty” restauration.
look here for further information:
https://beolover.blogspot.com/2016/02/beogram-8002-strange-behavior-after-play-arm-moves-2cm.html
Here is a good example about Transistor HFE :
https://beolover.blogspot.com/2019/12/beogram-8000-fun-evening-with-record-detection-mechansim.html
Kind regards
Christian
14 July 2022 at 19:29 #36035WallyGator
BRONZE MemberWell…sadly…replacing the servo belt and cleaning the spindle didn’t fix the issue. I guess replacing the caps is next. Seems odd that after operating the << & >> keys and watching the tomearm travel back and forth accross the platter for a few minutes would get the unit to perform normally. If the caps were bad, they’d always be bad, no matter how long you moved the tonearm back and forth. That’s what made me think is was a mechanical issue.
Anyways…anyone know where to get a replacement set of capacitors in the US?
14 July 2022 at 20:43 #36036You can’t get a “set”. You need to get a cap kit that includes all the values you need. These kits are available on Amazon, DigiKey, Mouser, etc. Only do the electrolytics (the cylindrical ones) first as they are the most likely culprits. Don’t forget the 47mF on the CPU board.
15 July 2022 at 02:18 #36037WallyGator
BRONZE MemberGot an Amazon link? I’m not finding anything that would be worth buying. There are many assortments that contain a whole range of capacitors (most of which wouldn’t get used). Is that what you mean when you say ‘kit’?
15 July 2022 at 04:47 #36038sonavor
BRONZE MemberIf you are going to buy a capacitor kit then buy it from Beoparts. Same for belts and lamps.
I am in the USA and I buy plenty of replacement parts from Martin’s Beoparts store. They usually only take a week to arrive.-sonavor
15 July 2022 at 17:19 #36039Yes that is what I meant. I do see that Martin has an 8002 Cap kit at https://www.beoparts-shop.com/product/capacitor-kit-beogram-6006-8000-8002/. I have gotten parts quickly from him in the US.
15 July 2022 at 18:54 #36040WallyGator
BRONZE MemberOK. Cap kit has been ordered.
9 September 2022 at 01:44 #36041WallyGator
BRONZE MemberUpdate!!
Cap kit installed and the turntable operates like new again! Had to disassemble it twice because of a loose connector but all in all, not as difficult as I thought it would be.
Thanks for your help!
9 September 2022 at 03:59 #36042Great to hear! Keep ’em spinning.
-
AuthorPosts
- You must be logged in to reply to this topic.


