


Home › Forums › General Discussion & Questions › General Discussion & Questions › Beo4-Controlled Raspberry Pi setup for streaming Net Radio on BeoLabs
- This topic has 7 replies, 3 voices, and was last updated 1 month, 3 weeks ago by

-
AuthorPosts
-
10 October 2025 at 19:02 #70288
Sharing some experience.
Wife wanted to play (net)radio on the kitchen Beolab 3s by pressing one button on the Beo4.
The solution:
Beolab 3s
Raspberry Pi running ‘Volumio’
B&O Link Eye
Works like a charm. Pressing RADIO starts the favorite radio station and other stations can be selected by pressing 1-9.
10 October 2025 at 21:31 #70291 BRONZE Member
Thanks for that tip!
I guess most of us will need a bit more information about that/about how to control that with ‘the remote’.
MM
Location: Flensborg————Danmark
10 October 2025 at 22:09 #70292Hi,
I can share that.
Download ‘volumio’ and burn the image to an SD card.
Boot up your pi. On the monitor connected to the pi, you can see what IP the pi got on your network.
Access the ‘volumio’ frontend via the browser on your computer. Register a free account. From the web frontend you can now install the IR remote plugin. And in the ‘volumio’ settings you choose your audio output. I use minijack.
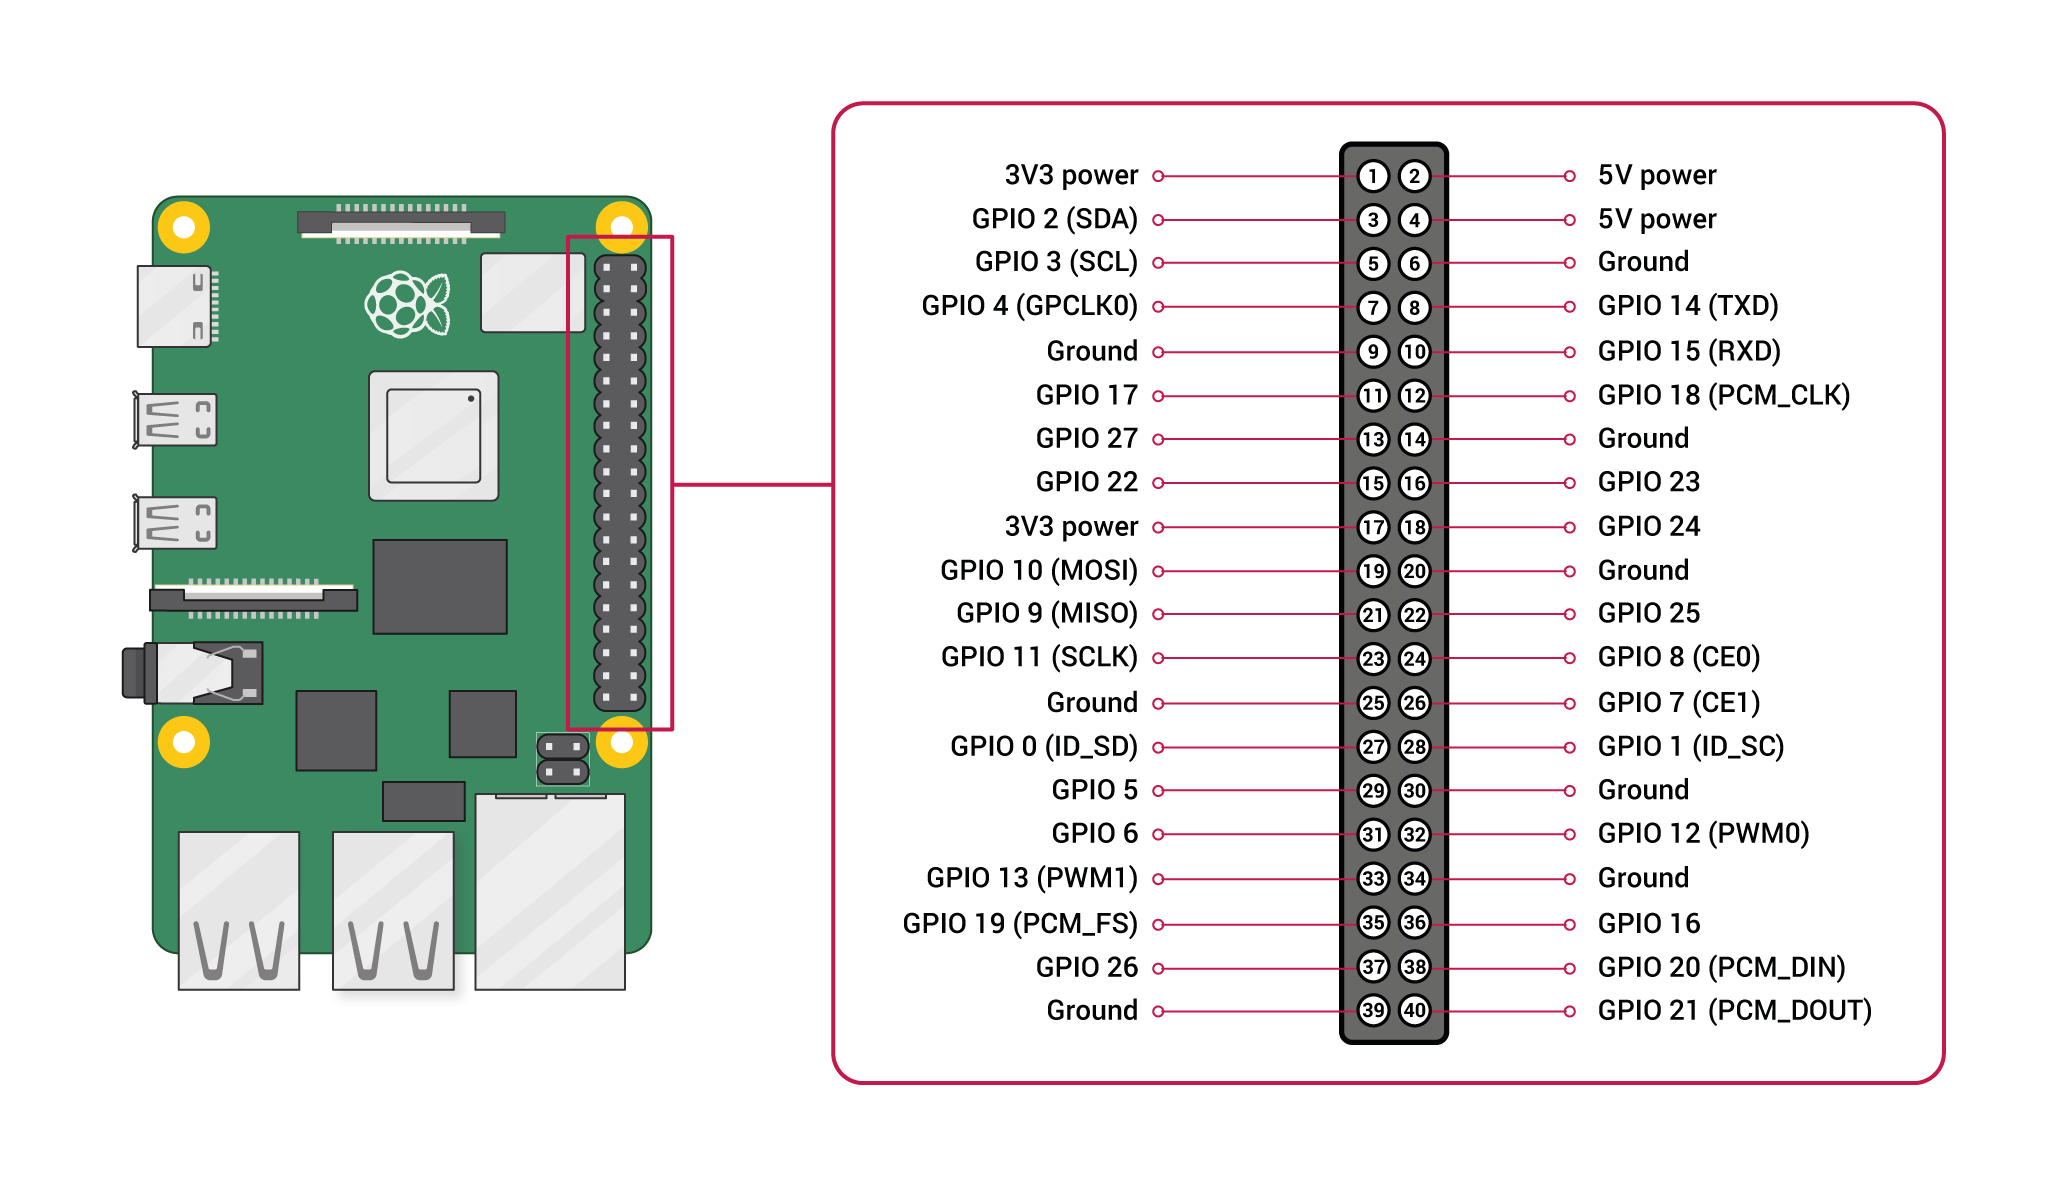
Connect the B&O IR Eye to PIN 2, 6 and 12.
Pin 2 is +5v
Pin 6 is ground
Pin 12 (called GPIO 18) is data
In the IR plugin on the ‘volumio’ web frontend select GPIO 18 and save.
All that is remaining is to create a folder with the name ‘Beo4’ in a specific folder on the pi. The web frontend defines where.
In that folder you place two custom files which tells the pi how to decode the signal from the B&O IR Eye and what to do when a specific button is pressed.
When the folder is created and the files are saved in the folder, Beo4 will appear in the remote control list. Select and save.
The files are called:
lircrc
lircd.conf
Now restart the plugin. A bit of flair for Linux, ssh and command line is an advantage.
I will share my 2 config files. That will make it easier to get started and modify for your needs.
Hope this guide helps.
Link to GPIO overview:
https://cdn.sparkfun.com/assets/learn_tutorials/1/5/9/5/GPIO.png
10 October 2025 at 22:19 #70294I have tried to upload the config files… but it does not seem to work 🙄
17 May 2026 at 10:38 #123617 BRONZE Member
Hi Ravsted,
I’m a bit late to this thread, but I would be very interested in using your setup.
It sounds very interesting to use Rpi to control radio, music, etc.
I need it for a Beomaster 7000, where you can get datalink commands directly from the Powerlink outputs.
I currently use Beomaster 7000 to control Beosound 5 / Beomaster 5 via Beolink converter 1611 (AUX-link <> Masterlink connection).
I understand that you have problems uploading the configuration: could it be that it is larger than 31 MB, which is max. upload size?
Kind regards,
Jens-
This reply was modified 1 month, 3 weeks ago by

Location: Copenhagen, Denmark
Favourite Product: Beomaster 7000
Signature: Jens Rendboell
18 May 2026 at 12:08 #123651lircd.conf:
begin remotename /home/osmc/beo4_ireye_pc.confflags RAW_CODESeps 50aeps 150gap 2000begin raw_codesname KEY_UP1562 1562 1562 1562 1562 140581562 1562 1562 4686 1562 46861562 4686 1562 4686 1562 46861562 4686 1562 4686 1562 78101562 1562 1562 4686 1562 46861562 7810 1562 4686 1562 46861562 4686 1562 1562 1562 109341562name KEY_DOWN1562 1562 1562 1562 1562 140581562 1562 1562 4686 1562 46861562 4686 1562 4686 1562 46861562 4686 1562 4686 1562 78101562 1562 1562 4686 1562 46861562 7810 1562 4686 1562 46861562 4686 1562 4686 1562 109341562name KEY_LEFT1562 1562 1562 1562 1562 140581562 1562 1562 4686 1562 46861562 4686 1562 4686 1562 46861562 4686 1562 4686 1562 78101562 1562 1562 4686 1562 78101562 4686 1562 1562 1562 46861562 7810 1562 1562 1562 109341562name KEY_RIGHT1562 1562 1562 1562 1562 140581562 1562 1562 4686 1562 46861562 4686 1562 4686 1562 46861562 4686 1562 4686 1562 78101562 1562 1562 4686 1562 78101562 4686 1562 1562 1562 78101562 1562 1562 4686 1562 109341562name KEY_RADIO1562 1562 1562 1562 1562 140581562 1562 1562 4686 1562 46861562 4686 1562 4686 1562 46861562 4686 1562 4686 1562 78101562 4686 1562 1562 1562 46861562 4686 1562 4686 1562 46861562 4686 1562 7810 1562 109341562name KEY_STOP1562 1562 1562 1562 1562 140581562 1562 1562 4686 1562 46861562 4686 1562 4686 1562 46861562 4686 1562 4686 1562 78101562 1562 1562 4686 1562 78101562 4686 1562 1562 1562 78101562 4686 1562 1562 1562 109341562name KEY_VOLUMEUP1562 1562 1562 1562 1562 140581562 1562 1562 4686 1562 46861562 4686 1562 4686 1562 46861562 4686 1562 4686 1562 78101562 1562 1562 7810 1562 46861562 1562 1562 4686 1562 46861562 4686 1562 4686 1562 109341562name KEY_VOLUMEDOWN1562 1562 1562 1562 1562 140581562 1562 1562 4686 1562 46861562 4686 1562 4686 1562 46861562 4686 1562 4686 1562 78101562 1562 1562 7810 1562 46861562 1562 1562 4686 1562 78101562 1562 1562 4686 1562 109341562name KEY_POWER1562 1562 1562 1562 1562 140581562 1562 1562 4686 1562 46861562 4686 1562 4686 1562 46861562 4686 1562 4686 1562 78101562 1562 1562 4686 1562 46861562 4686 1562 7810 1562 46861562 1562 1562 4686 1562 109341562end raw_codesend remote18 May 2026 at 12:09 #123652lircrc:
begin
prog = irexec
button = KEY_STOP
config = /usr/local/bin/volumio stop
end
begin
prog = irexec
button = KEY_POWER
config = /usr/local/bin/volumio stop
end
begin
prog = irexec
button = KEY_RADIO
config = curl “http://volumio.local:3000/api/v1/commands/?cmd=playplaylist&name=P4” >/dev/null 2>&1
end
begin
prog = irexec
button = KEY_VOLUMEUP
config = /usr/local/bin/volumio volume plus
end
begin
prog = irexec
button = KEY_VOLUMEDOWN
config = /usr/local/bin/volumio volume minus
end
begin
prog = irexec
button = KEY_LEFT
config = /usr/local/bin/volumio previous
end
begin
prog = irexec
button = KEY_RIGHT
config = /usr/local/bin/volumio next
end18 May 2026 at 12:10 #123653Using Essence Remote for start/stop/vol+/vol-
-
This reply was modified 1 month, 3 weeks ago by
-
AuthorPosts

- You must be logged in to reply to this topic.