


Home › Forums › Product Discussion & Questions › BeoSound › How to disassemble the essence remote
- This topic has 11 replies, 8 voices, and was last updated 2 years, 6 months ago by

-
AuthorPosts
-
28 October 2022 at 01:27 #40169
 samsp99BRONZE Member
Is there any information on how to disassemble the essence remote? I acquired one on ebay, that was listed as for parts. It seems to work, but the left button and volume wheel are a bit sticky. I’m thinking something may have been spilled.
I don’t see any screw holes and I don’t want to go randomly prying.
28 October 2022 at 09:09 #40170LeMirageBRONZE MemberIf you search on the archived forums you will find a post about this, but If I remember correctly it was next to impossible without damage since the ring is press fitted.
one big gamble would me immersing the remote in a bowl of alcohol and hope for the best. …
Maybe someone else has better advice…. They are super nice little remotes and without the full essence kit the wheely remotes can be used IR / Bluetooth with many beosound/play speakers!
28 October 2022 at 22:03 #40171NQVHNWIBRONZE MemberShort answer…I don’t know
Long answer
speculation mode….on
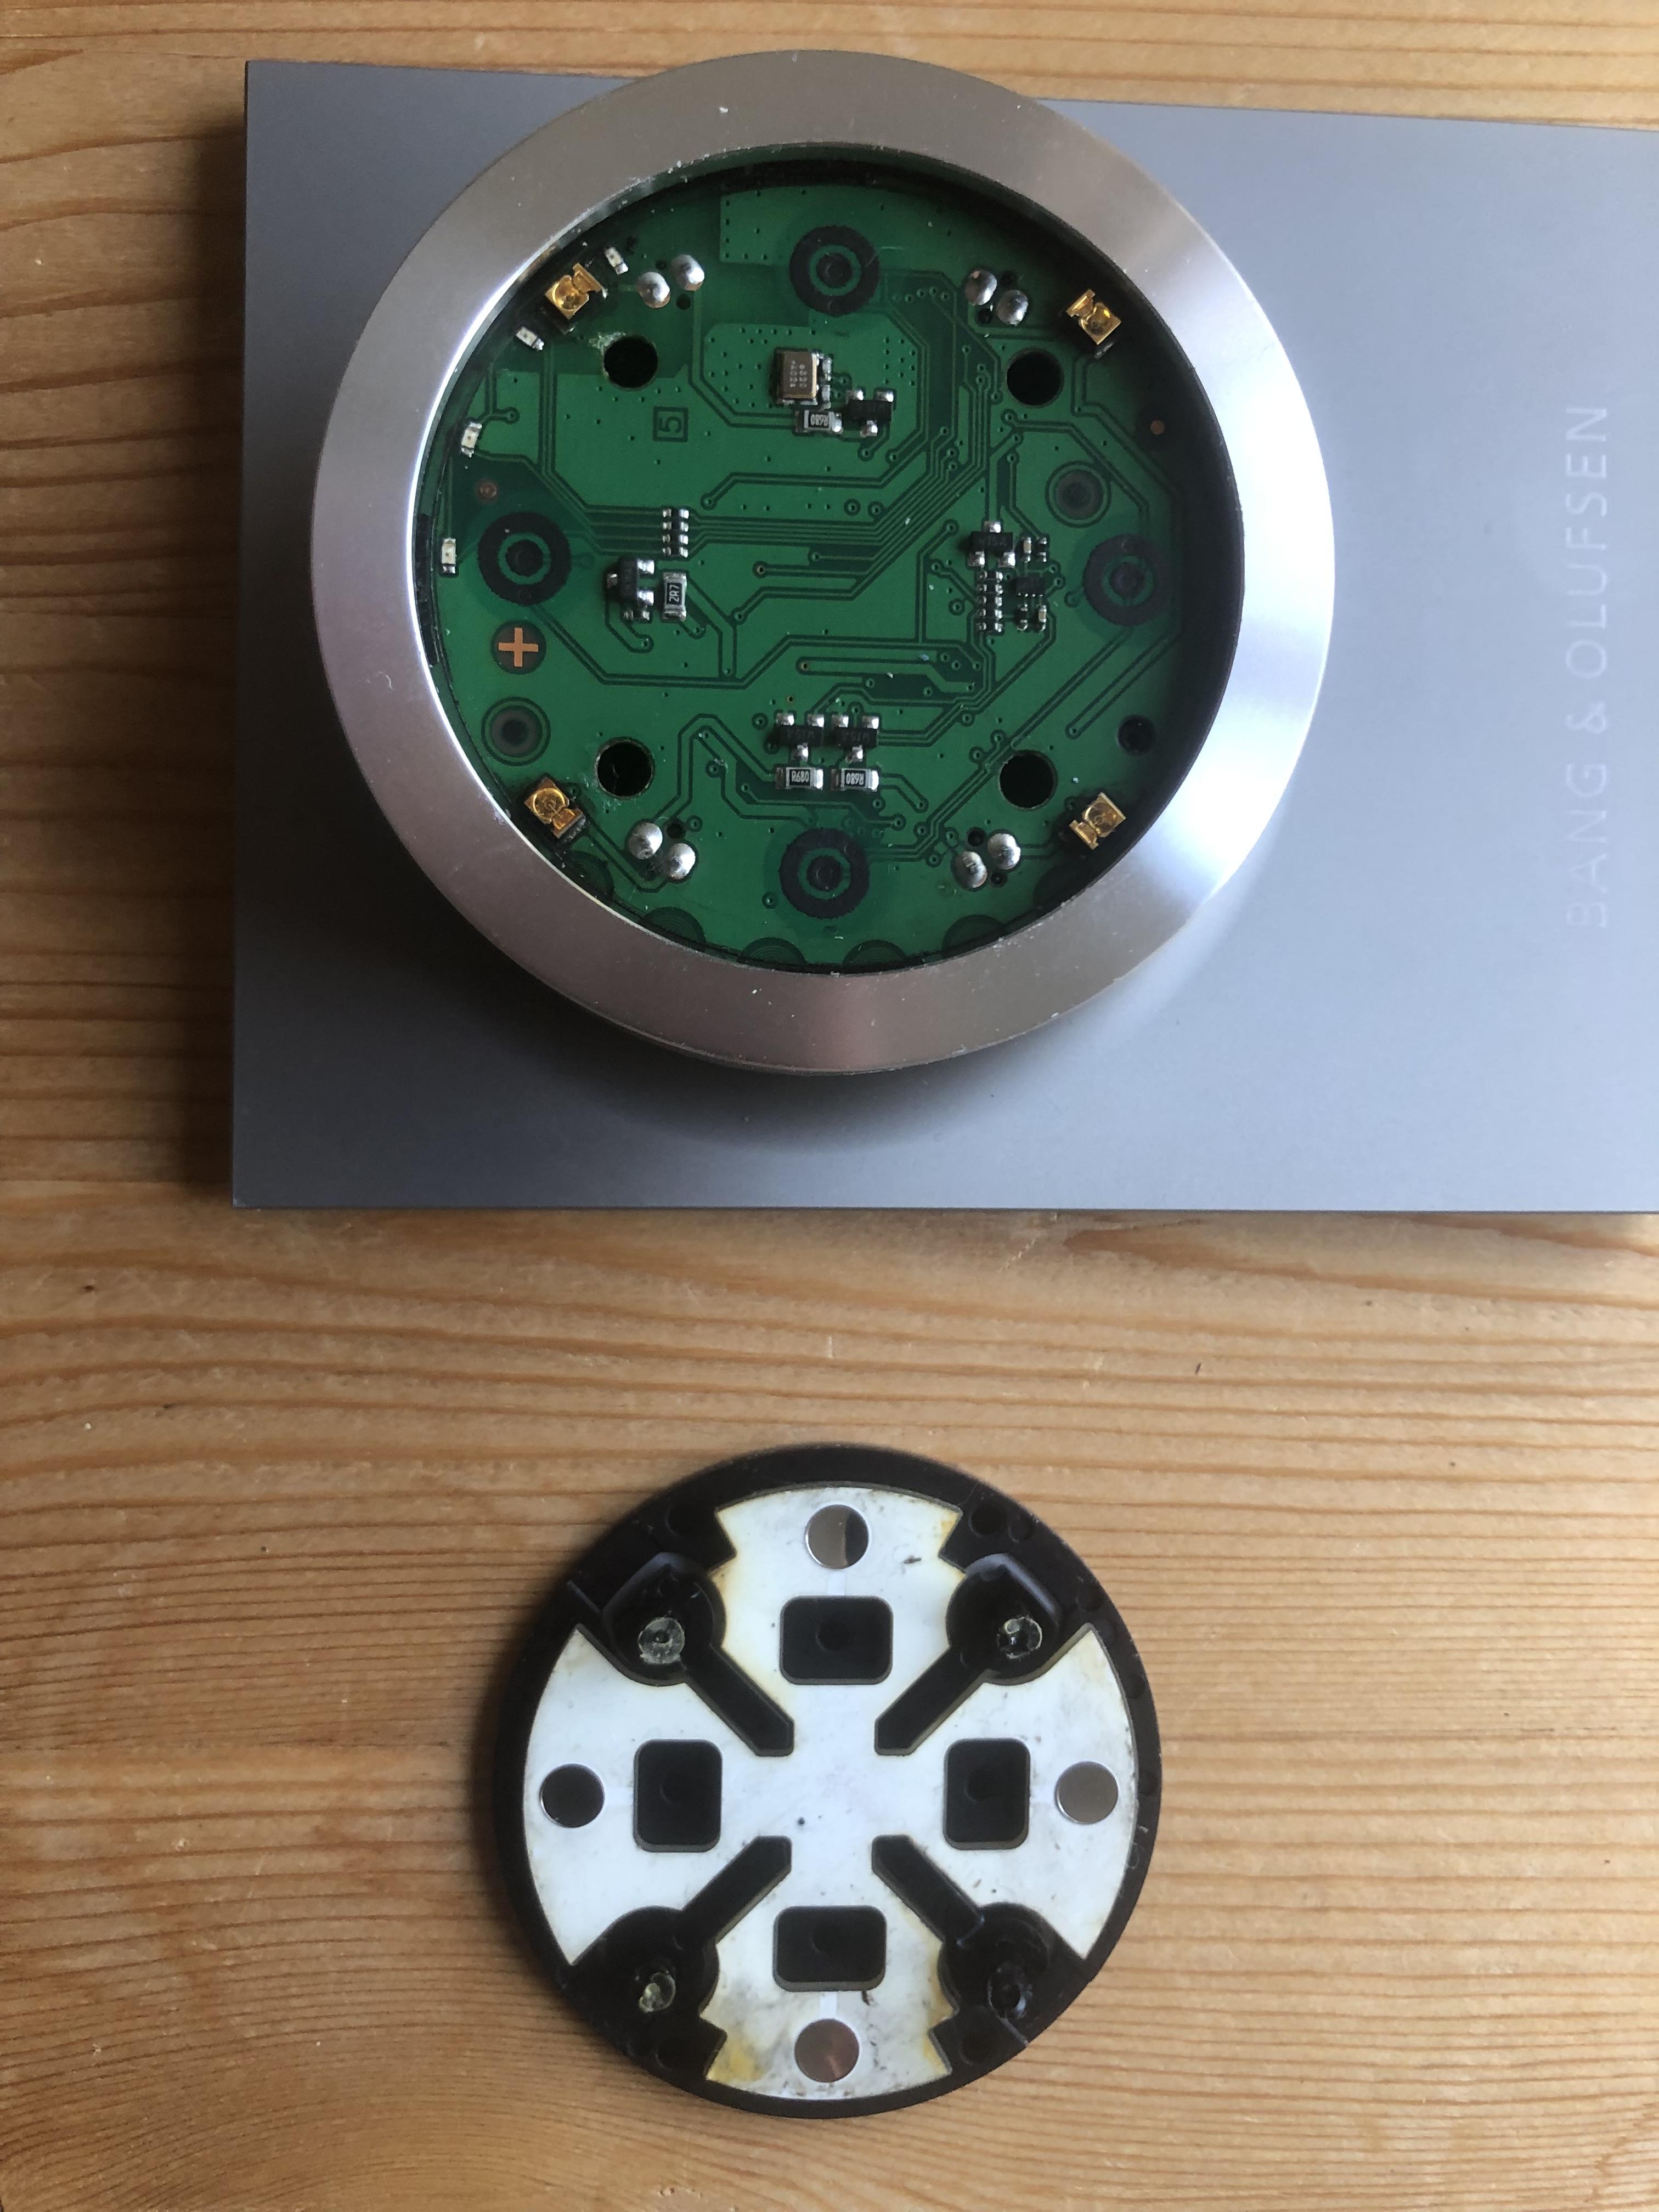
obviously a service manual is required if there is one but looking at the battery side, there are 4 x 3mm holes next to the locking lugs. When I look down these holes with a loupe there appears to be a ball bearing at the bottom of each and an off centre plate thing. I guess near to the underside of the touch pad?
I wonder If the volume ring is locked in position with a spring clamp/bearing arrangement and is released in a similar way to early 1990 car stereos – I.e with 2 U-shaped coat hanger wire (but thinner of course) which are pulled apart in pairs to release the clamping spring?
it may be that the Essence remote was never designed for service and a new module was matched to the expensive base?
speculation mode…off
28 October 2022 at 23:33 #40172GlitchBRONZE MemberI don’t see any screw holes and I don’t want to go randomly prying.
I assume that you didn’t have any luck finding a service manual.
If you do have to resort to “randomly prying”, having the proper tools can make a difference. Pry tools like they sell at iFixIt can help getting stubborn devices open with minimal damage. The plastic pry bars are softer than many of the plastic cases.
When it comes to opening cases, everything is fair game. I’ve used everything from credit cards, to guitar picks, to painter’s pallet knives to get into devices.
When I don’t have any clues on the proper way to get something apart, I start with the spot that will be least noticeable if the device is damaged by opening. Some manufacturers are kind enough to design the initial pry point in a discrete location to help out the people servicing the device. YMMV.
Glitch
29 October 2022 at 06:28 #40173BeoZipBRONZE Memberyou find the screws under the plastic plate/keyboard to open the remote ….

you must lift it up but please be very careful
good luck
My B&O Icons:
 29 October 2022 at 08:04 #40174LeMirageBRONZE Member
Cool info Beozip! Did you just carefully pry of the plastic cover ?
it will not bend doing that?
For extra support / info you could also sent a message to the company
They seem to be the company (located in Austria) contracted by B&O to have made the Essence remotes. They specialize in remotes and the name is found on the small print of the sticker on the essence plastic mounting plate….
29 October 2022 at 11:59 #40175BeoZipBRONZE MemberI have not try it for my self but with a little heat from a hairdryer can that maybe work.
The pic is from a member thread out of the archive forum
But no warranty from me 😉
My B&O Icons:
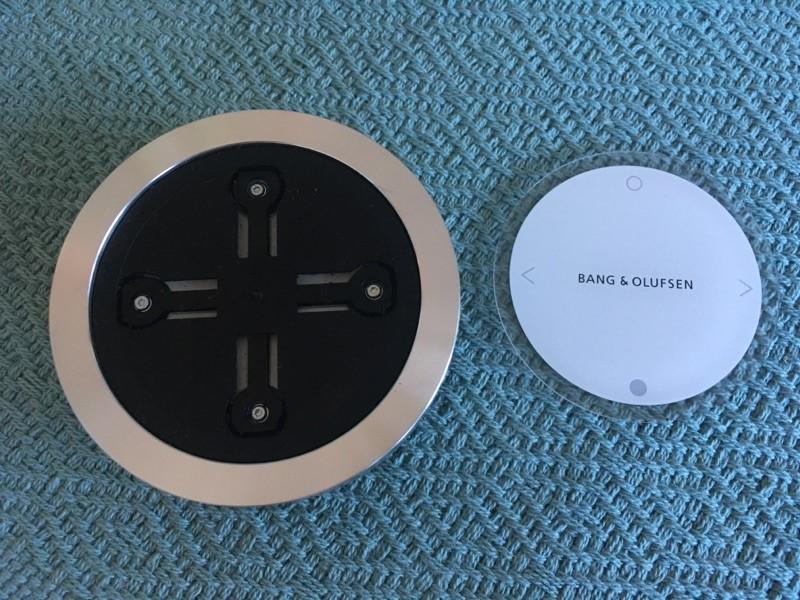
1 November 2022 at 14:45 #40176DannymBRONZE MemberThe plastic button cover is attached to the black plastic disc (with the four screws) with thin double sided tape. You need to use a tool that looks like a guitar puck to separate the bond. Some very gentle heat would help but because as the button cover can easily warp. Slide the puck between the two parts and work around until the tape bond it broken.
The battery tray on the reverse side can then be removed by gently straightening the four IR LEDs.
18 November 2023 at 14:30 #40177Old thread, I know!
Has anyone else had this problem (and what did they do)…….the wheel of the Essence Remote is not turning smooth (anymore)?
I got me a (secondhand) remote, that I wanted to wall mount, but this is by far not as buttery smooth when regulating the volume.
It does not seem, that any fluid was spilled on it.
I did try the tip from Beozip – but with no results.I’d be gratefull for any information – how many remotes suffer from this, if any?
I had to replace it with one of my other ‘wheelys’ – but I like that you can see the Bang & Olufsen logo, that you only have on the wall version.
MM
Location: Flensborg————Danmark
23 November 2023 at 23:15 #40178Hi MM,
why not just swap the plastic part so you get the B&O-logo on the functioning one?
I took the essence remote apart and posted pictures in the old forum. Reason? Same issue as you, MM. the wheel was not spinning properly, felt like it was sand inside it.
it seemed to me that the lubricant that had been used in the ball bearing caused the plastic ring holding them in place to dissolve.
I managed to drop all the metal balls out from the bearing, and did not have the tools (strong enough magnets) to get them in place again.it should be doable do clean of the old grease/lubricant and fit a new o-ring, but you have to be very careful. Chances of messing up is 85%
24 November 2023 at 00:01 #40179Hi Leo
Thanks – I did not think of that.
Will try….if that can be done without damaging.Of cource I’d like to have the faulty one fixed – nothing that I will try to handle myself, though.
Must ask my dealer next time I am there, what he thinks.
Maybe it will be better to chase down another (functioning) table model.
The wall one – the wall one – was rather hard to find.
So I hope, that swapping the plastic parts will do the job.MM
Location: Flensborg————Danmark
24 November 2023 at 10:44 #40180Hi again Leo
So, I did manage to get one of the ‘covers’ off….actually using my fingernails.
This however, was not without some hesitating, I was really worried to break it.
It looks like this – and seems to have been made for putting on once and never removed again.
I then tried with the other one, this time using a guitarpick like tool.
But stopped, becase I was really worried about damaging this one, which is fully functional.How did you do that?
Or did you instead mean to lift off the ‘label’ (with/without the Bang & Olufsen logo)?
In that case how did you do that??MM
Location: Flensborg————Danmark
-
AuthorPosts


- You must be logged in to reply to this topic.